What’s up, everyone!
Welcome to my first post in the mini-series about Liquidware ProfileUnity and FlexApp. In this post I will explore the world of ProfileUnity, specifically what it does and how to set it up.
The series:
- Part 1: Introducing ProfileUnity by Liquidware
- Part 2: How to use ProfileUnity with Azure Virtual Desktop
- Part 3: How to use ProfileUnity with PCs and Windows 365 Cloud PCs
- Part 4: Introducing FlexApp and FlexApp One
- Part 5: Packaging and deploying Liquidware FlexApp and FlexApp One
I want to send a big thank you to my friends at Liquidware for allowing me to set up a demo environment!
Enjoy!
Where does ProfileUnity fit in?
Liquidware offers 4 products that are part of the Digital Workspace Management solutions:
- Stratusphere UX provides monitoring capabilities offering Digital Employee Experience (DEX) services.
- CommandCTRL is a SaaS based solution that offers various features that expand on digital employee experience (DEX) features.
- FlexApp offers application deployment for various ecosystems like Microsoft Intune, the new App Attach for AVD, Citrix and Omnissa Workspace One.
- ProfileUnity manages the users workspace and offers various use cases like:
- managing the user’s profile and store it locally on the network or a cloud location like Azure blob storage. It also supports non-persistant workspaces like shared host pools in Azure Virtual Desktop.
- manage access to your applications (for FlexApp, MSIX, App-V, ThinApp)
- context-awareness allows admins to allow or deny access to various resources like printers, drive mappings and even manage shortcuts on your desktop and startmenu. This is done using variables like location, device, time-of-date and more. It is supported for local Active Directory (also in hybrid mode) and for Entra.
- capture the user’s profile and migrate to Windows 11 without any interaction with the user. This allows for automated migrations to Windows 11.

Now it’s time to find out how to install and configure ProfileUnity. In my next post I will show how to configure ProfileUnity for Azure Virtual Desktop which means I will need a small lab. Here is what I came up with:
- One AD DS server
- One AVD shared host pool
- Two AVD Sessions Hosts
- One member server to host ProfileUnity
- Optionally: A storage account in Azure hosting the profiles
- Optionally: I will use Nerdio Manager for Enterprise to configure my AVD environment. Let’s see if we can use it for some cool optimizations!
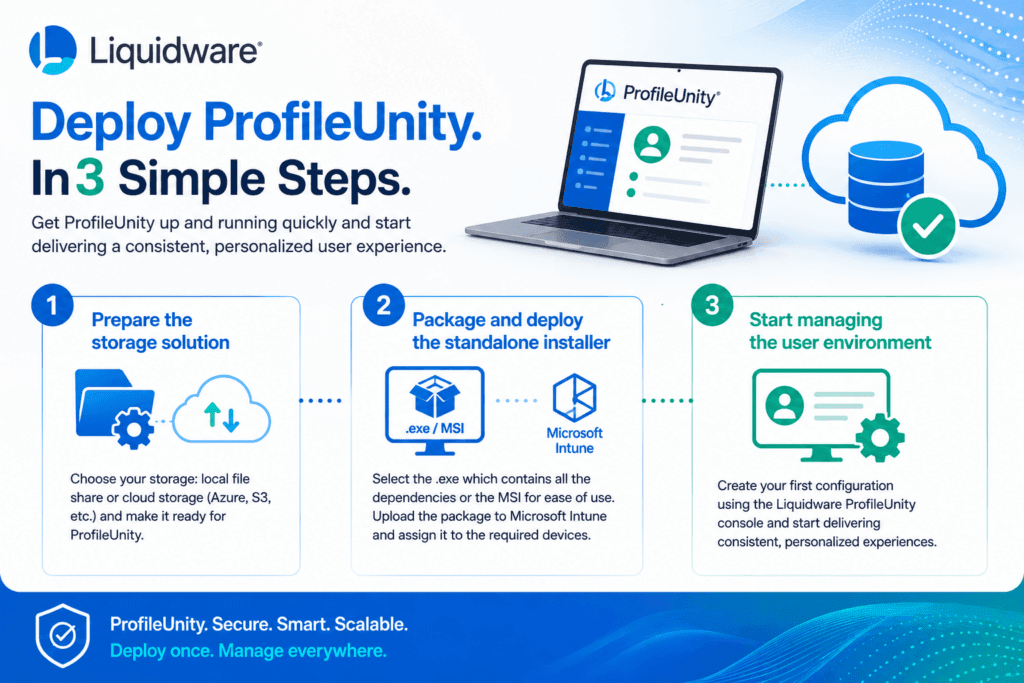
Installing the ProfileUnity console
The first thing I would like to point out is that Liquidware has prepared a quick start guide which comes in quite handy if you are new to ProfileUnity. You can find the link here.
Make sure to download the latest version and update if there is one and run the executable. It will start by checking and installing the prerequisites, like the database (MongoDB) and then start the ProfileUnity console installation. You will be asked to provide a password for the database user, make sure to write that one down somewhere safe.
For your convenience I will leave the download links below:
Here are the steps to install the ProfileUnity Console:


Time to install the update. As per the instructions, this is three step process:
- Stop the service (Liquidware Labs ProfileUnity Service)
- Copy the contents to C:\Program Files (x86)\Liquidware Labs\ProfileUnity. Choose overwrite if needed.
- Start the service mentioned earlier and open up the console:

Sign in using Admin with a blank password. You will be asked to change the password immediately.
You will be asked to configure Global Settings:
- Add users that need access to the ProfileUnity console. Domain Admins have access by default. You can also add users from Entra using SAML.
- Configure the deployment path. This is the location where the client tools and configuration will be stored.
I ended up with something like this for my demo environment:

Click the Save button to get access to the console.

Configuring the ProfileUnity console
It makes sense to activate the product right now. I will not go into too many details, but the process is pretty simple:
- Hover over the user icon and select licensing.
- From your browser, go to https://secure.liquidwarelabs.com/profileunity/activate.
- Enter the license code you acquired via email and the activation ID that you can find in the console.
- Copy content from the website and click on the red Update button. Paste the contents and Save.
Hover over the user account and select Administration from the menu. Scroll down to ProfileUnity Tools. Update the deployment path or use the location that you chose earlier and click the Download or deploy client tools button.

Check the settings in the popup and click the Deploy button.

The client tools will now be copied to the specified location.

Just a quick check in the netlogon folder shows that everything is working like it should.

We have now successfully installed the ProfileUnity Management Console and deployed the ProfileUnity client tools. I like how Liquidware made an effort to simplify the installation process by installing the prerequisites automatically before the actual installation of the ProfileUnity Management Console takes place. I am really looking forward to configure ProfileUnity to manage profiles for shared desktops in AVD. Make sure to check back to see what really cool features we can use!
Resources
I used the following resources for this post:
Liquidware Digital Workspace Management
ProfileUnity Quick Start Guide
Download link: ProfileUnity 6.8.7 GA
Download link: ProfileUnity HF1 update