What’s up, everyone!
A while back I wrote a couple of posts on how to deploy Liquidware ProfileUnity to desktops in Azure Virtual Desktop, Windows 365 Cloud PCs and Intune managed Windows 11 devices.
In this post I would like to give you an update on how to deploy the ProfileUnity standalone installer which makes your life a lot more easy. No more scripts, no more hassle! Just the ease of using Microsoft Intune.
Enjoy!
Prepare the environment
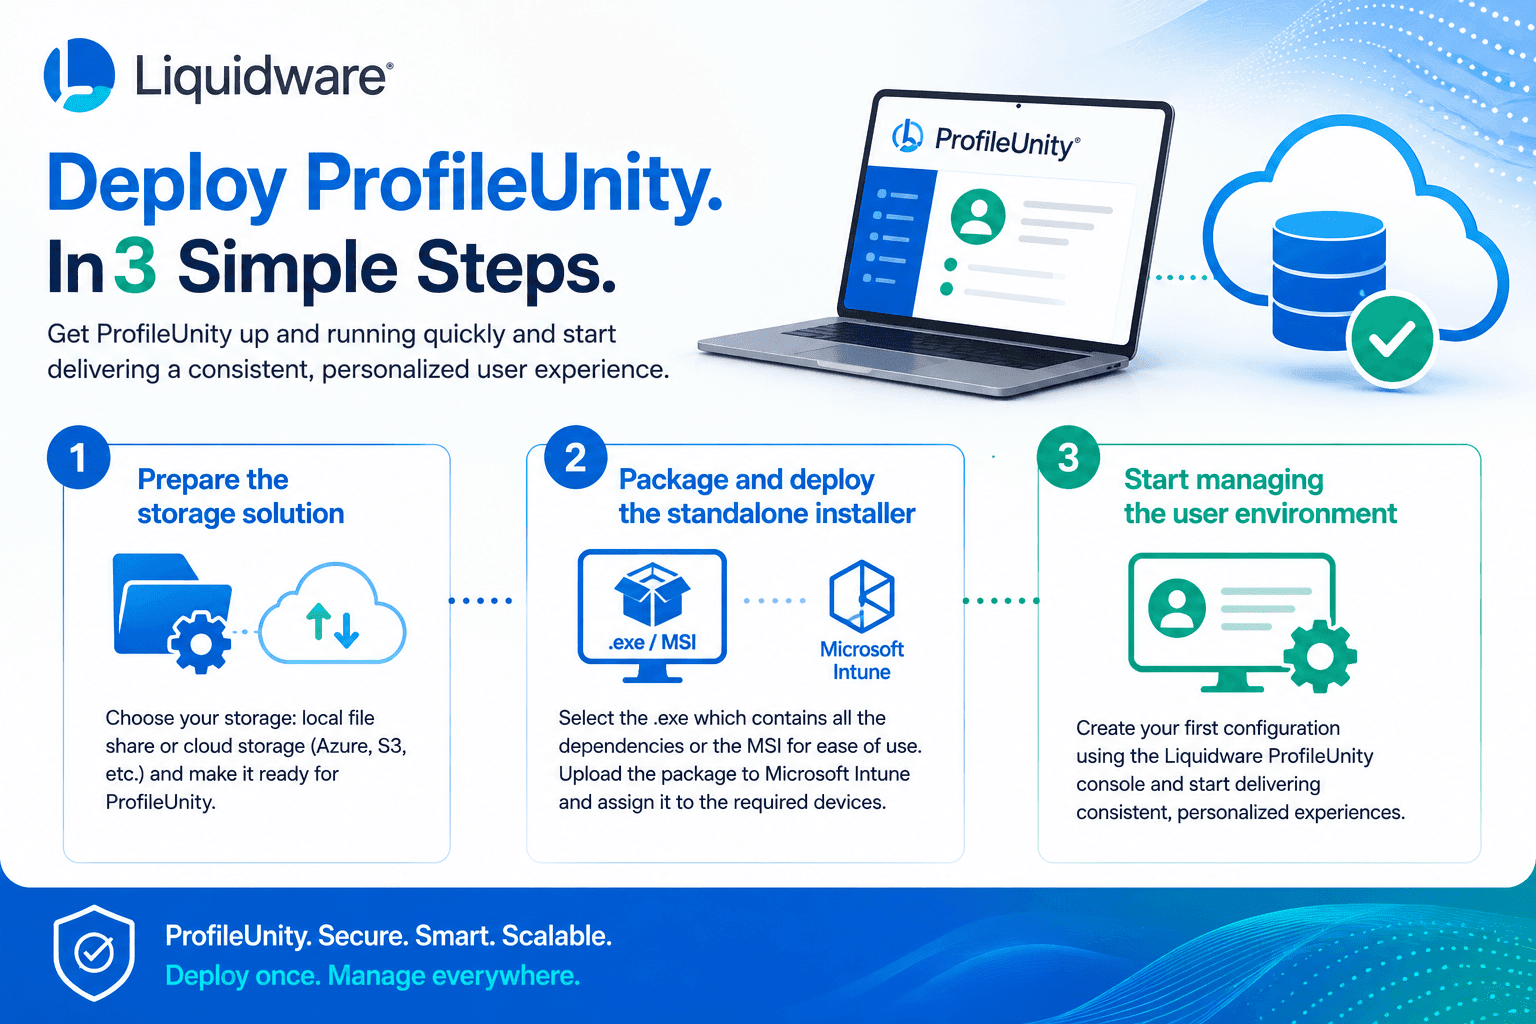
The process of deploying ProfileUnity to your desktops consists of a couple of steps:
- Prepare the storage solution.
- Package and deploy the standalone installer.
- Start managing the user environment by creating the first configuration.
My demo environment
My lab is running in Azure. It’s running AD DS and synchronizing the user accounts to Entra ID. A second member server has the ProfileUnity console and license server installed.
My testing device is a Windows 365 Cloud PC provisioned using an Azure Network Connection. That means I can easily configure network connectivity between the servers and the Cloud PC.
Prepare the storage solution
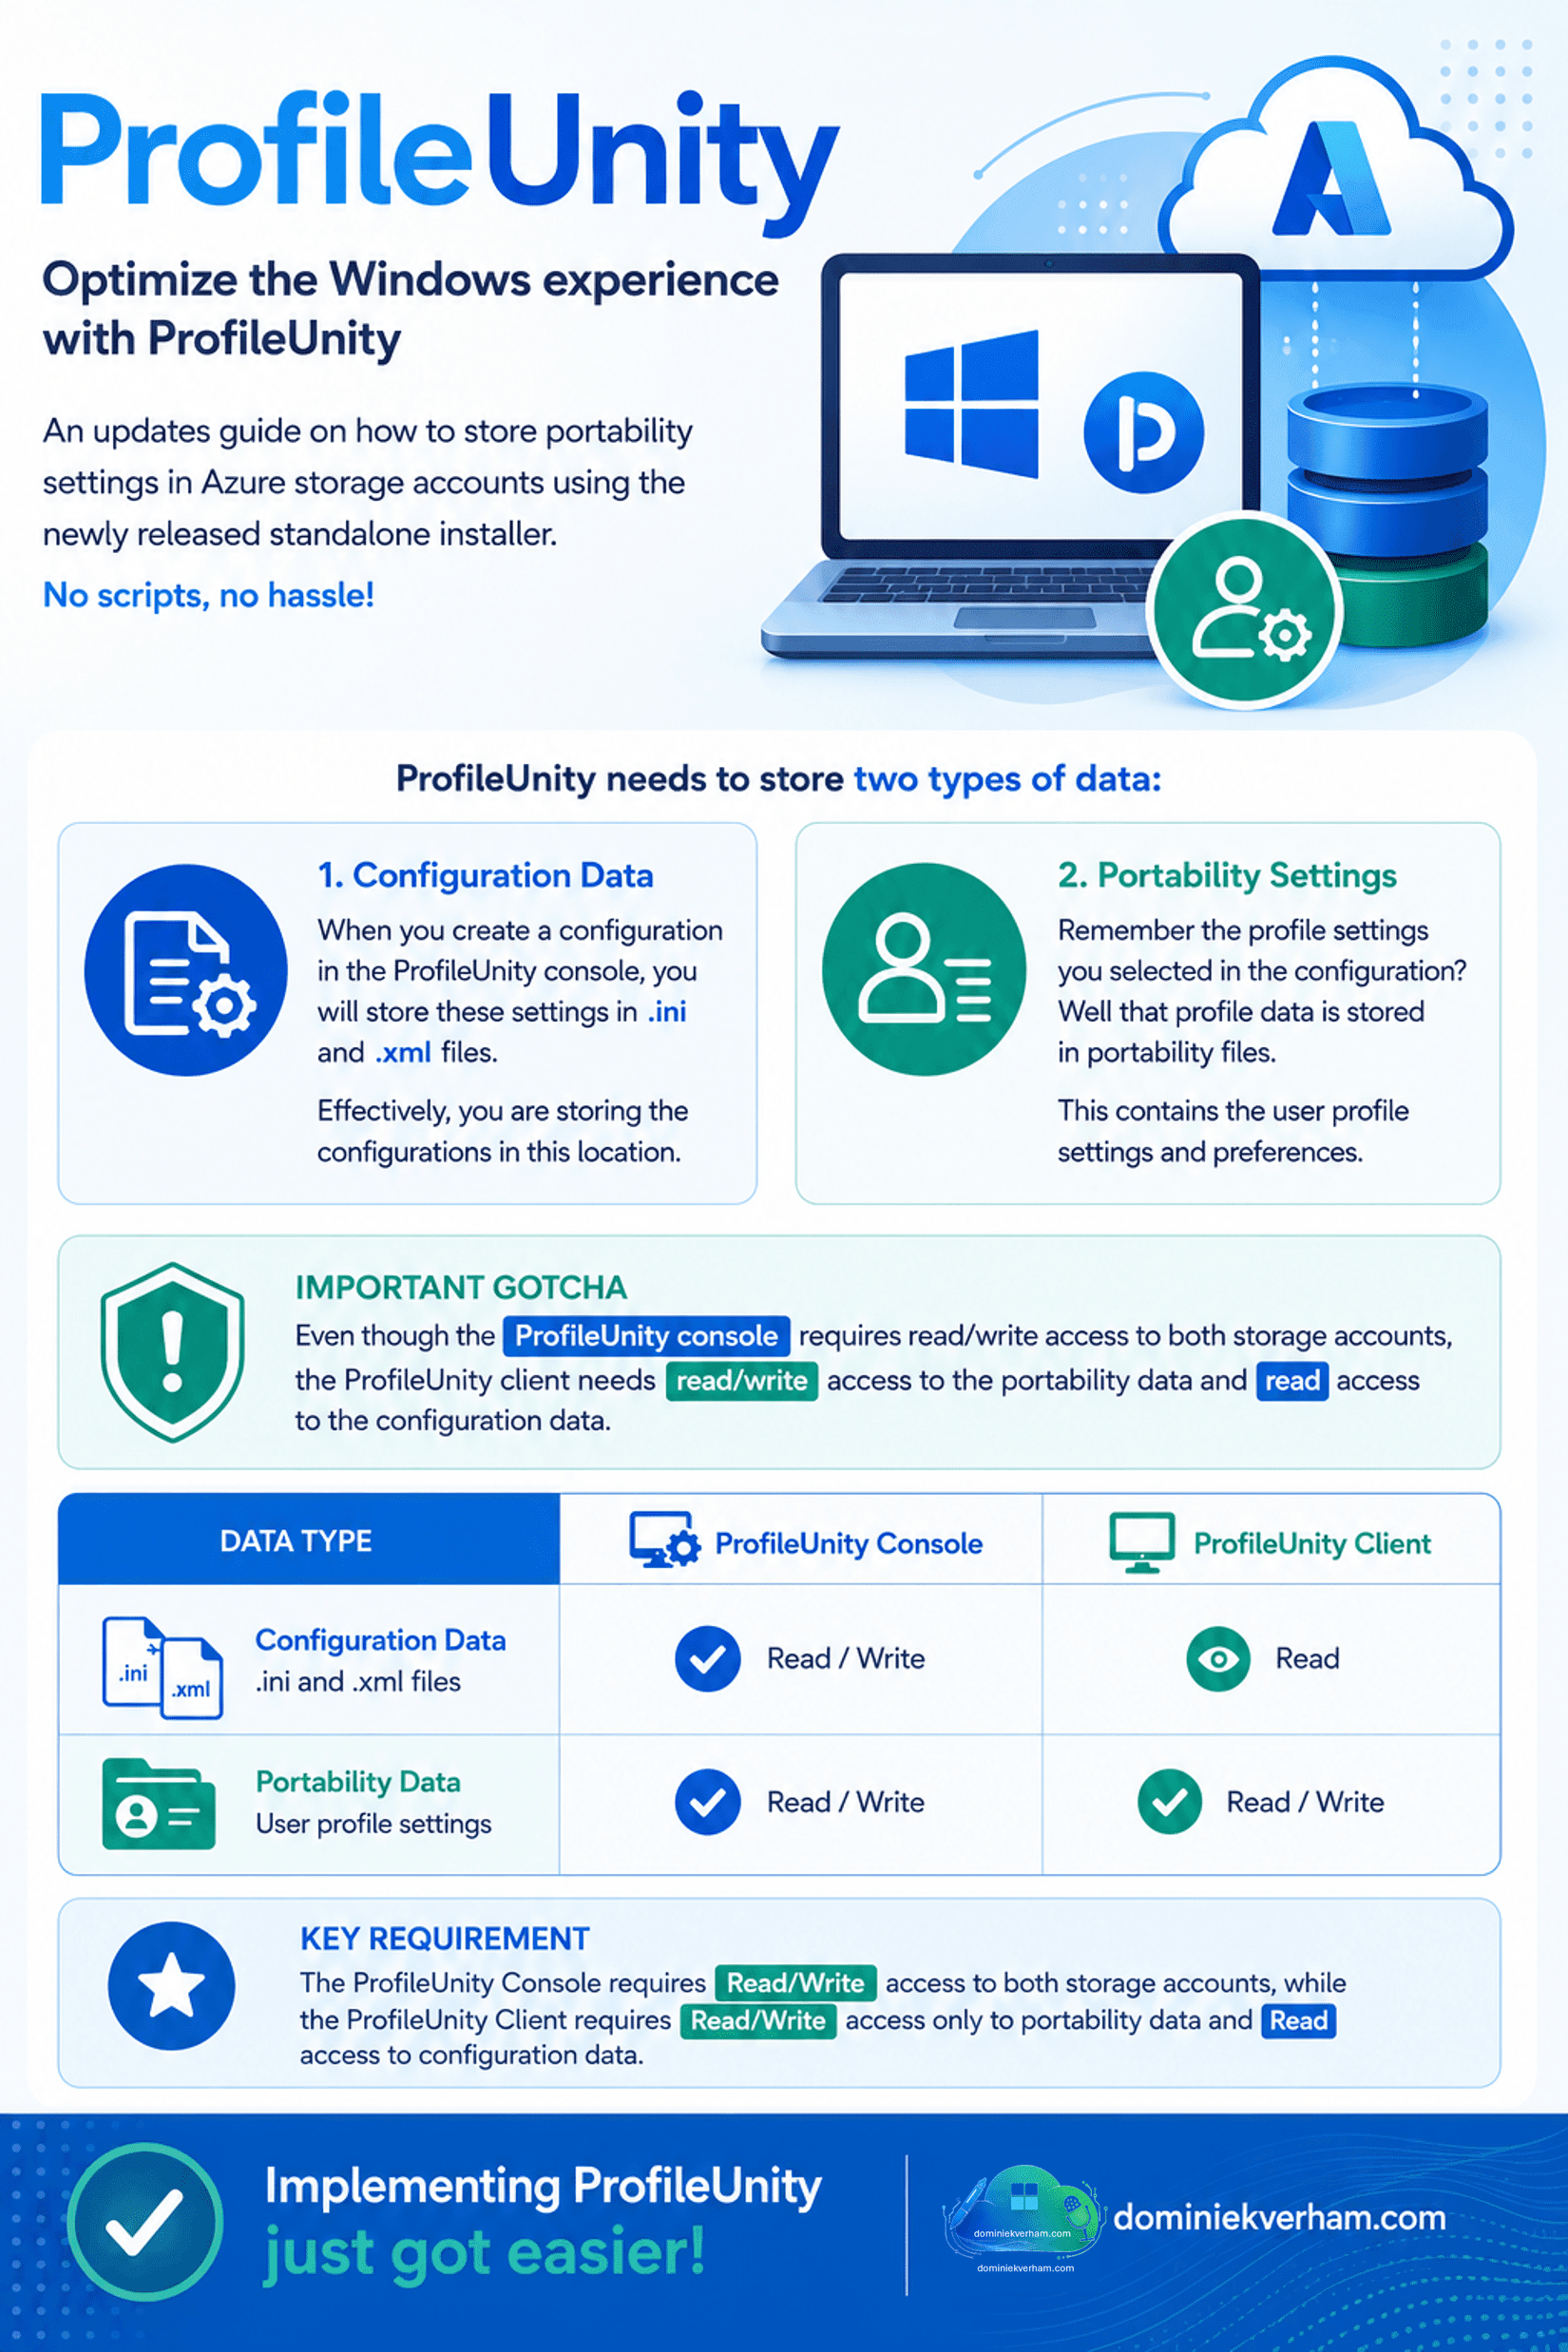
ProfileUnity needs to store two types of data:
- Configuration data: when you create a configuration in the ProfileUnity console, you will store these settings in .ini and .xml files. Effectively you are storing the configurations in this location.
- Portability settings: remember the profile settings you selected in the configuration? Well that profile data is stored in portability files.
There is one gotcha that you need to know. Once you deploy ProfileUnity to your endpoints, you need to make sure that ProfileUnity has read/write access to the portability data and read access to the configuration data.
As for the location of your data? Well the legends at Liquidware don’t really care so they made sure to include a lot of options. In my demo I want to store my ProfileUnity data in Azure. So how did that work again?
Step 1: Prepare a storage account for configuration data
Sign into the Azure portal and follow the steps to create a storage account. Make sure to select the Azure region of your choice and select Azure Blob Storage. You can save a bit of money in demo environments if you select Locally redundant storage (LRS) instead of GRS. I named mine saliqconfig.
Now it’s time to create a container that will store the configuration files. From the newly created storage account, select data storage, + Add container. All you need to do is to enter in a descriptive name for the container. I went with config.
Now we need to configure access to the saliqconfig storage account:
- Access keys for read/write access.
- Shared access signature for read-only access.
Let’s start with the access keys. Navigate to Security + networking, access keys.
Copy the key and connection string for key 1 or 2 and store it in a safe location. You will need it later on.
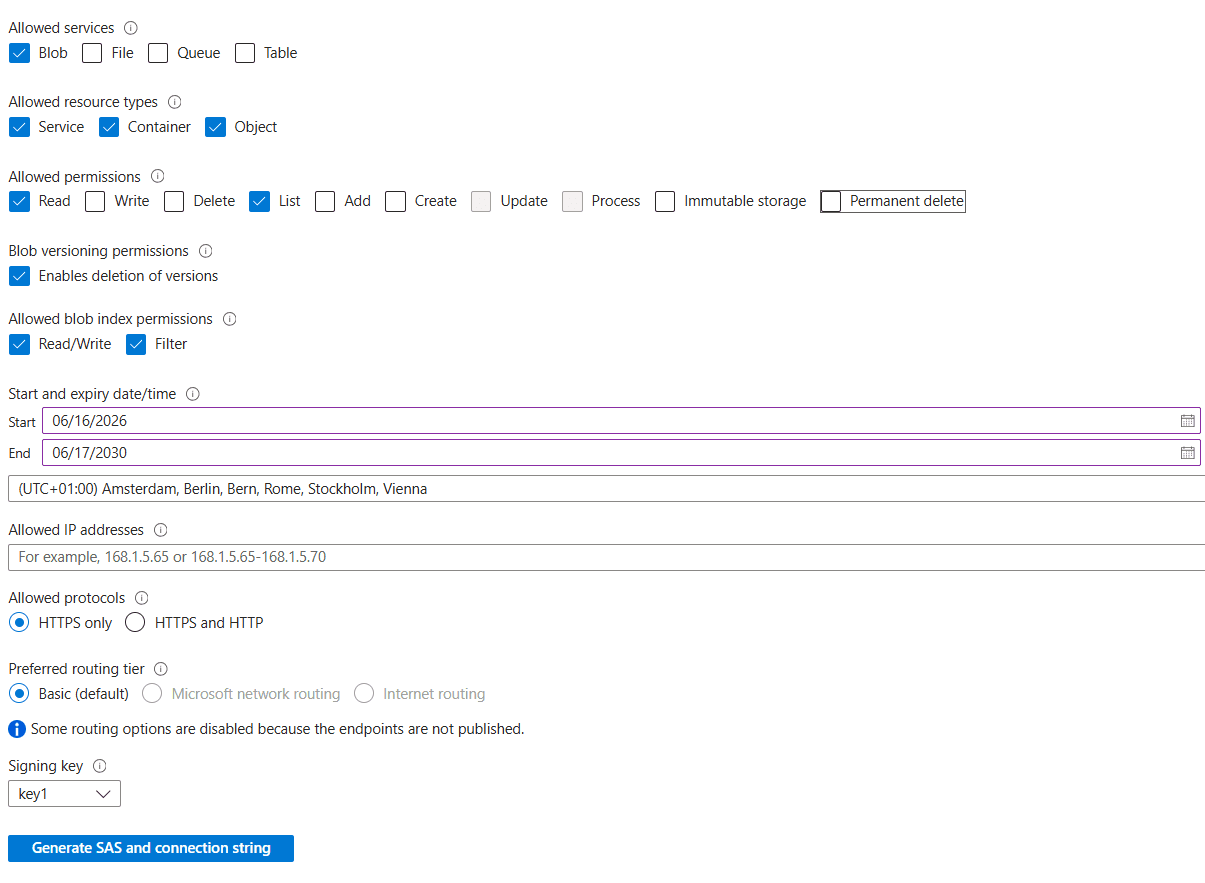
Now it’s time to generate a SAS key. Navigate to Security + networking, Shared access signature. Configure the following:
- Allowed services: Blob
- Allowed resource types: all three.
- Allowed permissions: Read and List.
- Start and expiry date: you might consider to bump the expiry date. Especially in a demo environment.
Other settings can remain at default. Finish up by clicking the blue button called Generate SAS and connection string. Make sure to save the connection string, sas token and blob service sas url. Yes, you will need these later.
Now it’s time to create a second storage account for portability settings. Follow the same steps except:
- select a descriptive name for the storage account and container. I used saliqportability for the storage account and portability for the container.
- You only need to save one access key. You don’t need to create a shared access signature.
Now let’s add our brand new storage accounts to the ProfileUnity console. From the ProfileUnity console, hover with the mouse over the user icon in the top-right corner and select Administration. The screen will refresh:
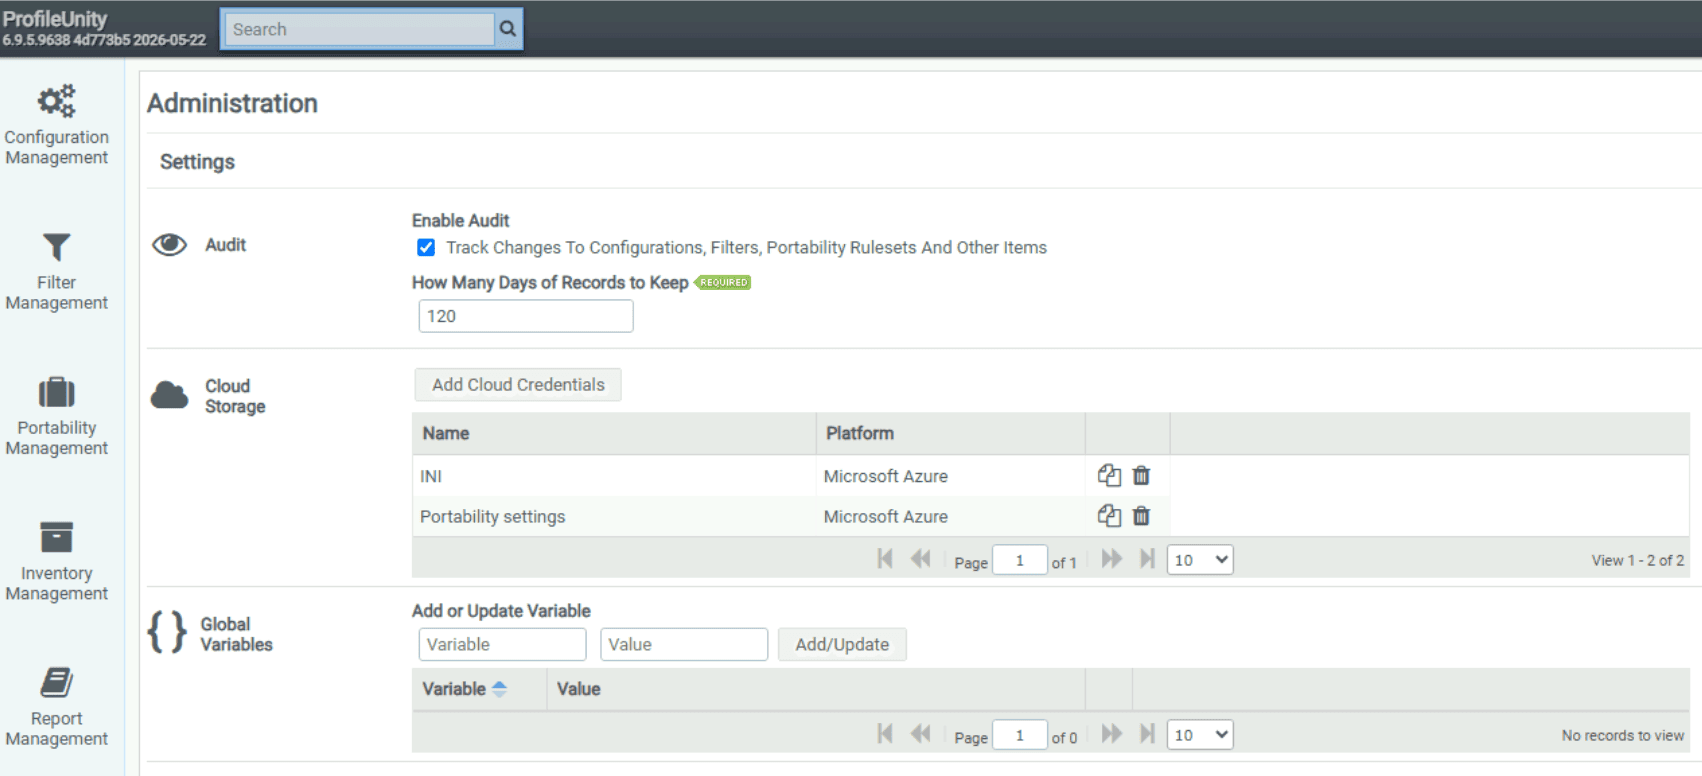
Look for the section called Cloud Storage. I’ve already added my storage accounts as you can see, but I will delete them and walk you through the process again. Click the Add Cloud Credentials button to start:
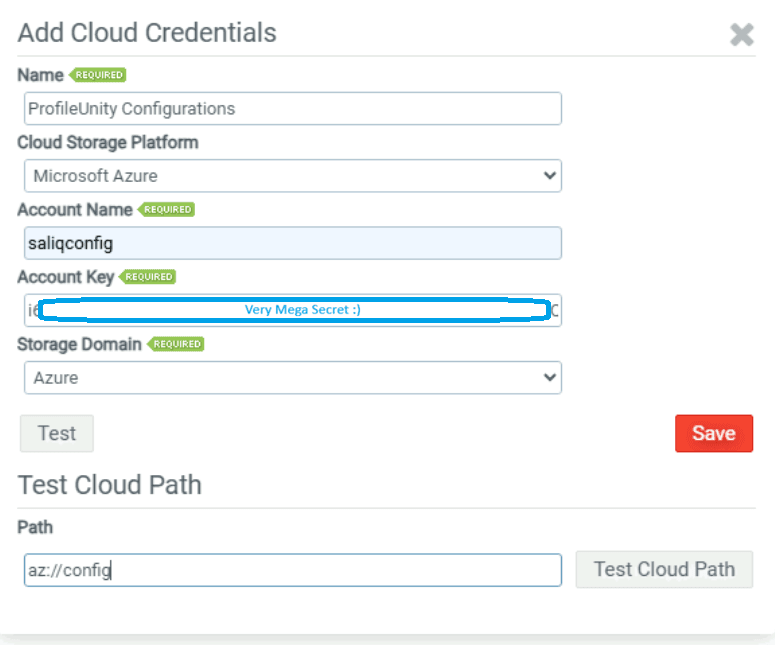
Add the following:
- Name: Give a simple and descriptive name. I went with ProfileUnity Configurations.
- Cloud Storage Platform: select the platform of your choice. No surprise here, I selected Microsoft Azure.
- Account Name: Enter the name of your storage account. No bells, no whistles, just the name. So in my case it’s saliqconfig.
- Account key: copy in your very mega secret account key that you saved while creating the storage account for your configurations.
- Storage domain: Azure.
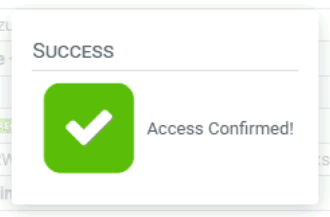
Make sure to test the connectivity to your storage account. Click the Test button to reveal the Test Cloud Path option.
- Path: ProfileUnity knows the storage account so just enter in the name of the container with az:// in front of it. So in my case: az://config.
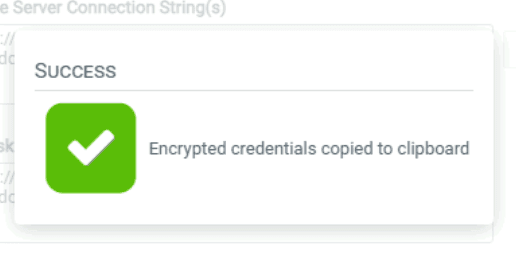
- If you did it right, ProfileUnity will reward you with this notification:
Click the red Save button and proceed to add the storage account for your portability settings:
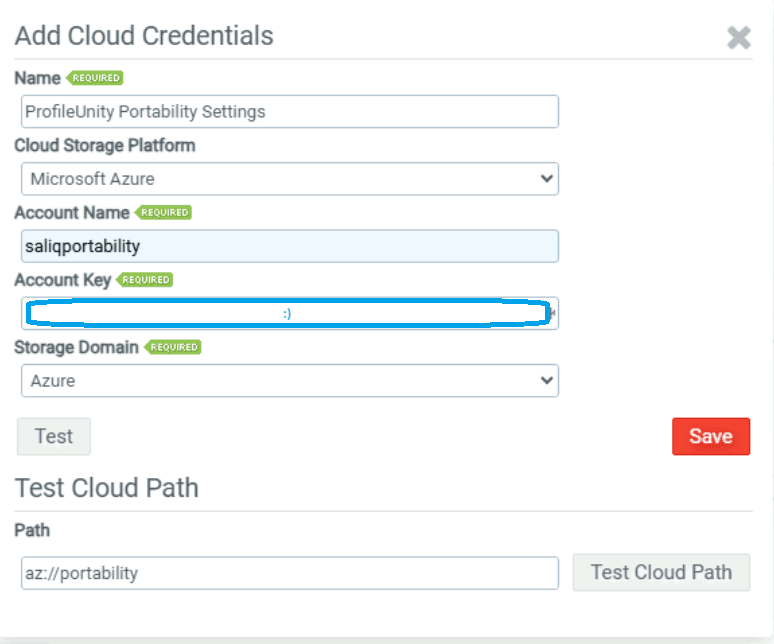
Make sure to test your connectivity again and click that red Save button. That completes the storage preparation:

If you saved the storage account but made an error or typo somewhere, well then there’s some bad news. Delete the affected storage account and add it again. There’s no edit button.
Let’s get all that info into a quick reference overview:
Deploying ProfileUnity using Microsoft Intune
Here is where our admin lives just got a lot more easy. Previously we were able to package the ProfileUnity client and install it using a PowerShell script. With the recent release of the standalone installer we now have a choice:
- install using an .exe file: the big advantage is that this executable also includes all the .NET dependancies. (download)
- install using an .msi file: which is just great for ease of use. You will need to manage and deploy the .NET dependencies manually. (download)
In this demo I will use the .exe file to install the ProfileUnity client on my Cloud PC using Microsoft Intune. That means I will have to add some arguments for ProfileUnity to work correctly. Luckily those arguments are well documented on their website.
There are three things to keep an eye out for:
- The website currently has a typo in ACCEPTEULA. Be mindful if you copy that value from the website.
- We need the connection string to the license server. From the ProfileUnity console, hover over the user icon and select administration. Locate the Client Settings section and select Manage Connection Strings. Click the Copy button. You now have an encrypted connection string. Make sure to save it because we need it in the next step.
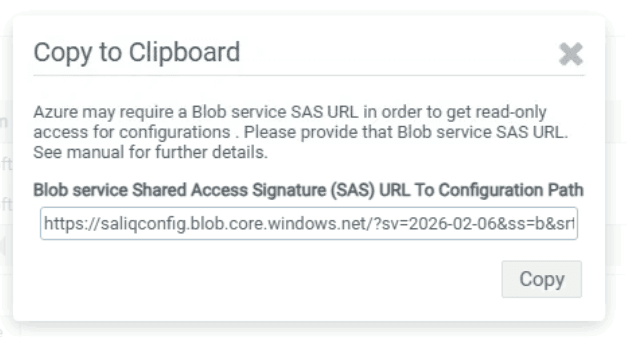
- We need credentials that allows the ProfileUnity client to read/write the portability settings and read the configuration settings. Follow these steps to prepare the encrypted credentials. Lookup the Blob service SAS URL from the storage account used for the configuration and copy it. Sign into the ProfileUnity console, hover over the user icon and select administration. Locate the storage account for the portability settings and click the first icon (copy). The ProfileUnity console will ask you to paste the Blob service SAS URL you just looked up and click the copy button. Save the connection string somewhere safe, because we need it in the next step.
Here is an example on how to install the .exe file using Microsoft Intune:
ProfileUnityClient.Setup_6.9.5ga7.exe ACCEPTEULA=1 E=1 LOGOFF=1 USERINI="az://Container" LICSTR="EncryptedConnectionString" AZCRED="EncryptedCredentials"Here is an example on how to formulate the uninstall command:
"C:\Program Files\ProfileUnity\Client.NET\Lwl.ProfileUnity.Client.Startup.Update.exe" /UninstallNote that you do not need to add the name of the storage account, just the container.
With that out of the way, continue the well known steps to deploy the ProfileUnity client using Microsoft Intune and wait for it to be installed on your device.
Creating and assigning a configuration
A group of these portability settings are called a configuration. Creating a configuration can be done manually or you can start using a guided process. So how does this work?
From the Liquidware ProfileUnity console, navigate to Configuration Management, click the Create button.

The following steps depend on the selected template and can look different. Here are a couple of examples I already posted:
Customizing your portability configuration
Any configuration that is created using the ProfileUnity console can be found in the Configuration Management section:
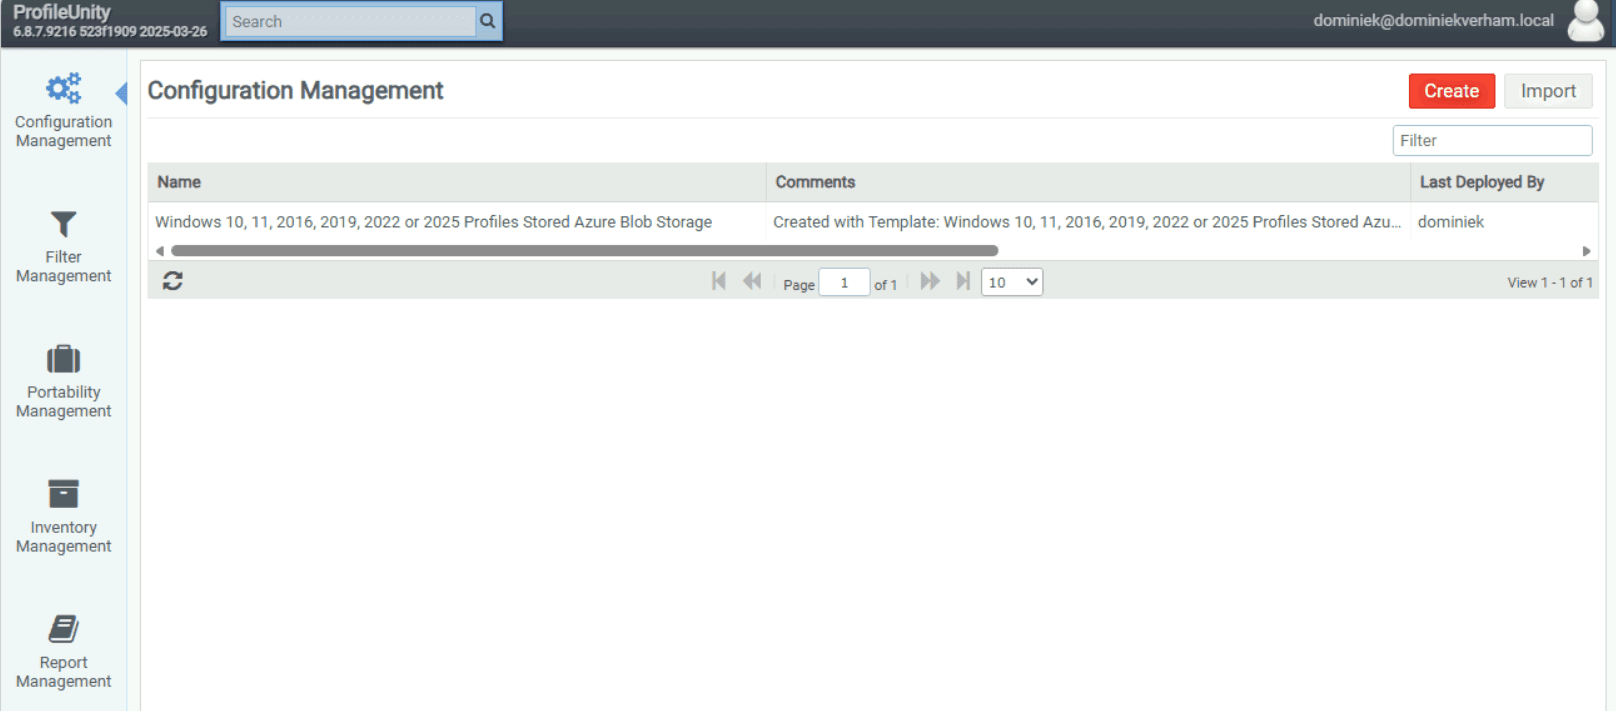
As you can see I created a configuration that allows me to save portability settings in an Azure storage account. At this point I optimized the columns a bit so I get easy access to the icons that allow me to:
- Edit
- Copy
- View in PDF or text format
- Export the configuration in JSON format or download the configuration in .ini format
- Deploy (a must after each change of the configuration)
- Access to configuration history
- Delete

The first icon allows us to edit the existing configuration and displays a window like this:
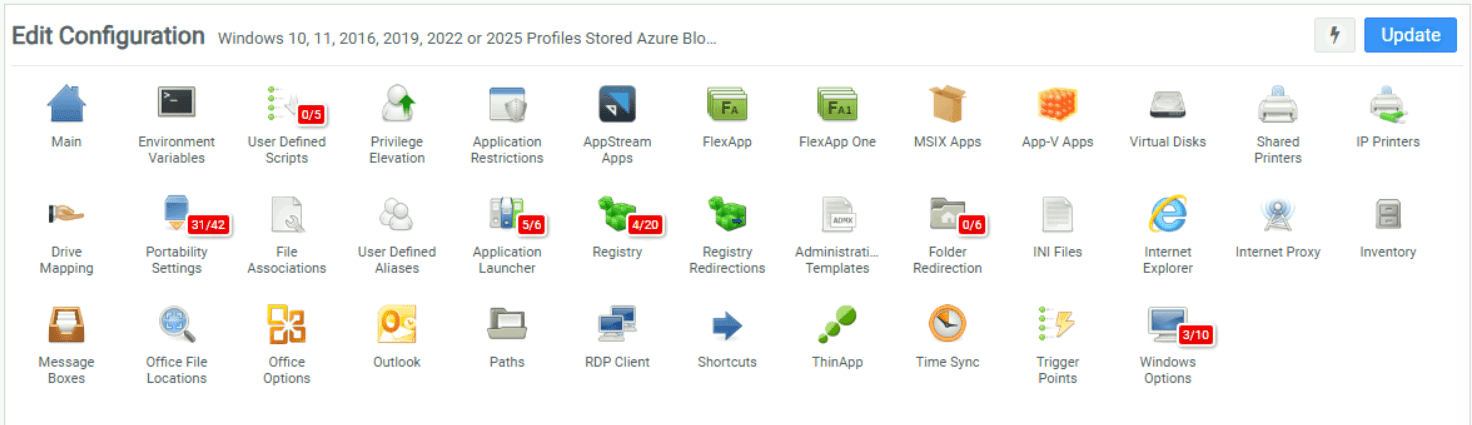
There are a lot of configurable items in this overview and some items are already preconfigured as highlighted by the red box with the number of settings. ProfileUnity includes a couple of powerful features like privilege escalation, administrative templates or application restrictions.
Resources
I used the following resources for this post:
How to use ProfileUnity with PCs and Windows 365 Cloud PCs
How to use ProfileUnity with PCs and Windows 365 Cloud PCs
Introducing ProfileUnity by Liquidware
https://learn.microsoft.com/en-us/azure/storage/common/storage-account-create?tabs=azure-portal
https://docs.liquidware.com/profileunity-695/en-us/installation-configuration/standalone-client-installer.htm
Downloads
https://cdn.liquidware.com/6.9.5/ProfileUnityClient.Setup_6.9.5ga7.exe
https://cdn.liquidware.com/6.9.5/ProfileUnityClient.Setup_6.9.5ga7.msi