What’s up, everyone!
Welcome to my mini-series about Liquidware ProfileUnity and FlexApp. In this post we will take a look on how to package applications to a FlexApp format and how to deploy them to a Windows device like a Cloud PC.
Join me in this post as I explore Liquidware FlexApp and FlexApp One. Let’s find out why FlexApp is a great way to manage and deliver applications to your devices.
The series:
- Part 1: Introducing ProfileUnity by Liquidware
- Part 2: How to use ProfileUnity with Azure Virtual Desktop
- Part 3: How to use ProfileUnity with PCs and Windows 365 Cloud PCs
- Part 4: Introducing FlexApp and FlexApp One
- Part 5: Packaging and deploying Liquidware FlexApp and FlexApp One
I want to send a big thank you to my friends at Liquidware for allowing me to set up a demo environment!
Enjoy!
Installing the FlexApp Packaging Console
The first step in this process is to create a packaging device. I would suggest to use a virtual machine so you can use snapshots to revert to a clean state in case something goes wrong. In my demo I simply created a virtual machine in Azure.
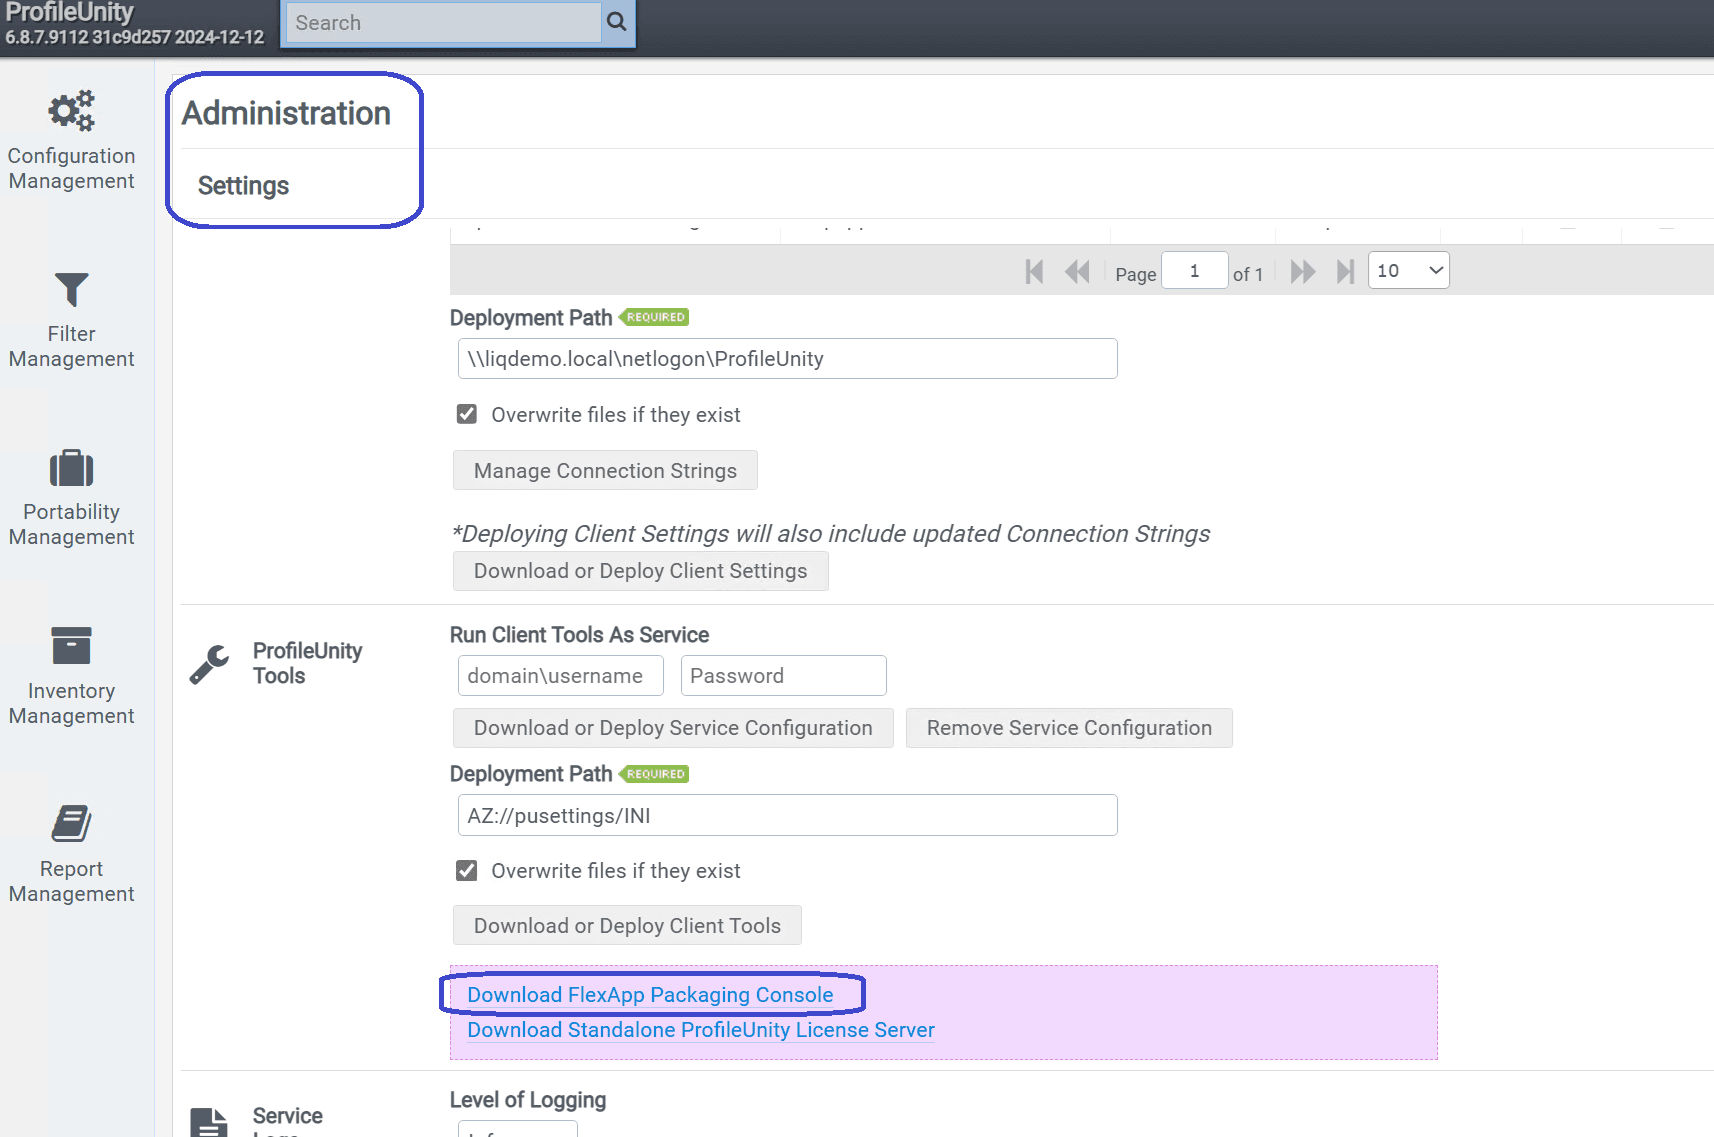
Next up is to install the FlexApp Packaging console. You can simply use the direct download link or use the ProfileUnity console. Hover over the user icon, Administration, scroll down to ProfileUnity Tools and click on the Download FlexApp Packaging Console:
Copy the fcpsetup.exe to your packaging VM and install the console. This is pretty straightforward process of accepting the license terms and simply installing the console. You will find a shortcut on the desktop once the installation is complete.
To sign in we need to provide the URL of the ProfileUnity server and a valid username/password combination.
You also have the option to save the FlexApp package locally. To do so, check the box next to Offline Packaging Mode, which is great for outsourced packaging scenarios where a 3rd party manages your packages.
About Rollback
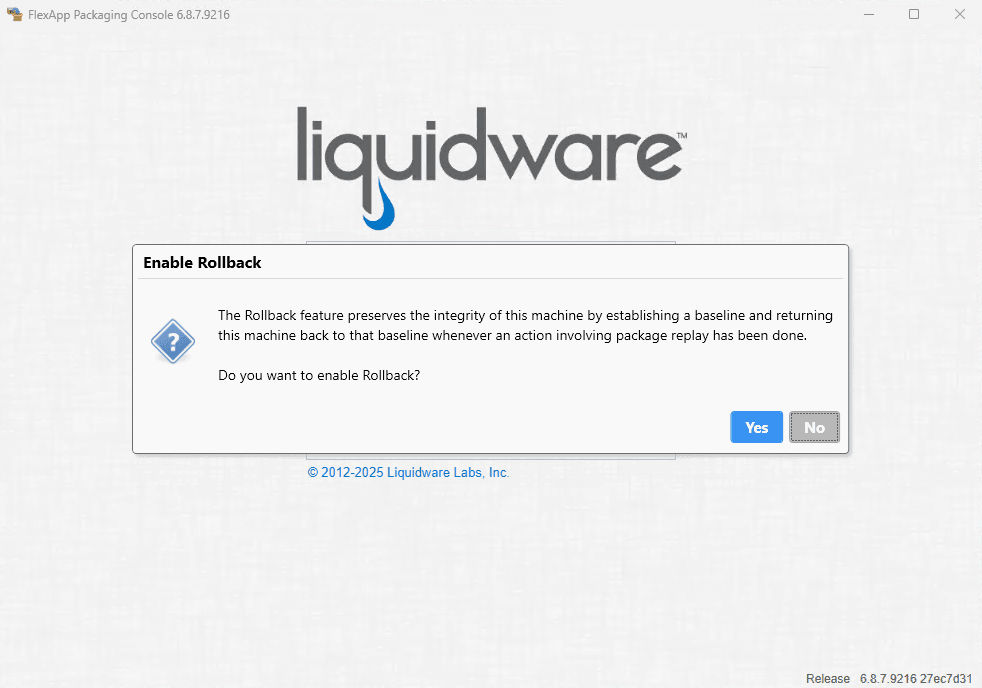
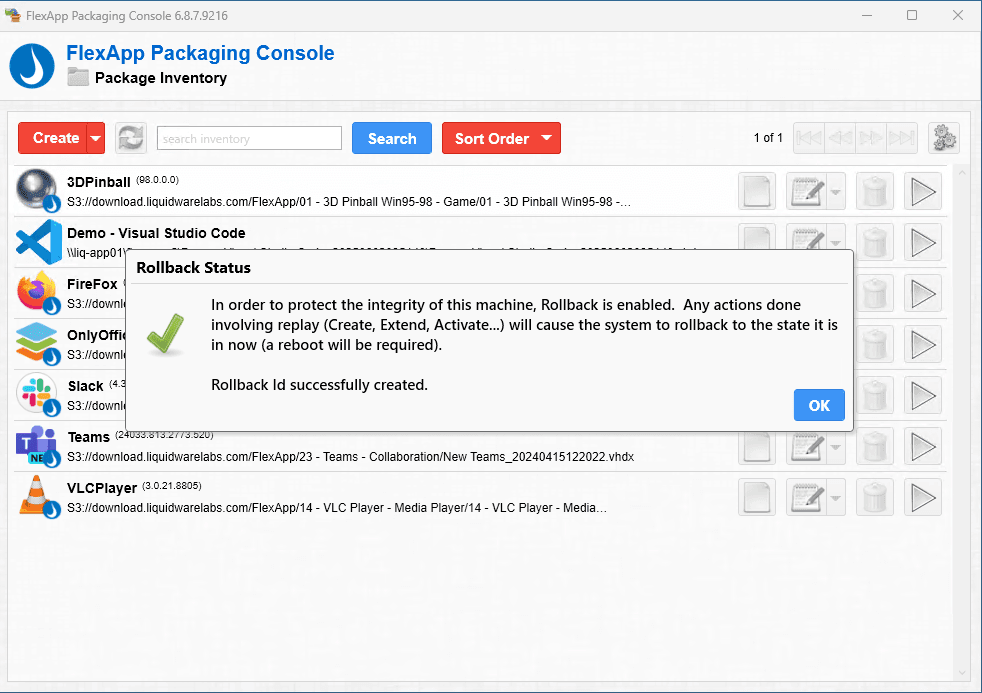
Next up is to decide if you want to enable rollback functionality. Let’s discuss how the rollback feature works. It’s actually based on a built-in Windows feature: System Restore. Yes, the one you find using the start menu, recovery, system restore. It’s possible to see the restore point that FlexApp Packaging Console creates if you select Yes. From that point on FlexApp will offer to revert to the restore point if you perform any action like create, extend, activate and more. The VM will reboot in a couple of seconds if you select to revert. Sign into the VM again once it’s running again and you should get a nice pop-up letting you know that the system restore was completed successfully. This feature is great if you have no snapshot capabilities, but it might be a bit slower.
About machine optimization
Packaging an app works best if the virtual machine is not doing a lot of background tasks. The legends at Liquidware have come up with various optimizations to remove interference from background processes. And since this is the first time that I’m running the console, it makes perfect sense to run these optimizations now. So make sure to click Yes in the Machine Optimization step:

Running these optimizations might take a bit of time and will require a reboot at the end:

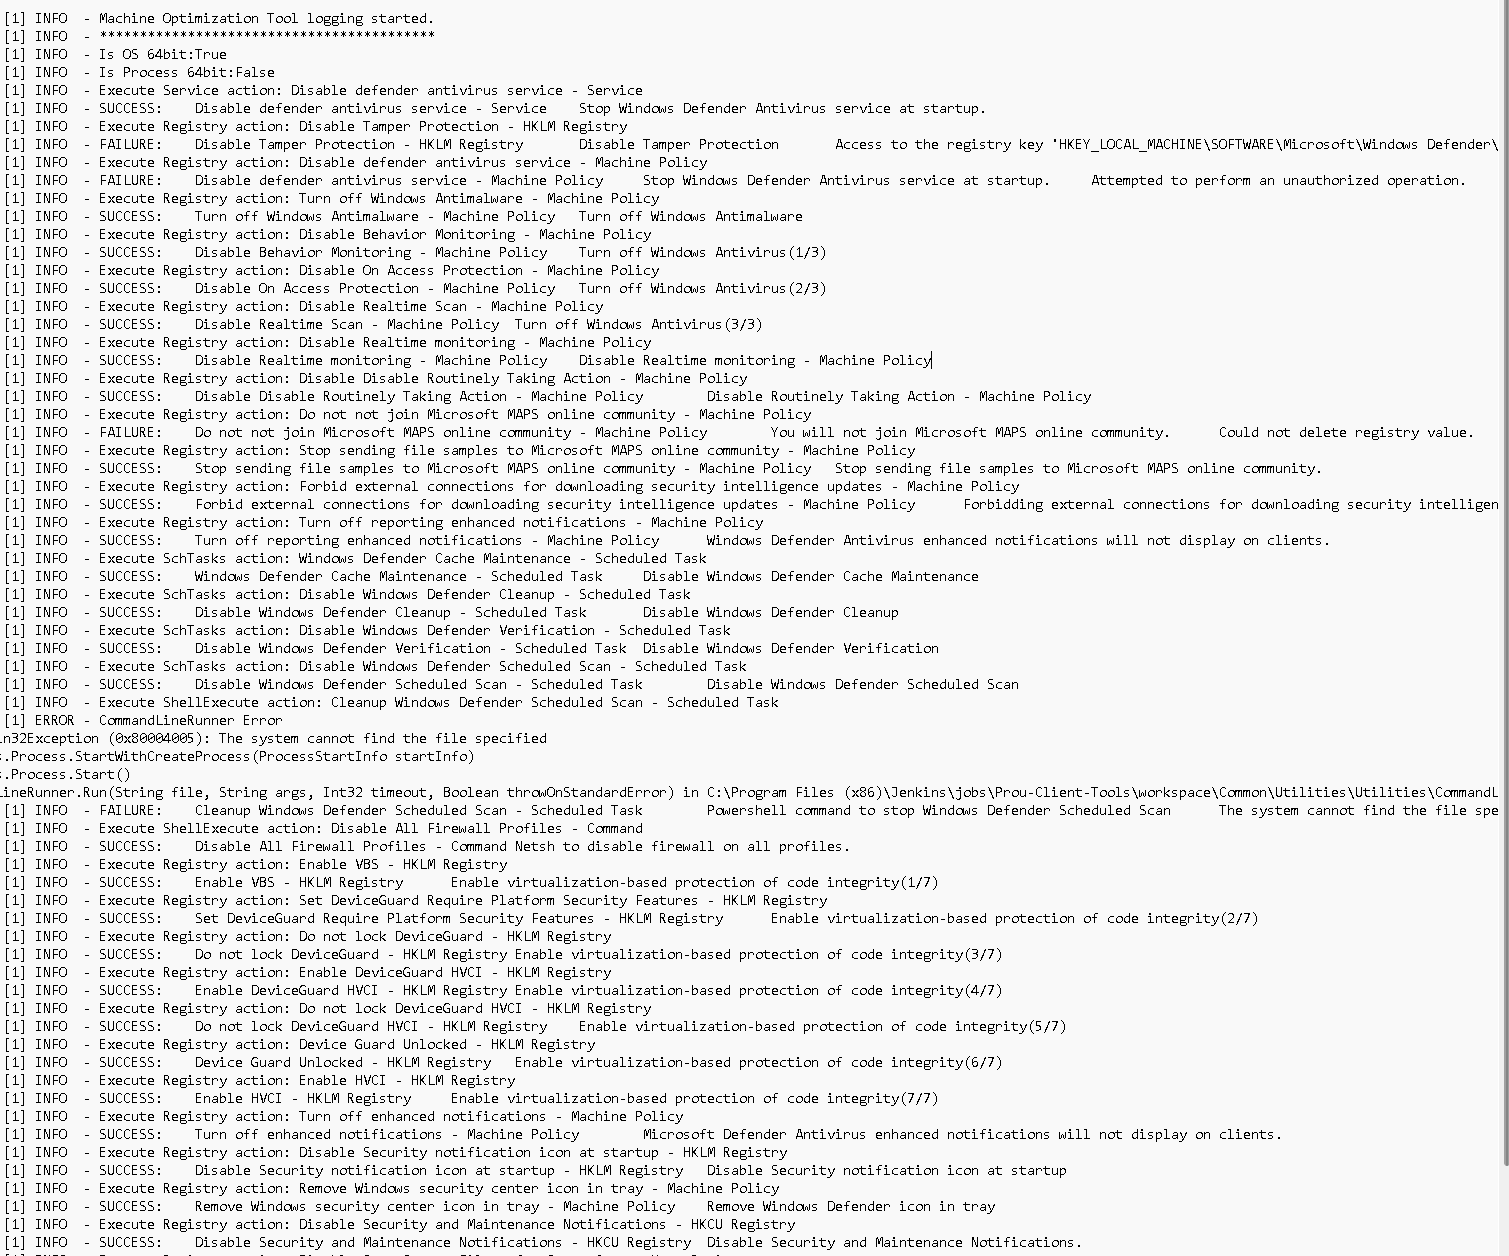
Did you notice the View log file link? It’s stored in C:\Program Files (x86)\Liquidware Labs\FlexApp Packaging Console\MachineOptimizationTool.log.
This is an excellent way to get more information on all the optimizations that have been performed on the packaging device:
It’s possible to add or remove optimizations by editing the XML file.
I signed into the VM once it was back up and running after the reboot. Signing into the FlexApp Packaging Console let me know that the rollback feature was indeed enabled.
Navigating the FlexApp Packaging Console
Did you notice the gears on the top-right corner of the screen? Clicking on those gears will bring you to the settings page:
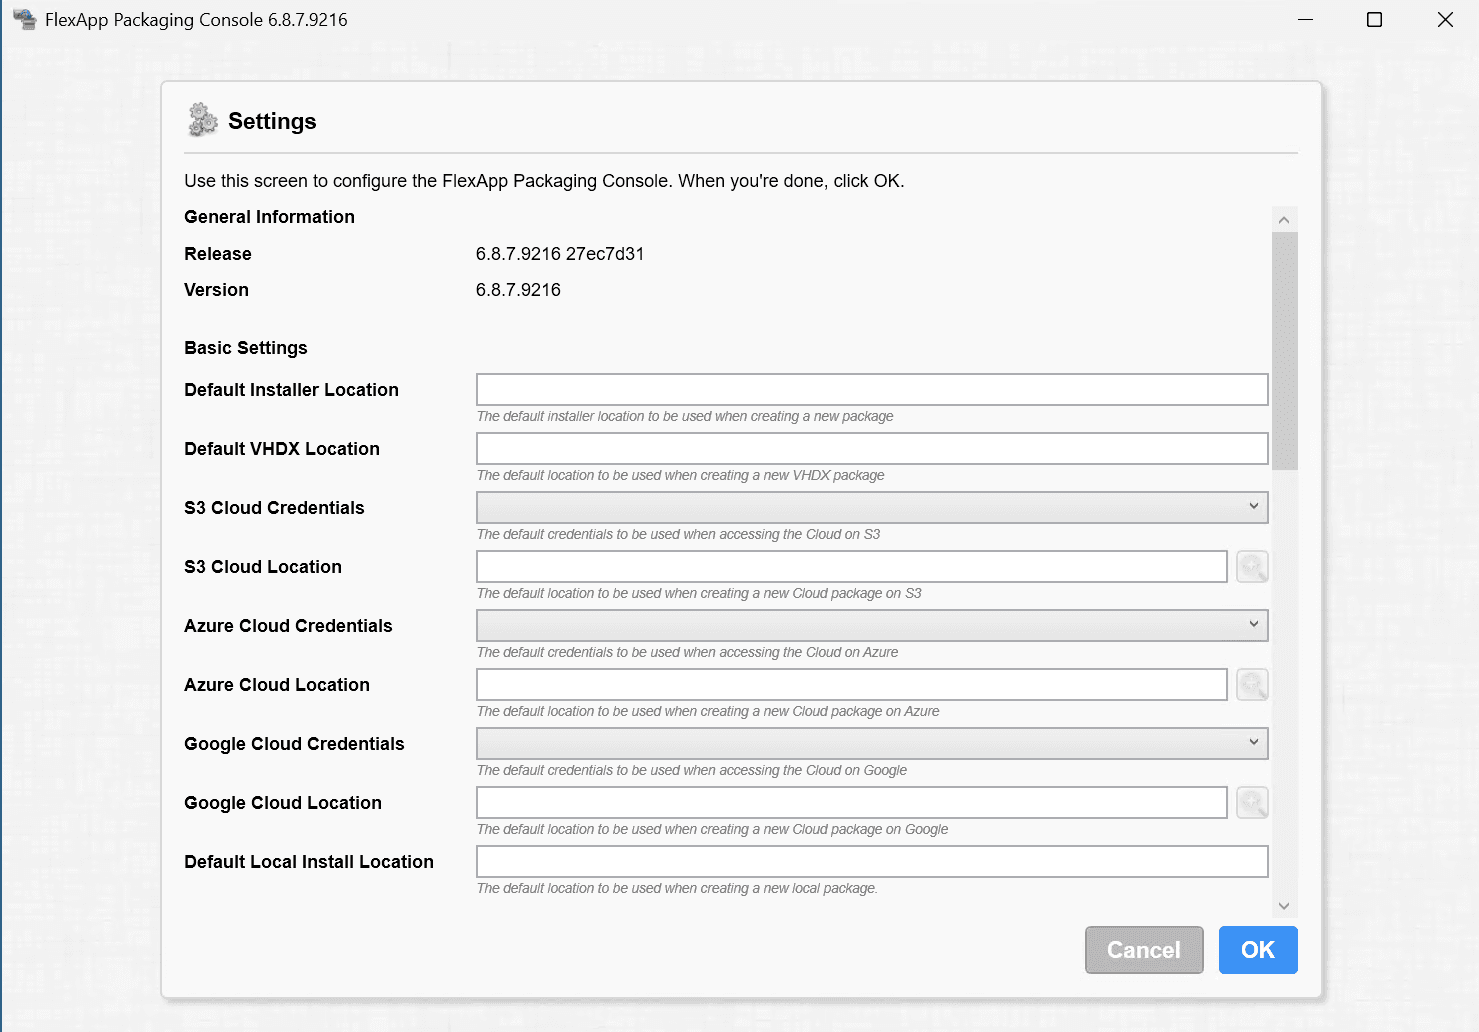
It’s definitely worth checking out the various settings like configuring your Cloud credentials and location or simply configuring the default location where your installers are stored.
On the left we find a red button with a dropdown menu to:
- Create a new FlexApp package
- Import an existing FlexApp package
- Create a FlexApp One package
- Convert App-V or MSIX to FlexApp
- Convert App Volumes to FlexApp

Each FlexApp has a small menu bar behind them with a couple of actions. Let’s take a look at what they do:
- The first action is: View the package. Clicking this button will give you a summary of that package like the name, icon, application that is installed and the history, dependencies and where it is stored.
- The second action is: Edit the package. This allows you to edit a custom package to your liking with files, registry settings and more. This action has more options hidden in a dropdown list.
- The third action is: Delete the package.
- The last option is: Activate the package. This will effectively download the FlexApp and mount it to the device. You can actually run the app at that point.
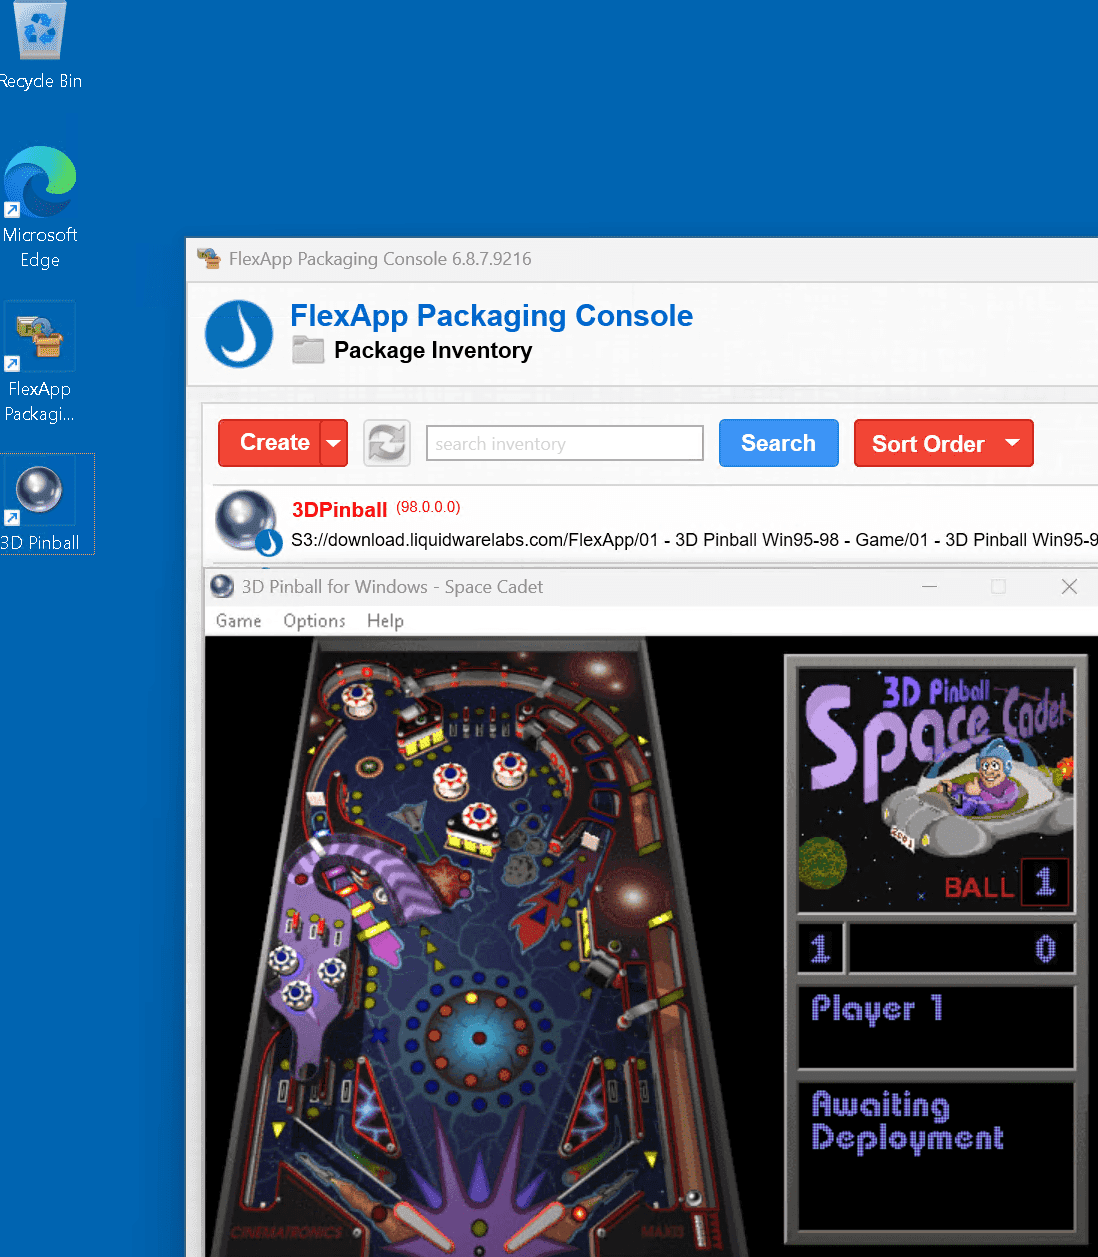
Let’s activate our core app 3DPinball by clicking on the Activate action.

The name of the FlexApp is now marked as red in the FlexApp Packaging Console. There is now a shortcut on the desktop and it’s possible to start the FlexApp.
Once you are done, make sure to click the Deactivate a package button.
Packaging your app to a FlexApp (One)
So what does the packaging process look like? First thing to note is that I already had a go with VS Code. You can download the installer in user installer or system installer. Make sure to go for the system installer in this case.
Let’s see how we can package Notepad++ v8.8.1.
Simply click the Create button in the FlexApp Packaging Console. This will bring up the following window:
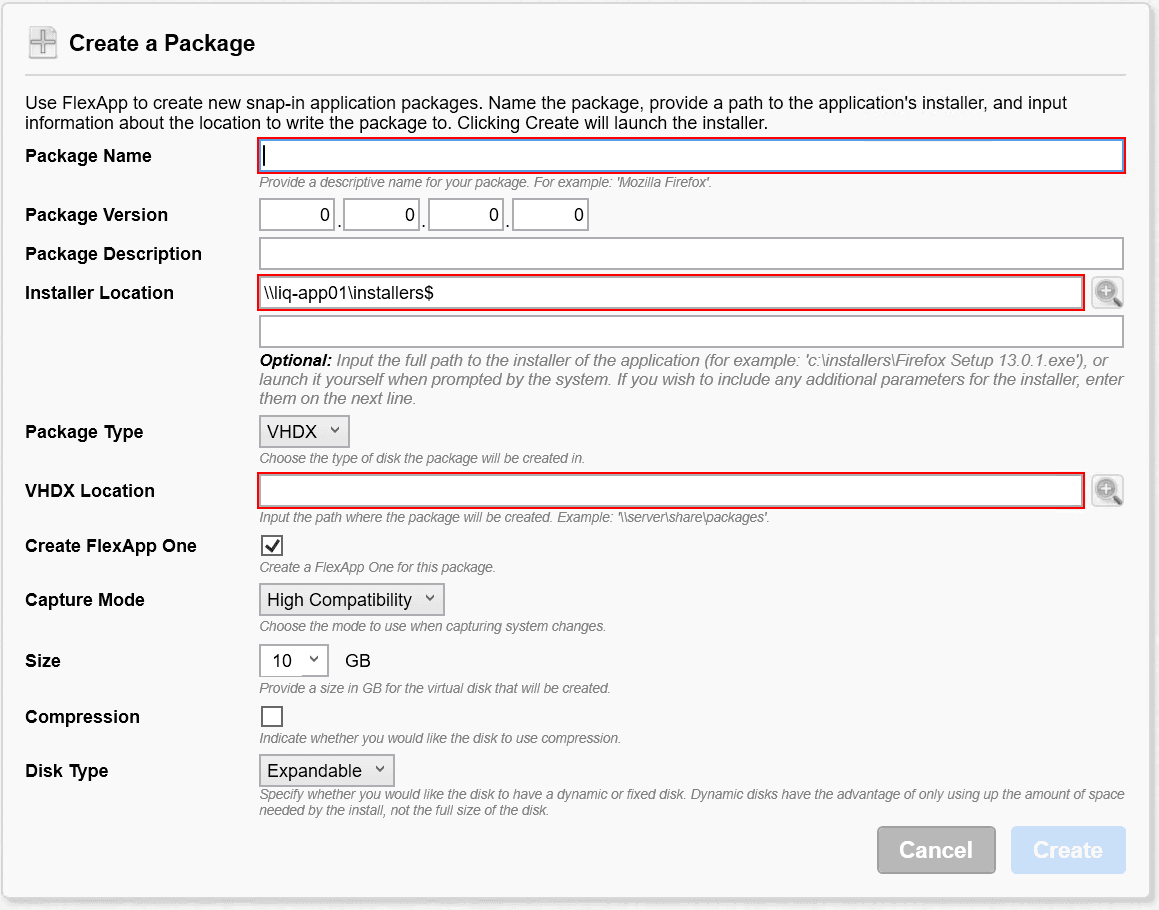
Let’s take a look at the various settings we need to configure before we can create our first package:
- Package name: Provide the name of your application. I will just use Notepad++ for this demo.
- Package version: I will use 8.8.1.0 for this demo.
- Installer location: This setting was already prefilled because I configured that in the FlexApp Packaging Console settings page. Click the hourglass icon to navigate to the location. Select the installer and click OK.

- Package type: gives you the choice which format you want to use. You can choose between FlexDisk, Cloud, VHDX or LocalDisk. I will use .VHDX in this demo. Note that FlexDisk is a deprecated feature.
- VHDX Location: Provide the path where you want to store the FlexApp.
- Create FlexApp One: Check this box if you want to create a FlexApp One package. Let’s keep this one enabled.
- Capture mode: choose between High Compatibility or Normal (legacy).
- Size: select the maximum size of the disk.
- Compression: allows you to enable compression if you want.
- Disk type: allows you to choose a fixed type where the disk size is fully used or choose expandable where only the required disk space will be used.
I ended up with the following:
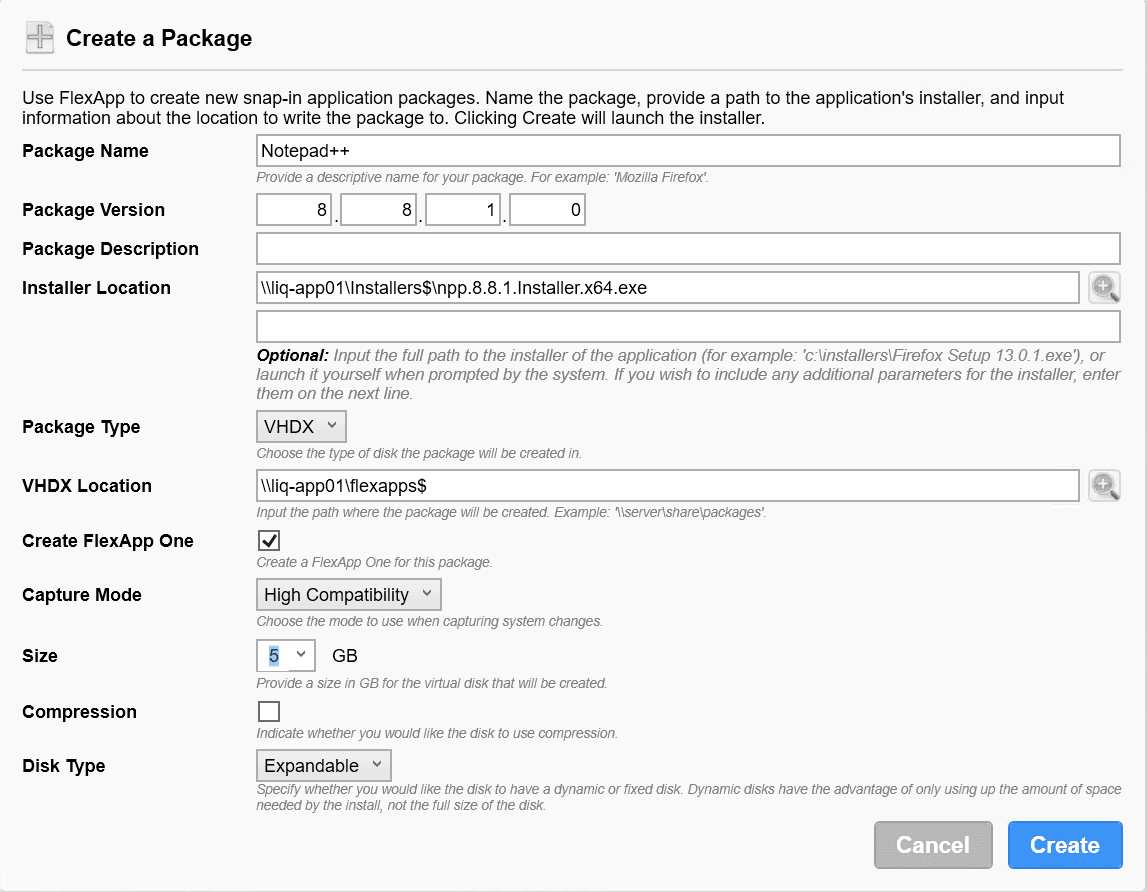
Click the blue Create button to start the packaging process.
The packager will start and automatically start the installer that was selected earlier:
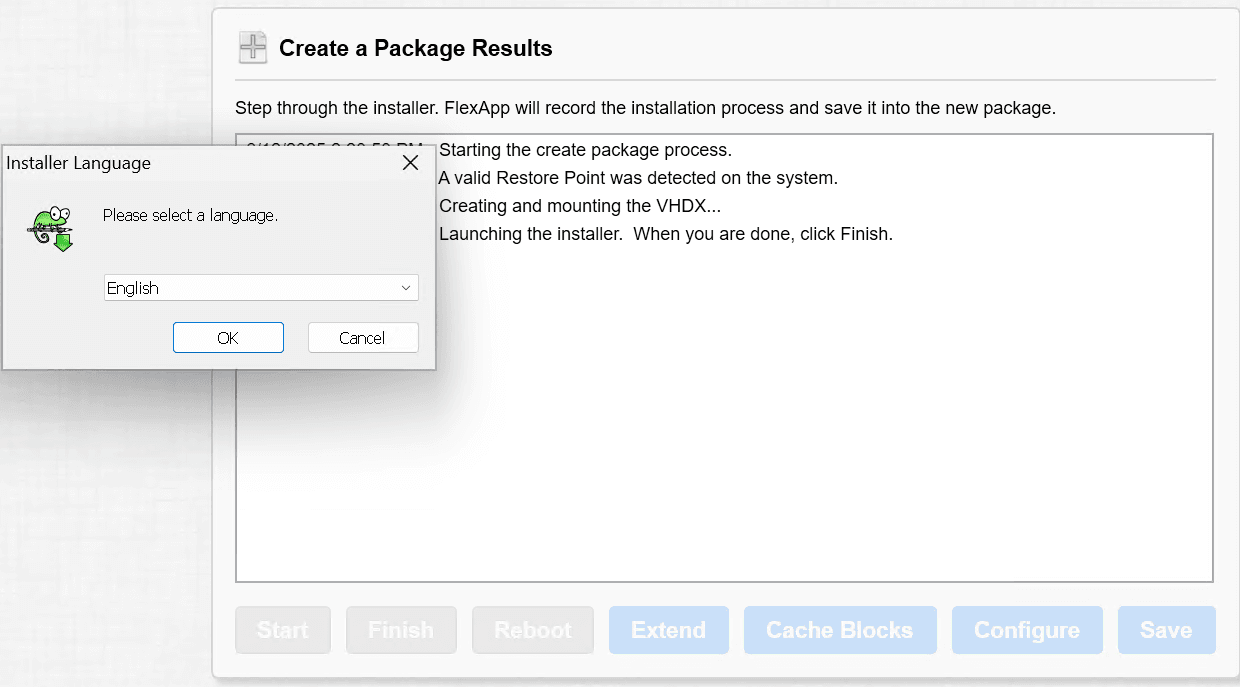
Just complete the installation as you normally would and finish by closing the installer. Let’s make things a bit more interesting and make sure that we install a plugin like Compare.

Click the Finish button in the packager and wait until the package is created. Click Save to store the package on the location that was selected earlier. Remember that closing the FlexApp Packaging Console will trigger a restore point and you will be signed out!

We can also find the newly created package in the Liquidware ProfileUnity console. Simply go to Inventory Management and locate the app there. Also note that the size of the app is just 324 MB, not the 5 GB that I selected while packaging the app.

And lastly you can find the FlexApp (One) files in the location that was entered earlier on:

This is a good time to have a look at the edit actions that we have before we end this section. From the FlexApp Packaging Console, select the second icon next to the package you want to edit. This will open the dropdown list with the following actions:
- Edit the package: allows you to view and edit everything from the files to the registry and more.
- Edit the package meta data: allows you to edit information like the name, version, description, icon and (un)check the box to create a FlexApp One for this package.
- Extend the package: allows you to package another application and merge it with the application you want to extend.
- Clone the package: makes a copy of the package.
- Merge the package: allows you to merge the selected package with another existing package.
- Setup predictive block caching: this feature is used to speed up the loading process of the package by identifying the which blocks need to be loaded first for the application to work. Running this action is pretty straightforward; the packager will mount the application and ask you to manually start and close the application.
The following actions are only available to you once you activate the package:
- Configure the package: This will allow you to change the configuration of a package. Think of the name, version, application location, check the box to create a FlexApp One and capture mode.
- Add scripts to the package: use this action to select a script and assign it to a specific phase:
- Pre activation
- Post activation
- Pre deactivation
- Post deactivation
- Edit dependencies of the package: use this action to select dependencies. You will have a window with other available packages to select from.
Let’s have a look at what is captured in a FlexApp. We can find out by clicking on the Edit the package action:
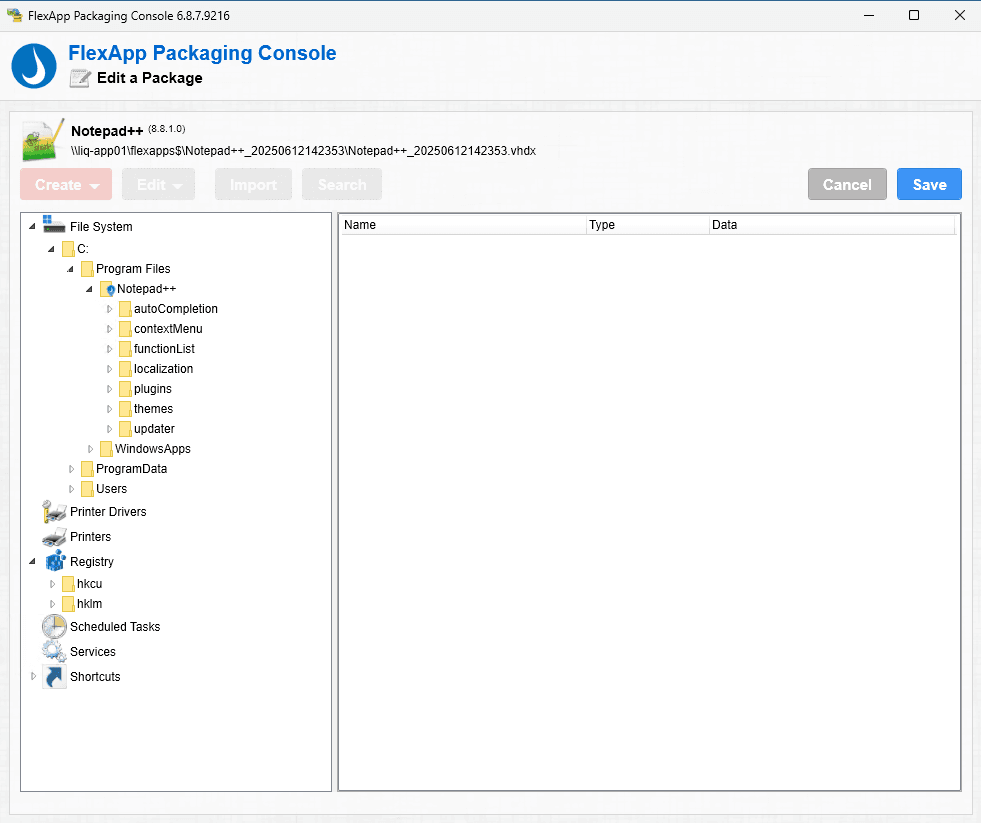
That concludes on how to package both FlexApps and FlexApp One packages. That brings me to the next question; how are FlexApps and FlexApp One packages deployed?
The cool thing is that you have multiple solutions at your disposal. You can use one of the following:
- Deploy FlexApp One apps using Microsoft Intune
- Deploy FlexApp One apps using Nerdio Manager for Enterprise
- Deploy FlexApps using the ProfileUnity console
Let’s find out how each solution works!
Deploying the FlexApp One using Microsoft Intune
There are a couple of ways you can use to deploy FlexApp One packages using Microsoft Intune. In this demo I have created a group with a user and I will use a Win32 app to deploy the FlexApp.
There are two steps to deploying the FlexApp One packages using Microsoft Intune:
- Package and deploy the FlexApp runtime.
- Deploy the Win32 app that containing the FlexApp One package.
Why is this important to mention? FlexApp One packages do have the runtime included, but it still needs to be installed before the FlexApp One package can be mounted.
Step 1: Package and deploy the FlexApp runtime
Sign into your packaging VM and navigate to the following folder:
C:\Program Files (x86)\Liquidware Labs\FlexApp Packaging Console\FlexApp One Bundler. Locate the installer.exe file.
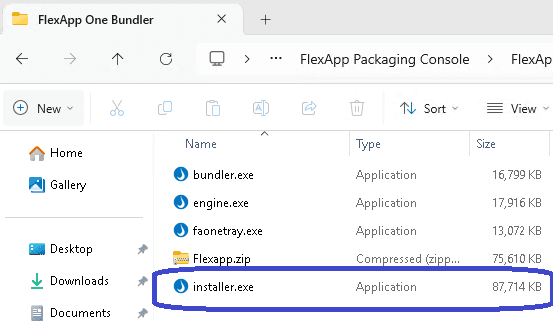
Copy this file locally and use the Microsoft Win32 Content Prep Tool to package the installer to a Win32 package.
Sign into the Microsoft Intune admin center, Apps, Windows, + Create and select Win32 app.
A couple of things are important:
- Install command: installer.exe –install
- Uninstall command: installer.exe –uninstall
- Detection: check for the path: C:\Program Files\ProfileUnity\FlexApp\ContainerService

Step 2: Deploy the Win32 app that containing the FlexApp One package
Up next is to package the FlexApp One package to a Win32 app. Of course you will need to use the Microsoft Win32 Content Prep Tool again.
Now it’s time to upload the Win32 app to Microsoft Intune. Sign into the Microsoft Intune admin center, Apps, Windows, + Create button and select a Win32 app.
Next up is to upload the Win32 package and configure the following:
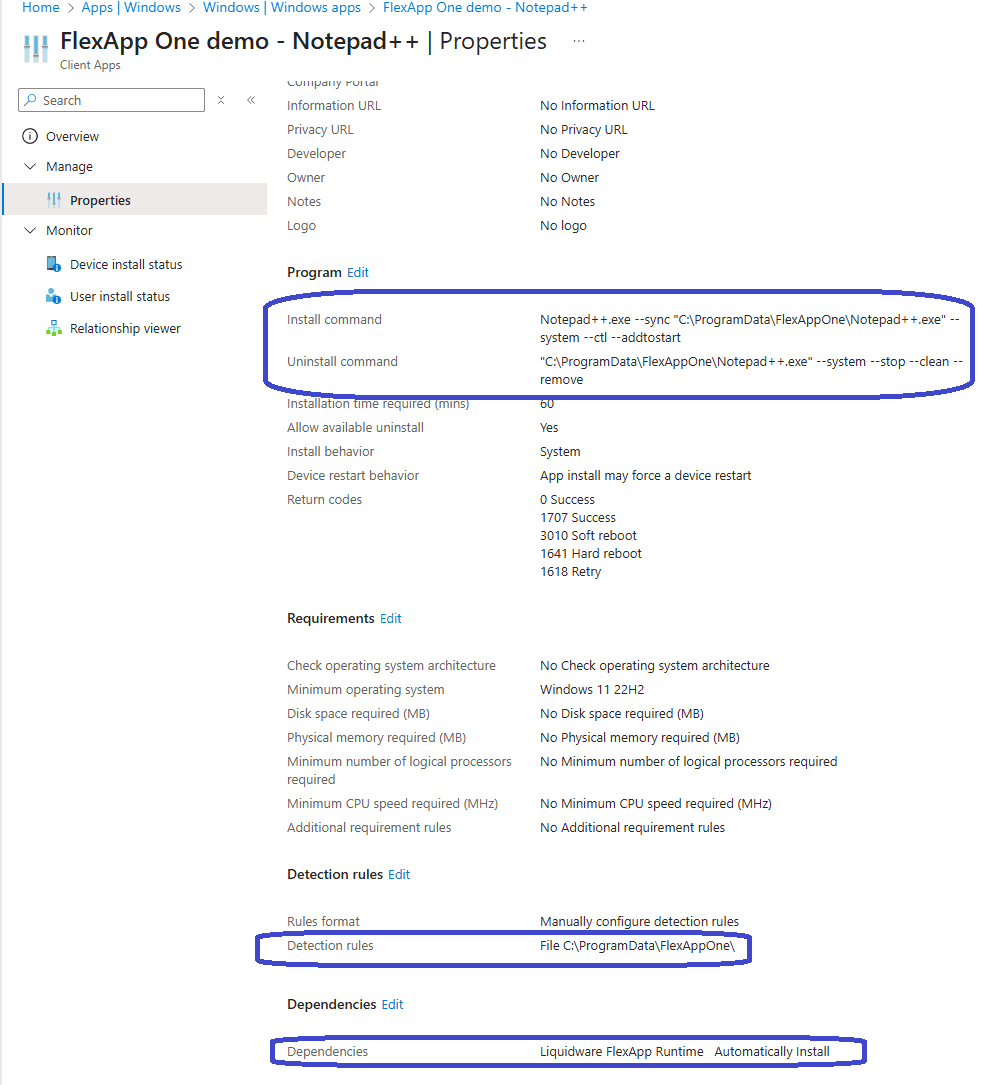
Let’s highlight a couple of things here:
- The install command is the name of the FlexApp One executable in the Win32 package. It will copy the FlexApp One file to C:\ProgramData\FlexAppOne. If you use the same folder for each FlexApp One, you will get a nice repository where all of the FlexApp One packages are stored and it makes it easy to use in a detection rule.
- The uninstall command uses the FlexApp One package in the ProgramData location and the parameters will ensure the package is removed.
- The detection is pretty easy because all of the FlexApp One packages are stored in the same location. Just check if the FlexApp One package is present in the folder.
- Dependencies: select the Liquidware FlexApp Runtime to ensure the runtime is installed before the FlexApp One package.
Save the Win32 app and then it is just a matter of time before the FlexApp Runtime and the FlexApp One package will appear on the device:

Do you remember that I mentioned you need to package the FlexApp runtime before deploying the FlexApp One package? You might ask the question: what happens if you forget to deploy the runtime and just deploy the FlexApp package to the device? In that case the user gets a nice popup:

At this point, two things can happen:
- The user has standard user rights. In this case it’s game over. No FlexApp.
- The user has administrative rights. In this case the user can simply click the Yes button to install the runtime and the FlexApp will open afterwards.
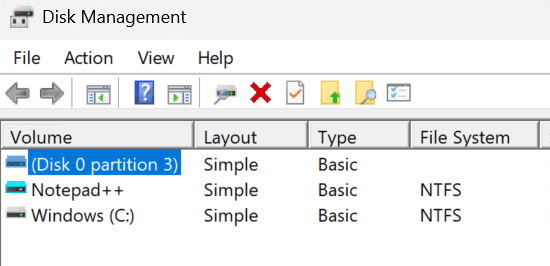
FlexApp One packages are basically virtual hard drives that are mounted to the system which means you can see them in the Disk Management console:
You can also locate the FlexApp One package in the folder. I used the folder C:\ProgramData\FlexAppOne to store the package:

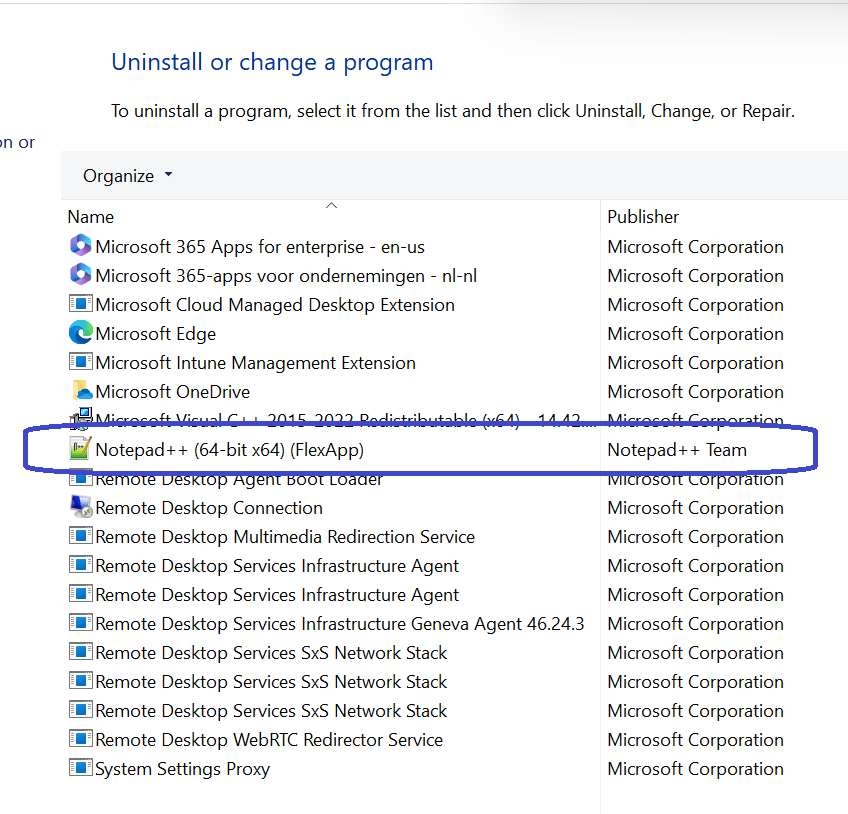
The app will also appear in the Programs and feature list in Windows. It will also show that it’s a FlexApp:
That’s how to deploy FlexApp One packages using Microsoft Intune.
Deploying FlexApps via the ProfileUnity console to AVD Session Hosts
Let’s take a look on how to deploy FlexApps on Azure Virtual Desktop session hosts using the ProfileUnity management console.
You can either use an existing configuration or create a new one. Personally I chose to create a new configuration and named it Demo – Deploy FlexApps to AVD.
- Click the FlexApp icon if you want to add FlexApps.
- Click the FlexApp One icon if you want to add rules to deploy FlexApp One packages.
Let’s test with FlexApp packages:

Click the red Add FlexApp rule button on the top right side of the screen:

Simply drag-and-drop the FlexApps to the left side. In my demo I selected the existing Firefox package and the custom packaged Notepad++ package. Select which capabilities you want to enable for each FlexApp:
- Enable Click to Layer
- Cache Blocks Locally
- Predictive Block Caching
- Cache All Block Locally

Optionally you can;
- Set a filter
- Add a description
Click the Save button to save the FlexApp rule. The rule is now visible in the FlexApp configuration.

Make sure to save or update the configuration and make sure to deploy the configuration:

All that is left to do is to sign into the desktop in Azure Virtual Desktop.
Immediately I can see Firefox as an icon on the desktop and in the start menu. If you look at the Programs & Features window, you can see that Firefox is installed and that it’s a FlexApp package.

If you just went “Wait a minute! What about Notepad++? That’s not in the list!”
Well, you are right! And the reason for that is that I enabled the Click to Layer capability when I added the FlexApp into the FlexApp rule. This means the link is visible in the start menu but that’s all. Once users click the link in the start menu, the app will mount, be visible in the same way in the Programs & Features overview and the app will start automatically. All within a couple of seconds!
But wait! There is more! Let’s shift gears and talk about Nerdio.
Deploying FlexApp One apps using Nerdio Manager for Enterprise to Windows 365 Cloud PCs
Did you know that you can also deploy FlexApp One packages using Nerdio Manager for Enterprise? You can choose from using Nerdio’s Scripted Actions or use the Shell Apps feature to deploy the runtime and the FlexApp One packages, just make sure you don’t forget about the connectivity from the target devices to your Liquidware license server.
Scripted actions
Select Scripted Actions, Windows Scripts. There used to be a couple of example scripts that started with (FlexApp), but they do not seem to be available by default anymore. No worries, you can still get the scripts from the Liquidware FlexApp One GitHub. You can find a full demo by Liquidware here: link
Shell Apps
You could also use Nerdio’s Shell Apps feature. This feature uses PowerShell scripts to detect, install and uninstall applications. This should work perfectly for FlexApp One packages. And just like before, we need to start with the FlexApp runtime to make sure users are not presented with questions when running FlexApps.
You will need a public place to download the required resources from. I kept things simple by using a storage account with a container that is publicly accessible with read-only rights. Make sure to implement the proper security measures for real-world scenarios.
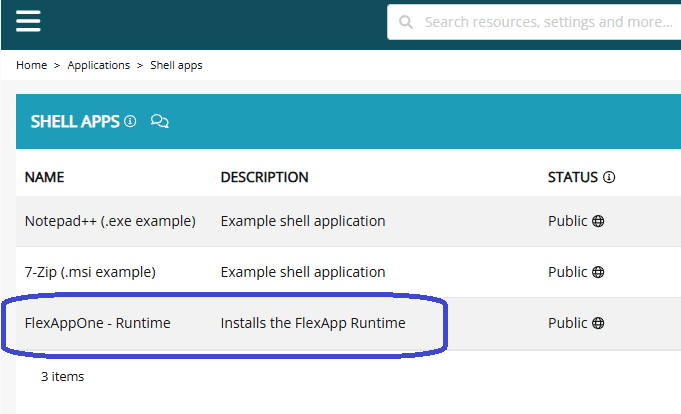
From the Nerdio Manager console, select Applications, Shell Apps. Click the blue Add button. Give the Shell App a name and description. Toggle the Public button to on if you want to publish the Shell App in the Unified App Catalog:
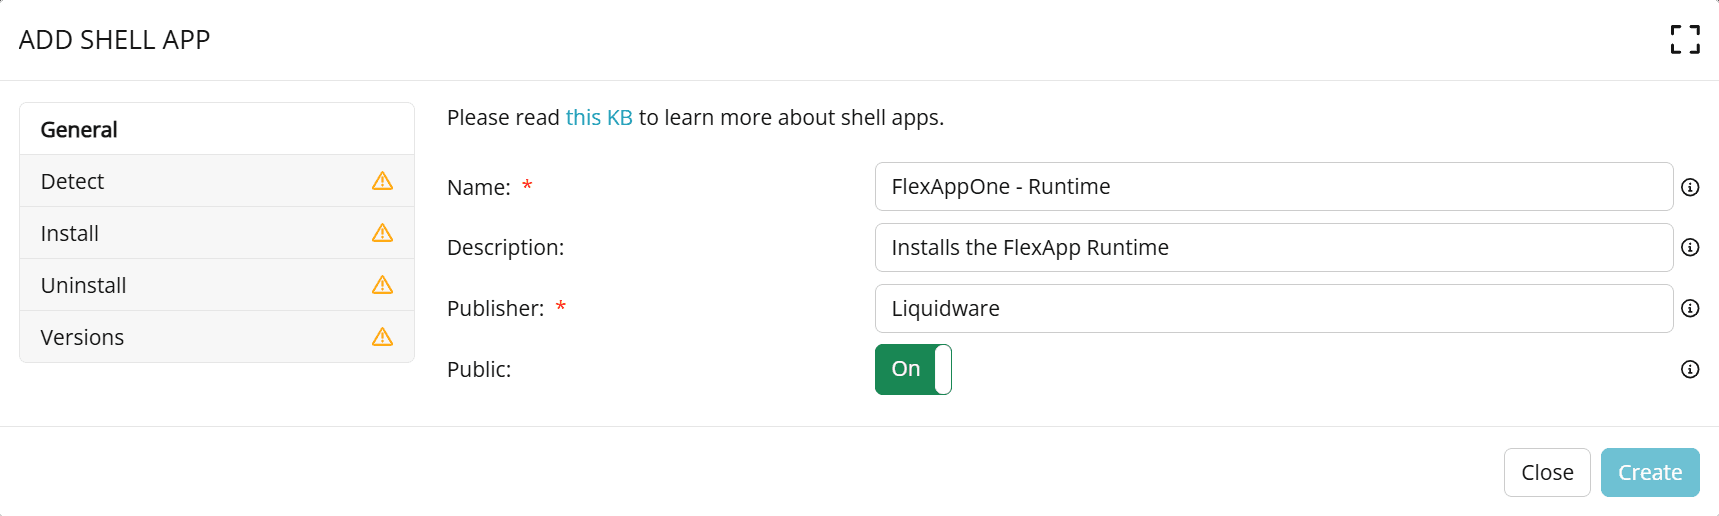
In the next steps we need to provide the detection, installation and removal script and we need a public place to download the installer from. For this demo I kept things simple and created a storage account with a container.
Here is the detection script I used:
$basePath = "C:\Program Files\ProfileUnity\FlexApp\ContainerService"
$basePathExists = Test-Path $basePath
if (!$basePathExists) {
    return $false
}
Explanation of the detection script
- Check if the folder path ending with ContainerService exists. If not, it will return with false.
Here is the installation script I used:
# Define variables
$storageAccount = "enter your storage account name here"
$containerName = "enter your container name  here"
$blobName = "FlexAppRuntime/installer.exe"
# Use SAS token if private: $sasToken = "?sv="

# Construct the blob URL
# Use SAS token if private : $blobUrl = "https://$storageAccount.blob.core.windows.net/$containerName/$blobName$sasToken"
$blobUrl = "https://$storageAccount.blob.core.windows.net/$containerName/$blobName"

# Make sure the destination path exists
$destinationPath = "C:\ProgramData\FlexAppRuntime\"
$installerFile = 'installer.exe'
$outFile = Join-Path $destinationPath $installerFile
if (-not (Test-Path $destinationPath)) {
    New-Item -Path $env:programdata -Name FlexAppRuntime -ItemType Directory | Out-Null
}

# Download the installer
$ProgressPreference = 'SilentlyContinue'
Invoke-WebRequest -Uri $blobUrl -OutFile $outFile -UseBasicParsing | Out-Null

# Install the FlexApp One Runtime
Start-Process -FilePath "C:\ProgramData\FlexAppRuntime\installer.exe" -ArgumentList "--install" -Wait -NoNewWindow
Explanation of the installation script
- Provide some values to construct the download URI.
- Test if the destination path is available. If not, create the folder.
- Download the installer from the Azure storage account and save it in the destination folder.
- Install the runtime silently.
Finally we need to enter the uninstall script:
# Make sure the destination path exists
$destinationPath = "C:\ProgramData\FlexAppRuntime\"
$installerFile = 'installer.exe'
$outFile = Join-Path $destinationPath $installerFile

# Uninstall the FlexApp One Runtime
Start-Process -FilePath "C:\ProgramData\FlexAppRuntime\installer.exe" -ArgumentList "--uninstall" -Wait -NoNewWindow
Explanation of the uninstallation script
- Silently yun the installer.exe with the –uninstall parameter.
Save the Shell App and it will pop up in the Shell Apps overview:
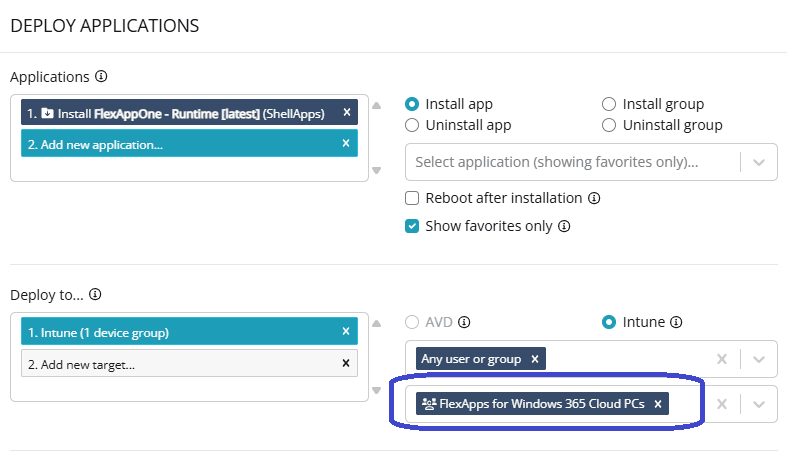
We can deploy the FlexApp runtime Shell App from the Unified Catalog. In my case I assigned it to a group with my Cloud PCs that should receive the FlexApp Runtime:
All we have to is check the detection path and we can see that it installed correctly:

Now it’s time to actually deploy the FlexApp Ones packages to our devices, or in this demo our Cloud PCs! Create another Shell App and let’s continue with the scripts:
Here is the detection script I used:
$basePath = "C:\ProgramData\FlexAppOne\Notepad++.exe"
$basePathExists = Test-Path $basePath
if (!$basePathExists) {
    return $false
}
Explanation of the detection script
- The idea is to download all FlexApp One packages into one folder; C:\ProgramData\FlexAppOne
- Check if the Notepad++.exe file is found in the FlexAppOne folder and return false if it is not found.
Let’s take a look at the installation script
# Define variables
$storageAccount = "name"
$containerName = "name"
$blobName = "Notepad++/Notepad++.exe"
# Use SAS token if private: $sasToken = "?sv="

# Construct the blob URL
# Use SAS token if private : $blobUrl = "https://$storageAccount.blob.core.windows.net/$containerName/$blobName$sasToken"
$blobUrl = "https://$storageAccount.blob.core.windows.net/$containerName/$blobName"

# Make sure the destination path exists
$destinationPath = "C:\ProgramData\FlexAppOne\"
$installerFile = 'Notepad++.exe'
$outFile = Join-Path $destinationPath $installerFile
if (-not (Test-Path $destinationPath)) {
    New-Item -Path $env:programdata -Name FlexAppOne -ItemType Directory | Out-Null
}

# Download the blob
$ProgressPreference = 'SilentlyContinue'
Invoke-WebRequest -Uri $blobUrl -OutFile $outFile -UseBasicParsing | Out-Null

# Install the FlexApp One Runtime
Start-Process -FilePath "C:\ProgramData\FlexAppOne\Notepad++.exe" -ArgumentList '--sync "C:\ProgramData\FlexAppOne\Notepad++" --system --ctl --addtostart' -NoNewWindow
Explanation of the detection script
- Provide values to construct the download URI.
- Check if the C:\ProgramData\FlexAppOne folder exists. If not, create it.
- Download the Notepad++.exe FlexApp One package.
- Mount the package.
Here is the uninstall script that I used:
# Make sure the destination path exists
$destinationPath = "C:\ProgramData\FlexAppOne\Notepad++"
$installerFile = 'Notepad++.exe'
$faoFile = Join-Path $destinationPath $installerFile

# Uninstall the FlexApp One Runtime
Start-Process -FilePath $faoFile -ArgumentList "--system --stop --clean --remove" -Wait -NoNewWindow
Explanation of the uninstall script
- Run the Notepad++ FlexApp One package with the parameters to stop and cleanup.
Finally we need to deploy the Notepad++ FlexApp One package as a shell app using the Unified Catalog. I used the same group for the Cloud PCs as before.

And now we can see that the FlexApp One package is deployed to the Cloud PC.
Resources
I used the following resources for this post:
FlexApp Packaging Console Guide
ProfileUnity™ with FlexApp™ Technology: Best Practices for the FlexApp Packaging Console
Runtime Installer Package – Liquidware Customer Support
FlexApp Packaging of Office 365 – Liquidware Customer Support
FlexApp One application commands
GitHub – liquidwarelabs/FlexAppOne: Enable PowerShell Templates – Use with Nerdio Scripted Actions
Share this:
- Click to share on LinkedIn (Opens in new window) LinkedIn
- Click to share on X (Opens in new window) X
- Click to share on Facebook (Opens in new window) Facebook
- Click to share on WhatsApp (Opens in new window) WhatsApp
- Click to share on Telegram (Opens in new window) Telegram
- Click to print (Opens in new window) Print