What’s up, everyone!
Join me in this weeks post where I dive into the different networking options that Windows 365 has to offer. Currently Windows 365 admins can choose one of the following options:
- Microsoft hosted network (MHN): Microsoft will take care of the networking part for you. It’s easy to configure but there’s no connectivity to an existing network so users can access the resources in that network.
- Azure Network Connection (ANC): in this scenario you manage the network yourself. You can create a VNet and subnet in Azure. From the Microsoft Intune admin center, you can create the ANC which connect Windows 365 to your corporate network. This works great for Microsoft Entra join and Microsoft Entra Hybrid joined Cloud PCs.
There are a couple of other ways to connect to corporate resources like using a client VPN, use SaaS apps or… use Global Secure Access! Let’s find out what it is and how we can use it to connect to corporate resources!
Introducing Global Secure Access
Let’s start off by demystifying some technical terms. The term Global Secure Access refers to Microsoft Entra Internet Access and Microsoft Entra Private Access. Both of these solutions are part of a new security category called Security Service Edge (SSE) and can be managed via the Microsoft Entra admin center.
Let’s insert an image by Microsoft that explains this concept really well:
So what is the difference between Microsoft Entra Internet Access and Microsoft Entra Private Access?
Microsoft Entra Internet Access aims to protect all internet bound traffic while Microsoft Entra Private Access provides secure access to existing networks without using a VPN solution. It also supports Conditional Access policies!
In this post I will focus Microsoft Entra Private Access to connect to corporate resources from a Windows 365 Cloud PC.
Prerequisites for Microsoft Entra Private Access
There are some prerequisites if you want to use Microsoft Entra Private Access:
- Microsoft Entra P1 or P2 license.
- Users need a Microsoft Entra Suite license or standalone license.
- An account with at least Application Administrator privileges.
- User identities can be either synchronized from a local AD or created in Entra ID.
- The server running the Microsoft Entra private connector needs to run at least Server 2012 R2 or later.
- The server needs at least .NET v4.7.1 or newer.
- Disable the HTTP2 protocol is you are using a server with Server 2019 or later.
- Enable TLS1.2. This will require a reboot of the server.
Microsoft also released a couple of recommendations:
- Make sure to optimize performance by placing the connector on a server which is located close to the target apps and services.
- Make sure that the connector is installed on a server that is part of the same AD
- domain (or trusted domain) if you want to use single sign-on (SSO).
The lab environment
Let’s keep things simple and create a lab in Azure. I used three VMs to simulate a small domain environment:
- DC01: AD DS and Connector
- File01: File server
- Web01: Web server
I will connect to these resources from my Windows 365 Cloud PC which are configured to use the Microsoft Hosted Network.
Configure Microsoft Entra Private Access
We already arrived at the configuration phase. Here are some general steps to take to configure Microsoft Entra Private Access:
- Step 1: Enable Global Secure Access in the Entra portal
- Step 2: Prepare the target server
- Step 3: Download and install the connector
- Step 4: Create a connector group
- Step 5: Add application segments
- Step 6: Configure conditional access
- Step 7: Configure traffic forwarding for private access
- Step 8: Install the Global Secure Access client on the Cloud PC
Step 1: Enable Global Secure Access in the Entra portal
Sign into the Entra portal, Global Secure Access, Dashboard. Click the Activate button.
This will onboard the tenant and activate Global Secure Access. This will only take a couple of seconds to complete:
Step 2: Prepare the target server
Since I’m running server 2019, I need to disable the HTTP 2.0 protocol and configure TLS 1.2.
Microsoft already prepared the commands for each step. Here is the powershell command to disable HTTP 2.0:
Set-ItemProperty 'HKLM:\SOFTWARE\Microsoft\Windows\CurrentVersion\Internet Settings\WinHttp\' -Name EnableDefaultHTTP2 -Value 0Setting the registry keys can be done using these settings:
Windows Registry Editor Version 5.00

[HKEY_LOCAL_MACHINE\SYSTEM\CurrentControlSet\Control\SecurityProviders\SCHANNEL\Protocols\TLS 1.2]
[HKEY_LOCAL_MACHINE\SYSTEM\CurrentControlSet\Control\SecurityProviders\SCHANNEL\Protocols\TLS 1.2\Client]
"DisabledByDefault"=dword:00000000
"Enabled"=dword:00000001
[HKEY_LOCAL_MACHINE\SYSTEM\CurrentControlSet\Control\SecurityProviders\SCHANNEL\Protocols\TLS 1.2\Server]
"DisabledByDefault"=dword:00000000
"Enabled"=dword:00000001
[HKEY_LOCAL_MACHINE\SOFTWARE\Microsoft\.NETFramework\v4.0.30319]
"SchUseStrongCrypto"=dword:00000001
You can check the registry to verify that the keys are configured and make sure to reboot the server.
Step 3: Download and install the connector
From the Microsoft Entra admin center, Global Secure Access, Connect, Connectors. Select Download connector service in the ribbon, accept the terms and start the download.
Installing the connector is pretty straightforward:
- Accept the terms and conditions.
- Wait while the installation runs.
During installation, you need to sign in with an account that has at least Application Administrator privileges.
If everything checks out, you will get a success message:
You can verify if the services have been created and successfully started:
So far so good!
Step 4: Create a connector group
Let’s head back to the Microsoft Entra admin center, specifically the Connectors menu item under Connect. We now have a connector assigned to the default group.
Let’s create our own Connector Group. Select the + New Connector Group button in the ribbon. You’ll see a blade popping out on the righthand side of the portal. Fill in the required info:
- Name
- Select the connector(s)
- Verify if the region is correct under advanced settings.
- Select the + Create button on the top part of the screen.
We now have two connector groups. The newly created GSAdemo group and the default group which now has no connectors assigned to it.
Step 5: Add application segments
This part might get a bit tricky because there are some choices you can make:
- Quick Access: this is an easy way to secure access to resources.
- Application Discovery: allows companies to gain a good understanding what applications are being used.
- Enterprise Applications: used to provide secure access to resources on a per application basis.
Make sure to provide a name and select the Connector Group that was created earlier.
Now it’s time to add application segments. Think of this as the place where you want to publish your services that should be accessible to your users via Entra Private Access. In my demo I will try to publish a webapp (on server WebApp01) and a file share (on server File01).
To do so, click the + Add Quick Access application segment button in the ribbon and choose one of the following:
- IP address
- FQDN
- IP address range (CIDR)
- IP address range (IP to IP)
Before we dive into the wonderful world of DNS, let’s first give it a try using an IP address.
Did you notice the status is Pending? This is actually something to look out for. The server File01 has an internal IP address of 10.0.0.5 and I want to allow SMB. Here is an example when the check fails:
This can occur when you aren’t sure which ports you want to use. For SMB, it’s of course port 445. Just delete the faulty segment and re-add it. Click the Save button and wait for the status to change to Success.
Next is to grant your users access to the newly created enterprise app that is created during this process. From the Quick Access menu in Global Secure Access, select Users and Groups. Select + Add user/group in the ribbon.
I would recommend to use a group here containing the users that will get access to the corporate resources using Global Secure Access. For demo purposes I will just add my own account.
Once added, select the Assign button on the bottom of the page.
You will be presented with an overview of all assigned users and groups.
Step 6: Configure conditional access
Remember that I mentioned that Global Secure Access supports the use of Conditional Access? Yes, we have arrived at this point!
Select Conditional Access under Security. I already like how this page displays existing Conditional Access policies that affect Global Secure Access. If you have worked with CA before, you can easily add a conditional access policy here by click the + New policy button in the profile:
I really like how Microsoft does this. Let me explain!
Here is what I did:
- I gave the new policy a name.
- I added the user to the profile. Again, in real world scenarios you would use the group that you used earlier.
- In target resources, Microsoft already configured the correct target resource named GSAdemo. So there is no need to figure that out yourself.
- Go to Grant and check the Require multifactor authentication control.
- To finish up, slide the Enable policy to Report-Only or On.
You will see the conditional access policy in the overview once it is saved.
Step 7: Configure traffic forwarding for private access
Navigate to Global Secure Access, Connect, Traffic forwarding. The idea is to enable the Private access profile. If the sliders are greyed out like the screenshot below, you probably do not have the correct licenses. Fear not! If you want to kick the tires a bit, Microsoft provides a trial with 25 licenses that you can use!
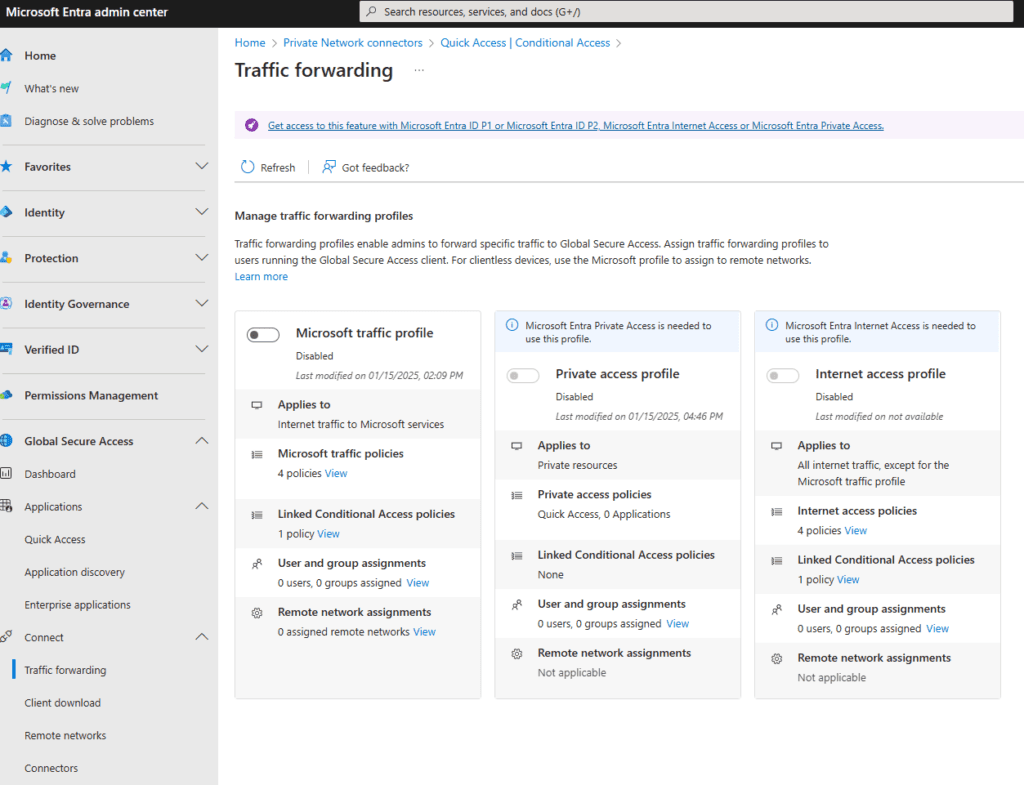
Once the correct licenses are added to the tenant, you need to assign the license to your user(s). I will skip this step since you are probably well aware of how that works.
Refresh the Microsoft Entra admin center and enable the Private access profile. Confirm that you want to enable Entra Private Access by select OK.
Take a moment to admire your awesome work. You will get a nice notification letting you know when everything is configured correctly.
Now the only thing that we need to do is to assign users and groups:
Click the View link to add all users (via a toggle) or add individual users or groups. Once completed, you will see that everything is configured and the warning notification on top disappears.
That concludes the steps we need to ‘on the backend‘ so to speak. We are almost done and ready for testing. But before we test, we need to…
Install the Global Secure Access client
We need to install the Global Secure Access client on the Windows 365 Cloud PC before we can access our resources. You can either install the client manually or publish the client using Microsoft Intune.
It does not matter which method you use, the first step is to download the client. Go to the Microsoft Entra admin center, Global Secure Access, Connect and select Client download.
At the time of writing, the client is available for Windows 10/11 and Android. The client is in preview for iOS and macOS.
Let’s do a manual installation. Just run the executable and wait for the installation process to complete:
Once installed I get the message that Private Access was not enabled for my organization, but that was nothing that a reboot of my Cloud PC couldn’t fix.
Time for some basic testing!
Let’s see if we can connect to our file share:
It makes perfect sense that I’m prompted to enter my username and password since my AD lab is not synced with my Microsoft tenant.
And there is my file share. That works beautifully! Let’s check out our webapp!
I allowed SMB connections to my File01 server, but not to my webapp01 server. Let’s see if that is blocked:
Like we expected, only our webapp was allowed and SMB is blocked.
Configuring DNS
Now it’s time to add some name resolving into the mix! Global Secure Access uses a private DNS zone in Azure which is pretty easy to deploy. Next, add your records in the DNS management recordset:
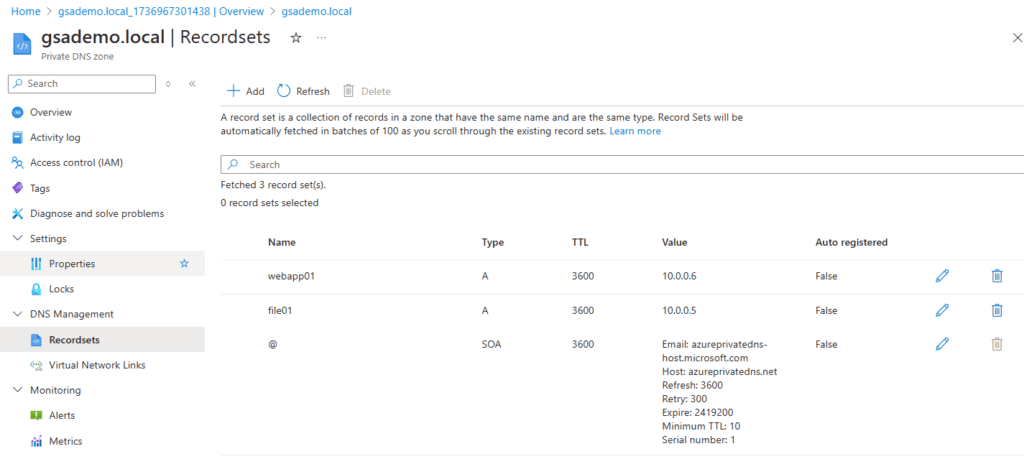
From the Microsoft Entra admin center, Global Secure Access, Applications, Quick Access, check the box to enable Private DNS and add the DNS suffix:
All that’s left to do is test on the client. Let’s try a ping:
That looks good!
Let’s try to connect to our webapp using the name:
This also works like a charm. Only one more test to do and that is to connect to the File01 server using Windows Explorer:
That also works like a charm.
Finishing up
I was really looking forward to learn more about Global Secure Access and to be honest I was pretty amazed how easy the process was of configuring Entra Private Access. I expected to run into some problems but that was not the case. It just works!
Of course I tested everything on a Cloud PC just to show that you can use a Microsoft Hosted Network in combination with Global Secure Access to connect to your corporate network. But you can easily use GSA for your Windows desktops if they are Entra joined as well.
If you haven’t tried it yet, I highly recommend to play around with it!
Resources
I used the following resources for this post:
Learn about Microsoft Entra Private Access – Global Secure Access | Microsoft Learn
How to Configure Quick Access for Global Secure Access – Global Secure Access | Microsoft Learn
There is also a ton of really great content from fellow MVPs and community members, like step-by-step videos on YouTube.


