


What’s up, everyone!
This post is for my Nerdio friends. Did you know you can configure a user friendly URL to access Nerdio Manager for MSP? Once NMM is installed, the default URL is https://web-admin-portal-somethingrandom.azurewebsites.net. Since even admins once in a while love some user friendlyness, you can change this URL to https://manager.yourdomain.com. Let’s get to it!
Requirements
- You’ll need to have Nerdio Manager for MSP up and running.
- Access to your DNS environment to publish a CNAME.
- A SSL certificate for your custom URL.
- I will use manager.techlab.blog as a custom URL (And no, this is not a URL that I will actually use)
- Certificate requirements are mentioned in this Microsoft document
Step 1: Configure The DNS Record
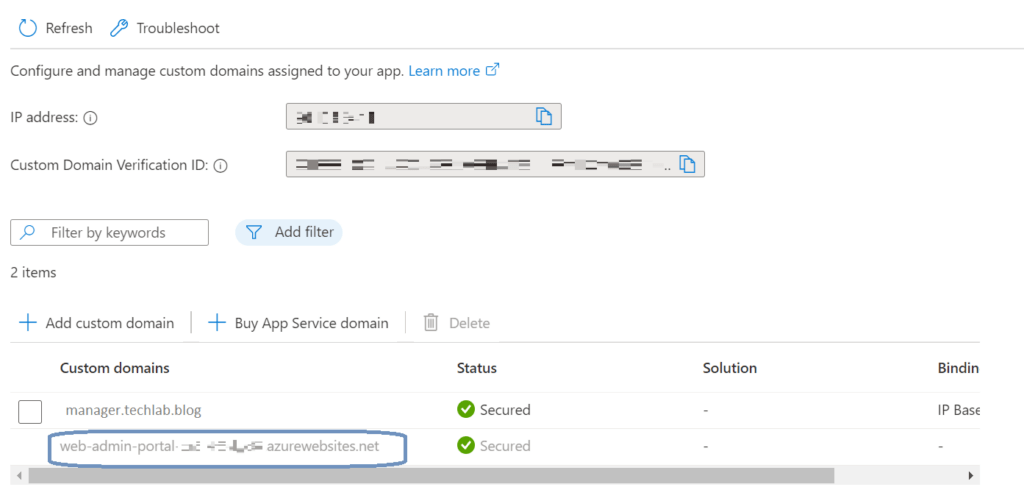
Log into the Azure portal and open the App Service used by NMM. You can easily find it by searching for the app service named web-admin-portal-[somethingrandom] etc. Go to Settings, Custom Domains. You can copy the value of the custom domain which is needed to create the CNAME record.
Now it’s time to create the CNAME record;
- Record type: CNAME
- Name: manager.techlab.blog
- Value: The URL you copied before
- TTL: 1800 or your preferred default
Step 2: Add A Custom Domain
We can add the custom domain from the App Service pane in the Azure portal. If you haven’t closed it, you’re ready to go. Click on the + Add custom domain button in the ribbon and fill in the required fields. Finish up by clicking on the validate button.
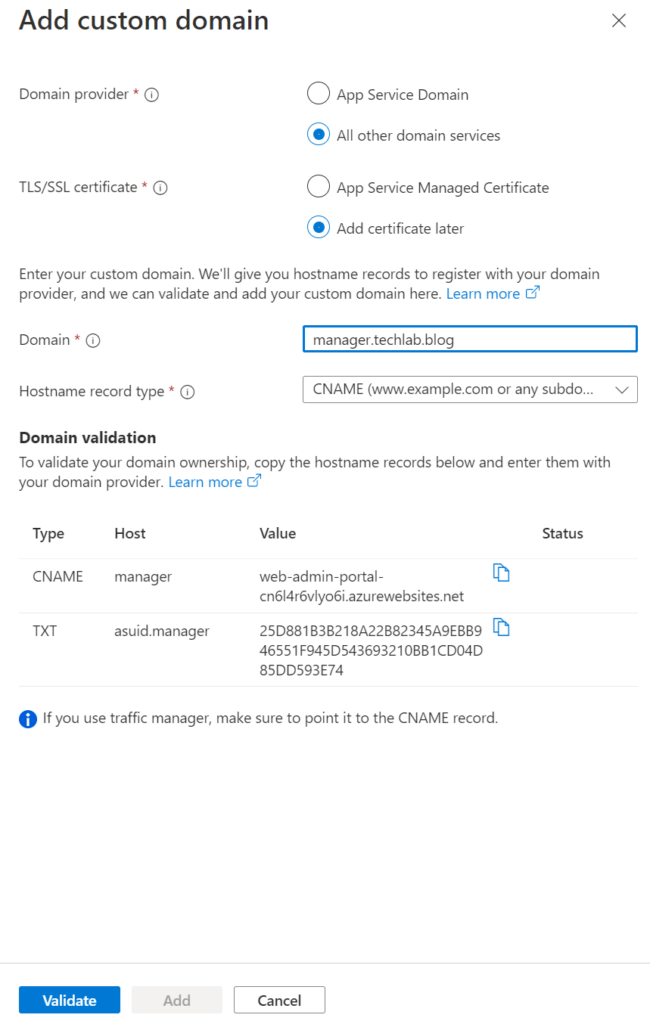
Next up is to bind a certificate to the custom domain. Click on the Binding button. If you have any trouble validating the certificate, then make sure that the following requirements are met (Encrypted with TripleDES, Private key at least 2048 bits, .pfx contains all intermediate and root certificates, more in the linked Microsoft URL).
If you still experience any issues with validating the .pfx file, you could try the following;
Import the .pfx into your Windows 11 endpoint using the following Powershell command;
Import-PfxCertificate -FilePath "path\file.pfx" -CertStoreLocation Cert:\LocalMachine\My -Password (ConvertTo-SecureString -String 'YourPassword' -AsPlainText -Force) -ExportableNext export the certificate using mmc.exe. (Add module, Certificates) Export the certificate to a .pfx file and make sure to add intermediate and root certificates.
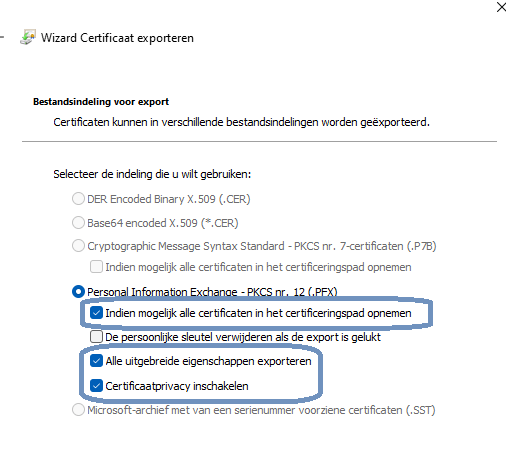
Also, for security reasons, make sure to remove the certificate on your local machine.
Upload the newly created .pfx file to the App Service and this will most likely pass the validation phase. If everything checks out, you should get a green checkmark next to your custom domain.

Step 3: Add Redirect URLs
Open the Azure portal and open the App Registration. Search for ‘web-‘ and the web-admin-portal-[somethingrandom] will appear. If not, make sure to click on the ‘All applications’ tab.
Go to Manage, Authentication. Repeat after me:
“Do not delete the existing values.”
“Instead add values with the custom domain. “
You need to add the following to get this to work:
- The domain with the trailing / : https://manager.techlab.blog/
- Add another with: /signinoidc
- Add another with: /add-account
In my demo environment it would look like:

Make sure to save the changes.
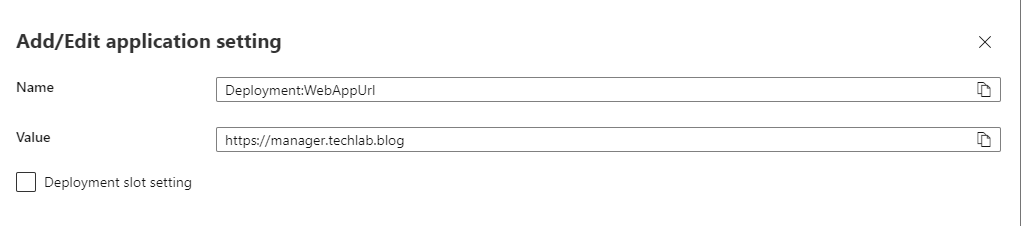
For the last and final step we have to go back to the App Service. Go to Settings, Configuration. Search for the value ‘Deployment:WebAppURL‘. Change the value to your custom domain, in my demo it would be https://manager.techlab.blog. Do not add the trailing ‘/’.
Make sure to save your change. This will result in restarting the App Service. And then there’s only one more thing to do, test it!
Resources
I used the following resources to write this blog:
How to customize address (URL) of Nerdio Manager for MSP – Nerdio Help Center
Share this:
- Click to share on LinkedIn (Opens in new window) LinkedIn
- Click to share on X (Opens in new window) X
- Click to share on Facebook (Opens in new window) Facebook
- Click to share on WhatsApp (Opens in new window) WhatsApp
- Click to share on Telegram (Opens in new window) Telegram
- Click to print (Opens in new window) Print


One Comment
Comments are closed.