What’s up, everyone!
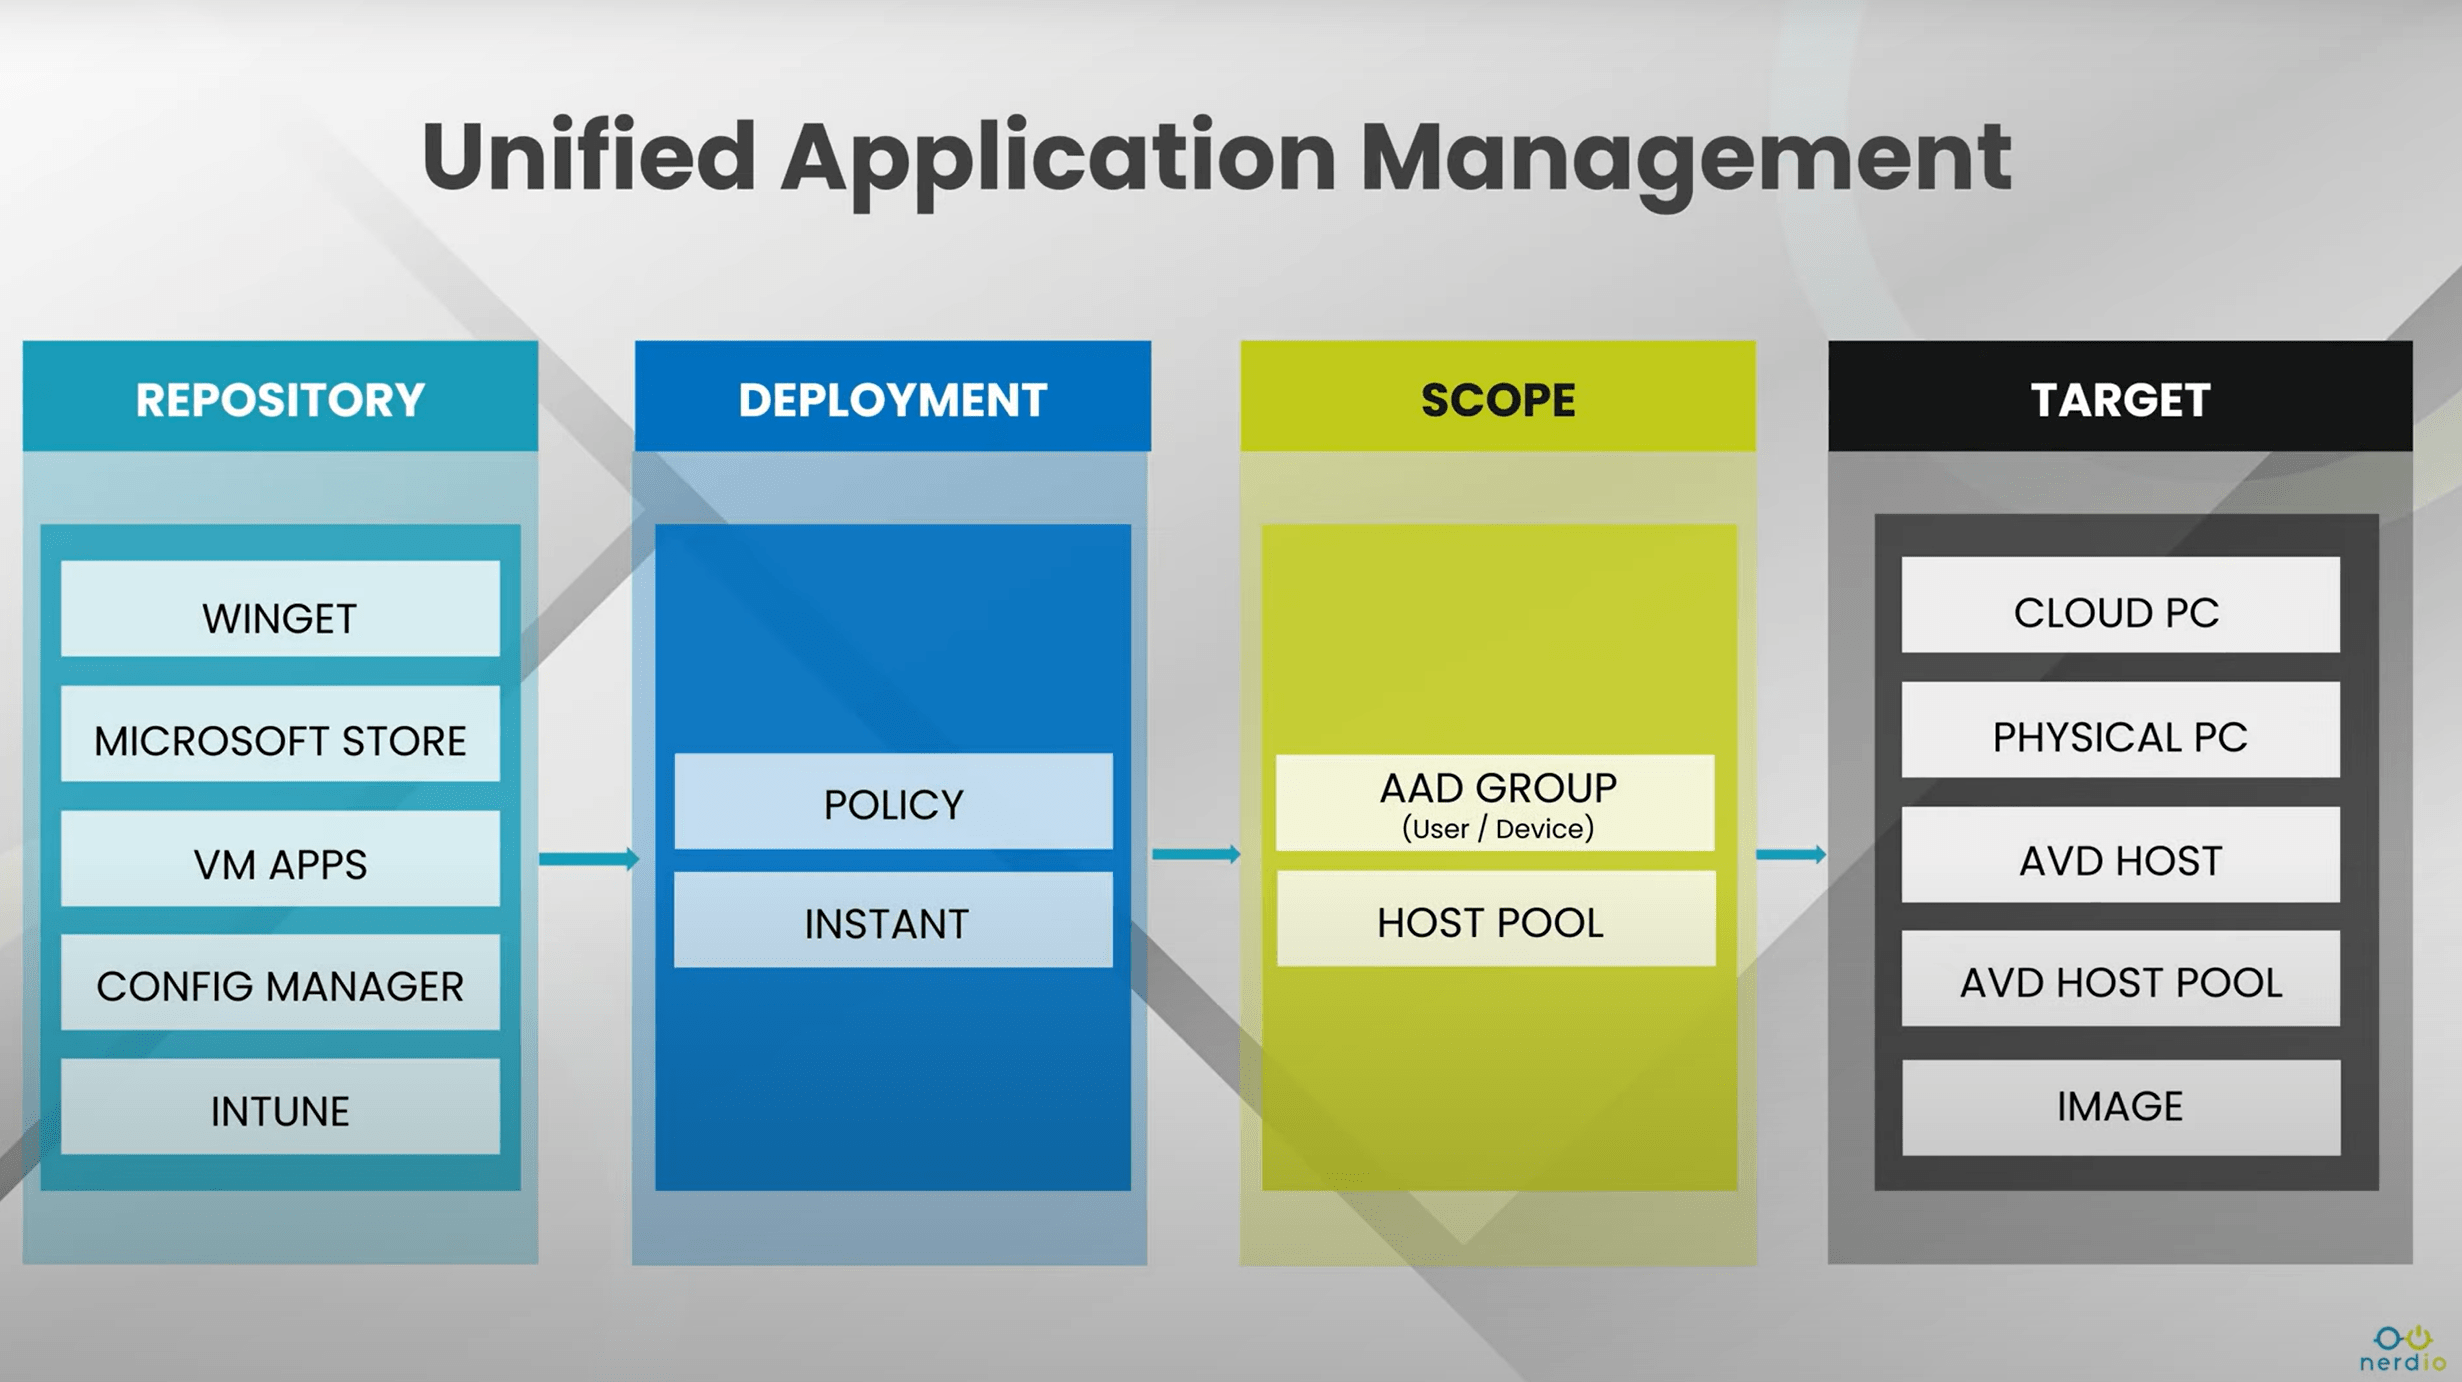
Last week I wrote an introduction into Unified Application Management which has been introduced in Nerdio Manager for Enterprise v5. This week I will continue with a second post where I will get into more details. I will show how to configure your own personal winget repo and of course how to install or uninstall apps.
My demo environment
My demo environment looks like this:
- Microsoft tenant with Nerdio Manager for Enterprise V5.0.2 (latest GA release at the time of writing)
- One personal desktop (AVD)
- A Windows 365 Enterprise Cloud PC
Exploring UAM and the Unified Catalog
Let’s have a look at UAM and the Unified Catalog. From the Nerdio Manager menu, go to Applications, Unified Catalog or Applications, Deployment policies.
Unified Catalog
The Unified Catalog contains all the applications in the repositories it has access to. By default it will have access to the public winget repository which means you can immediately start to search for an app. Let’s have a go with Winamp.
The search bar is pretty well thought out. You can select which repository you want to search (if you have multiple configured), the vendor and you can search for all apps or just your favorite apps. This last bit will come in handy if you are using UAM for a longer period of time.
The output of the search will show you the apps it found and from which repository.
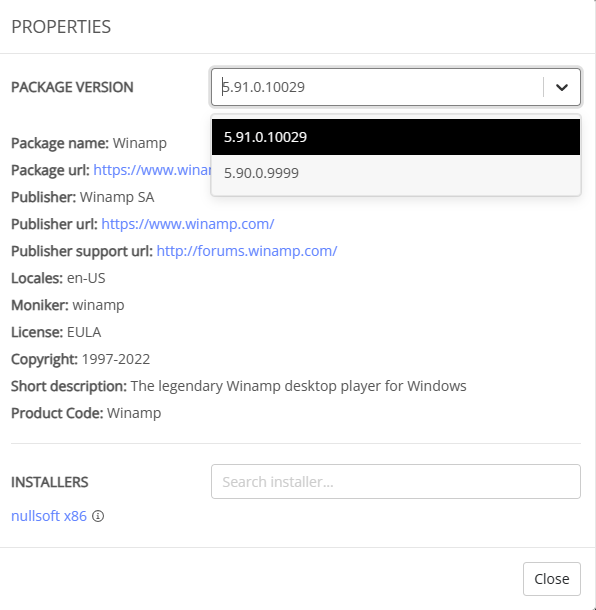
Just click on the name of the app to get more information. You can even see other versions of the app in the package version dropdown box.
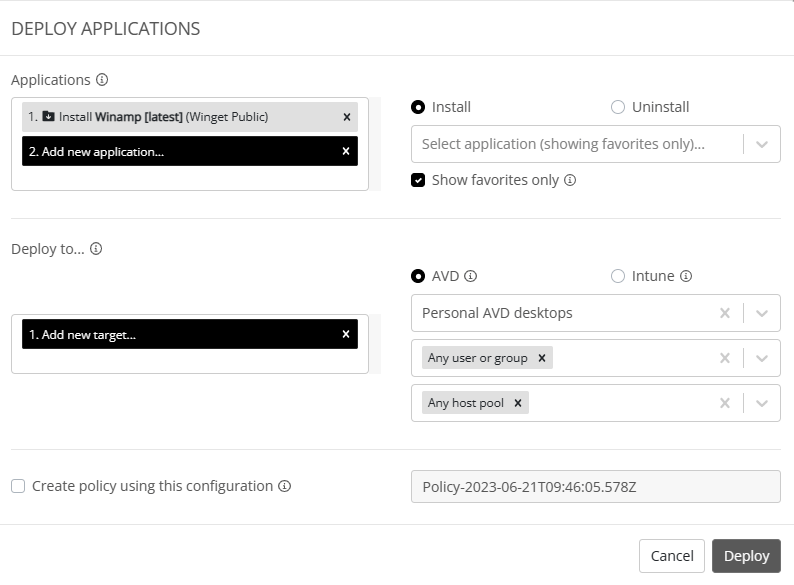
Looks great right! Let’s see if we can deploy the app to my Cloud PC. If you check two screenshots back, you can see we found Winamp and there’s a small deploy button on the right side. Click that button to start. NME will present you with the following window:
There is more to this window than you might think so let’s walk through this one together. Basically there are three parts;
Applications
Admins can group one or more apps together in this deployment. Winamp is already up there since we started from the UC and click the deploy button. You can specify to install or uninstall the app for each app in the list. You can use the search box to add more apps into the deployment. If you can’t find the app that you are looking for, make sure to uncheck the show favorites only box.
Deploy to…
This part will assign the policy that you are creating to a group of devices or users. And yes, you can select more than one group.
Select AVD to assign the deployment to an AVD host pool or select Intune to assign the deployment to physical devices or Windows 365 Cloud PC’s.
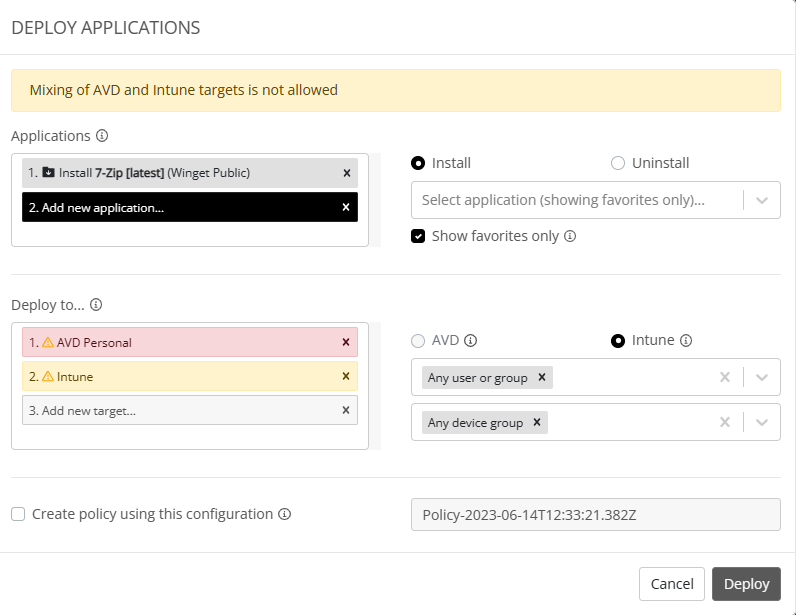
You cannot combine AVD and Intune. You can however create more deployment policies, one for AVD and one for Intune for instance.
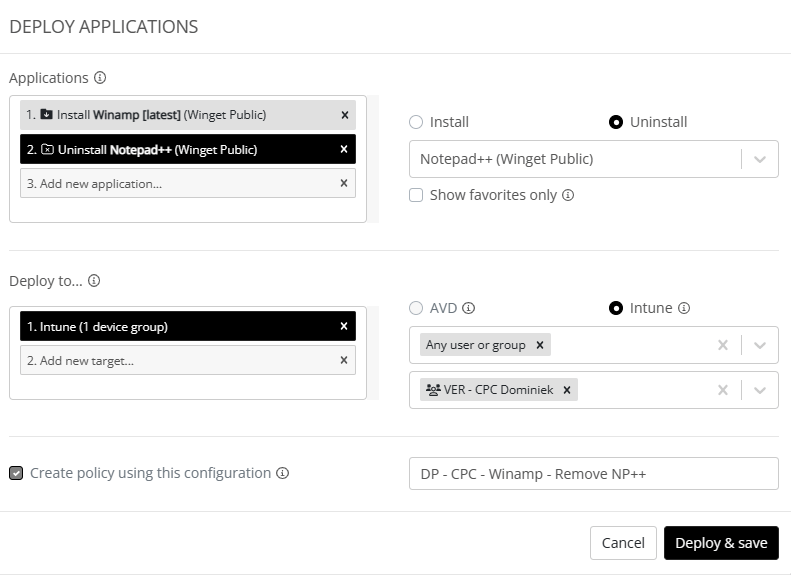
There’s a checkbox at the bottom which will convert this deployment to a policy which means it will run every 15 minutes. By checking this box you can enter your custom name. Here’s an example of a couple of options;
Deployment policies
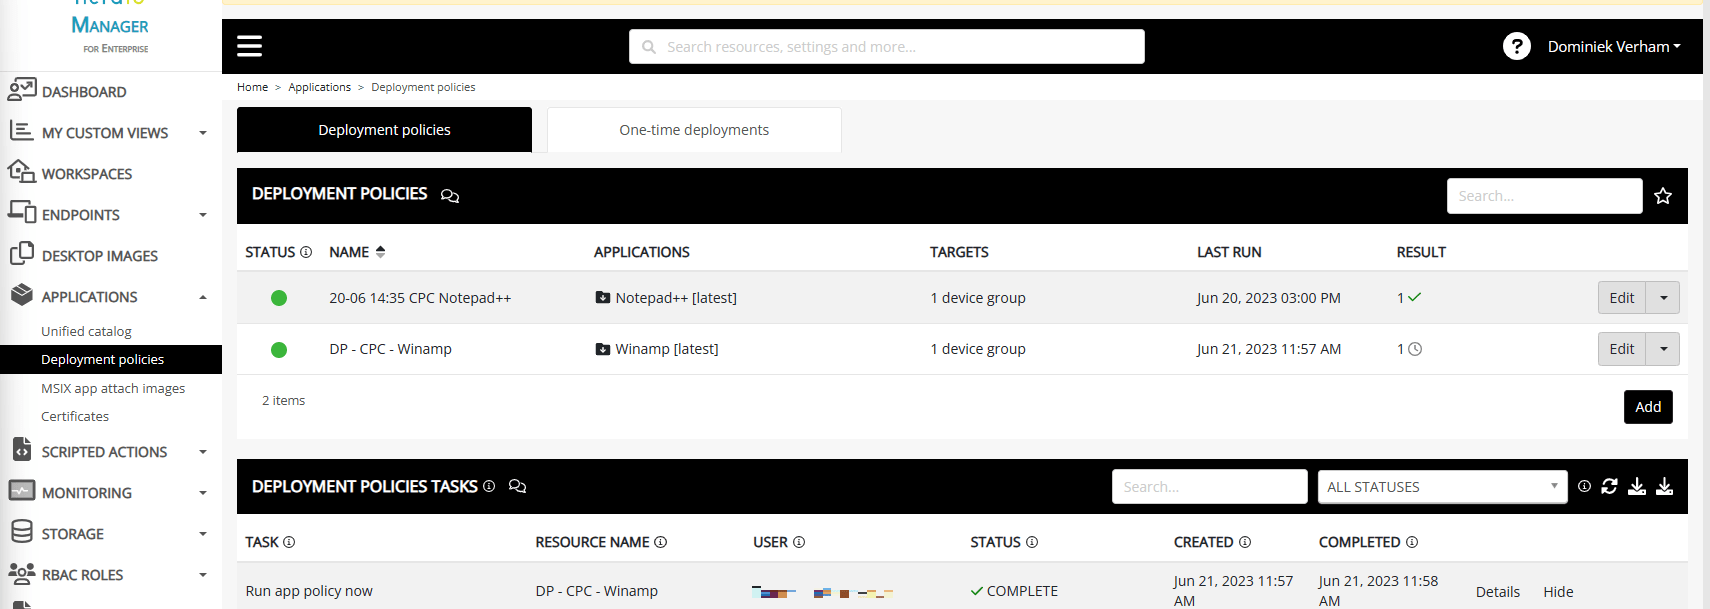
Let’s keep things simple for this demo. I’ve removed Notepad++ and created a deployment policy. Let’s go to Applications, Deployment policies.
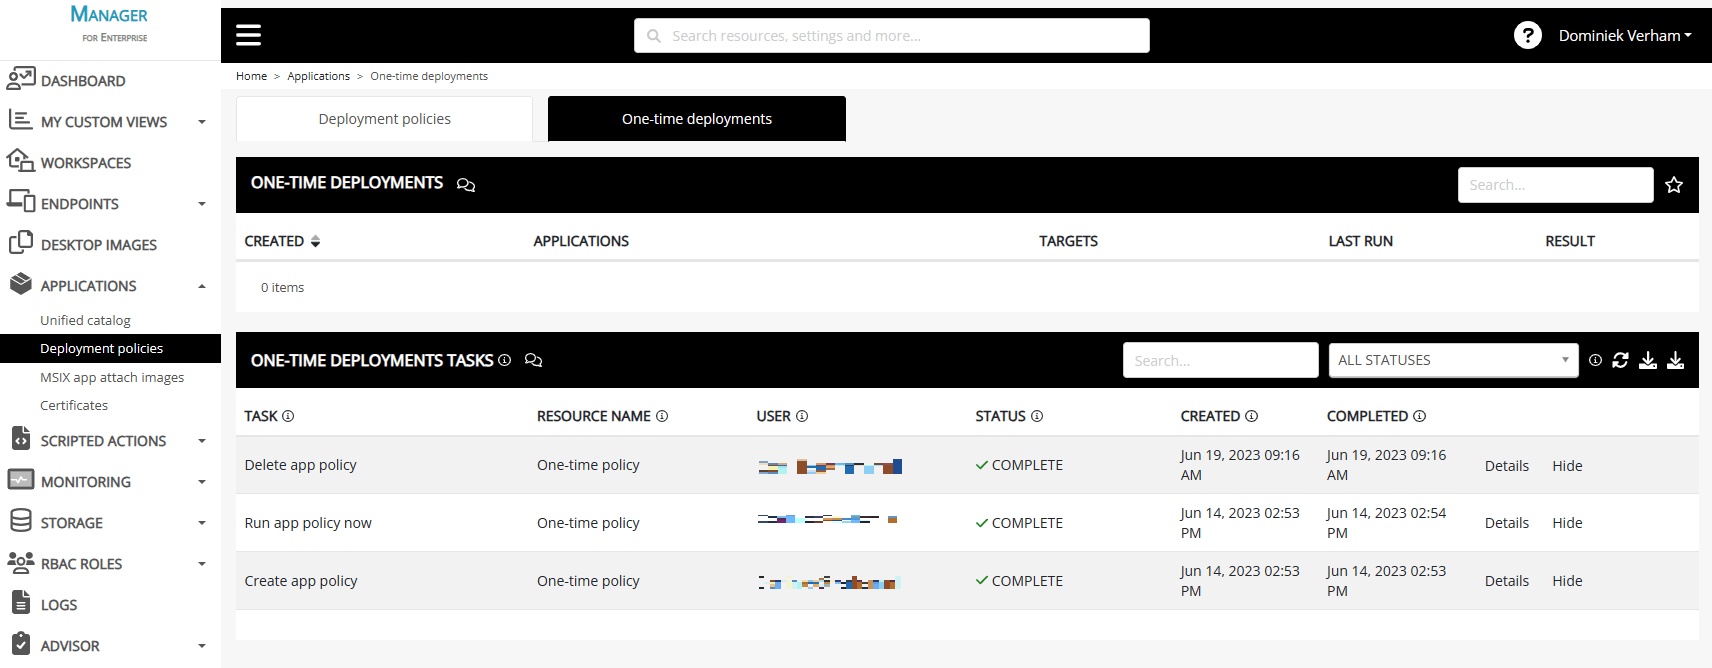
There are two buttons on top of this screen. You can select if you want to see the deployment policies or the one-time deployments. In my screenshot you can see the deployment policies that I’ve created. You can see the deployment policy that we just created to install Winamp.
We have some options on this screen. We can deactivate the policy, choose the run the policy now, get more details or delete the policy by clicking on the down arrow.
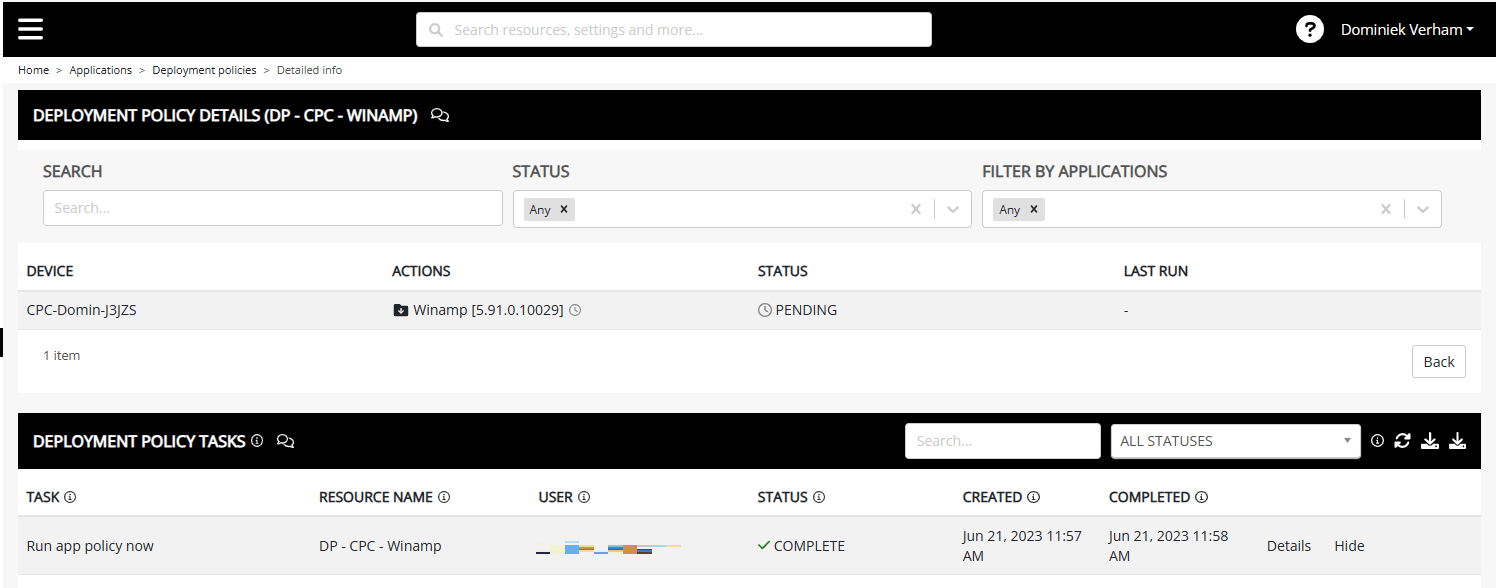
Click the Details… option or just click on the click symbol next the number of devices where this policies applies.
You can see if the installation completed or failed in the overview or the details screen. You’ll see a green check icon or a red cross.
That’s all about deployment policies. The one-time deployment are basically the same with the exception that they only run just one time. You can find the One-time deployments if you click one the corresponding button in the top.
A bit of troubleshooting
Let’s checkout some troubleshooting options. Remember that NME will not directly manage your endpoint, instead it utilizes Microsoft Intune to do so. So how do the legends at Nerdio get this to work?
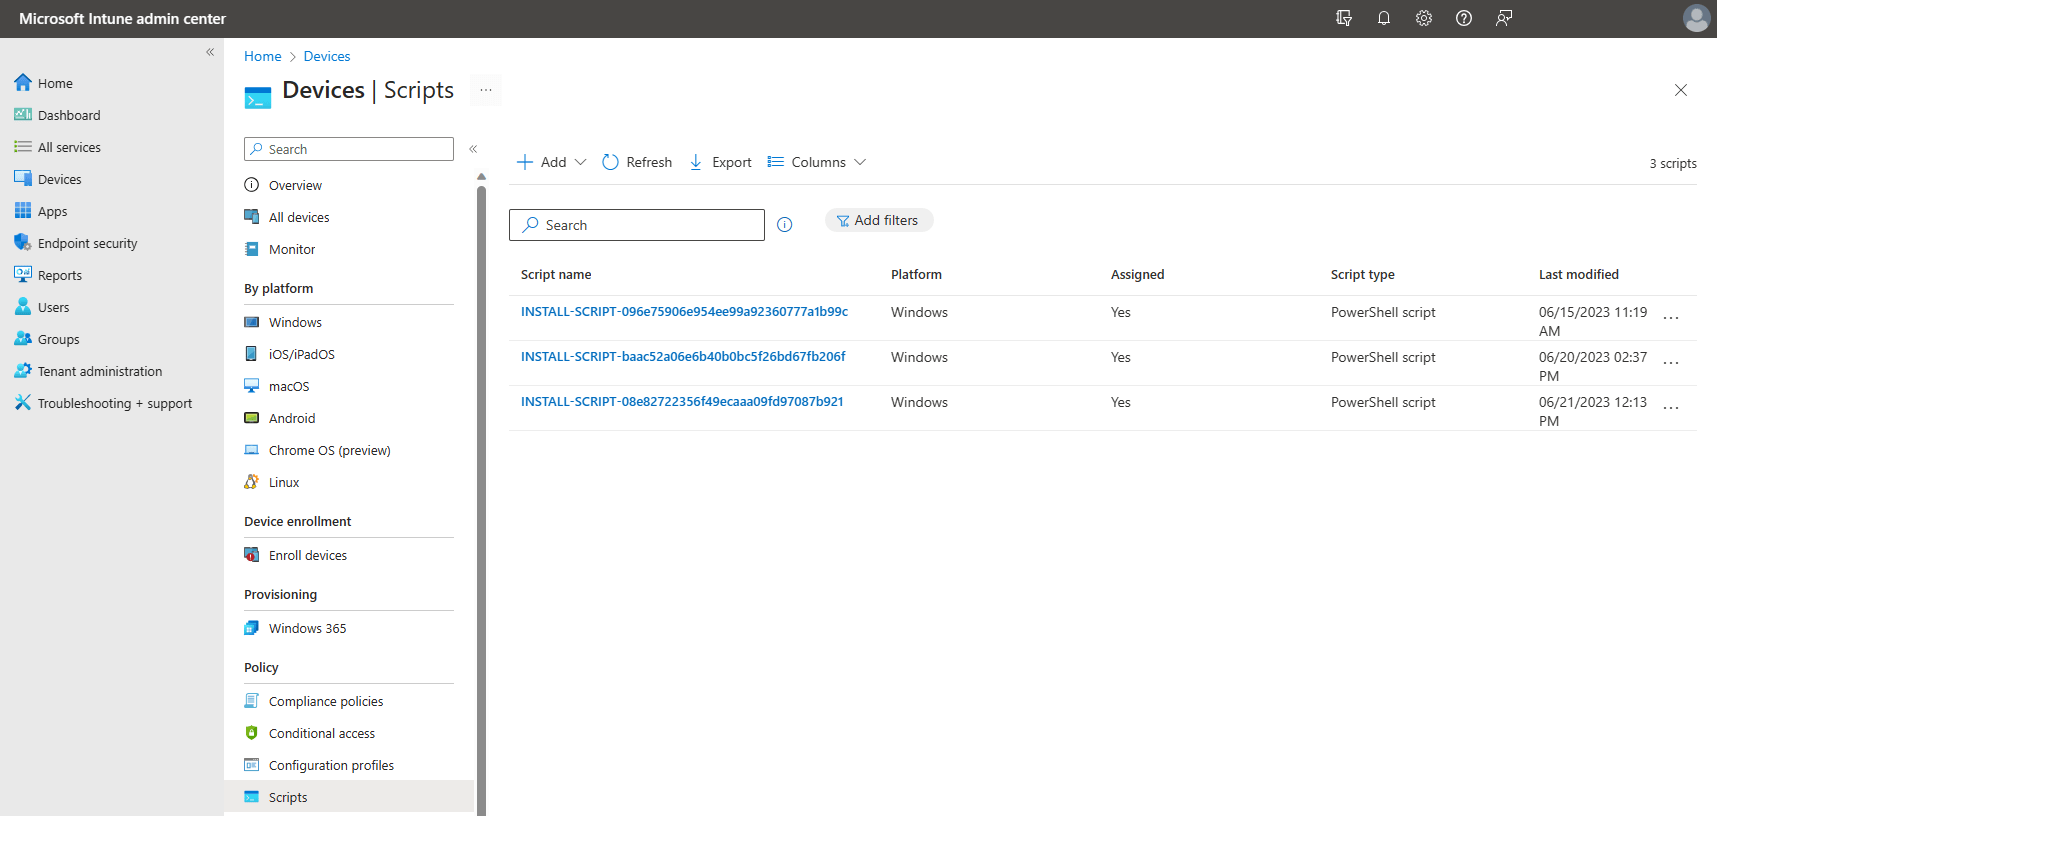
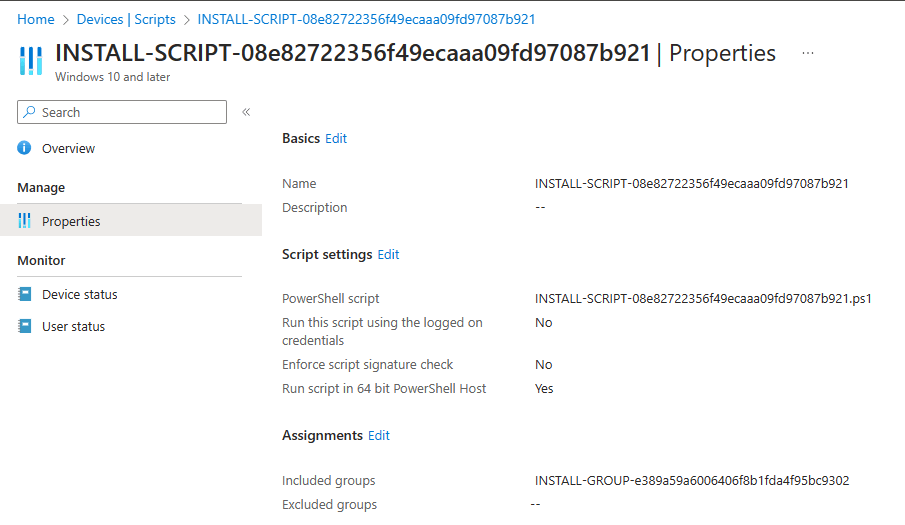
Well, they use a couple of things. Like a Powershell script for instance. Since we ran the policy, we should be able to see a Powershell script. Go to the Microsoft Intune admin center, Devices, Policy, Scripts.
We can see a couple of scripts exist. Let’s checkout the script ending with 21 and open the properties.
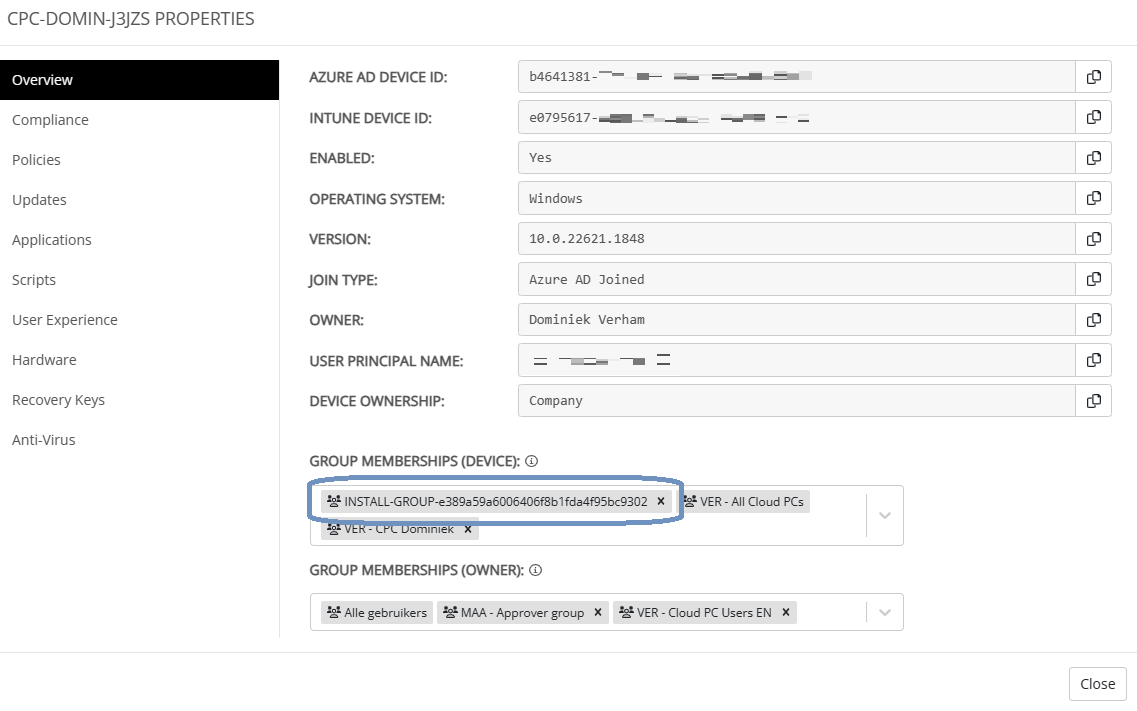
The script is assigned to a group ending with 02. Let’s find out if it contains my Cloud PC.
As we can see it does contain my Cloud PC. So all there’s left is for my Cloud PC to receive the Powershell script and install Winamp. We can either wait or just restart the Microsoft Intune Management Extension service on the endpoint.
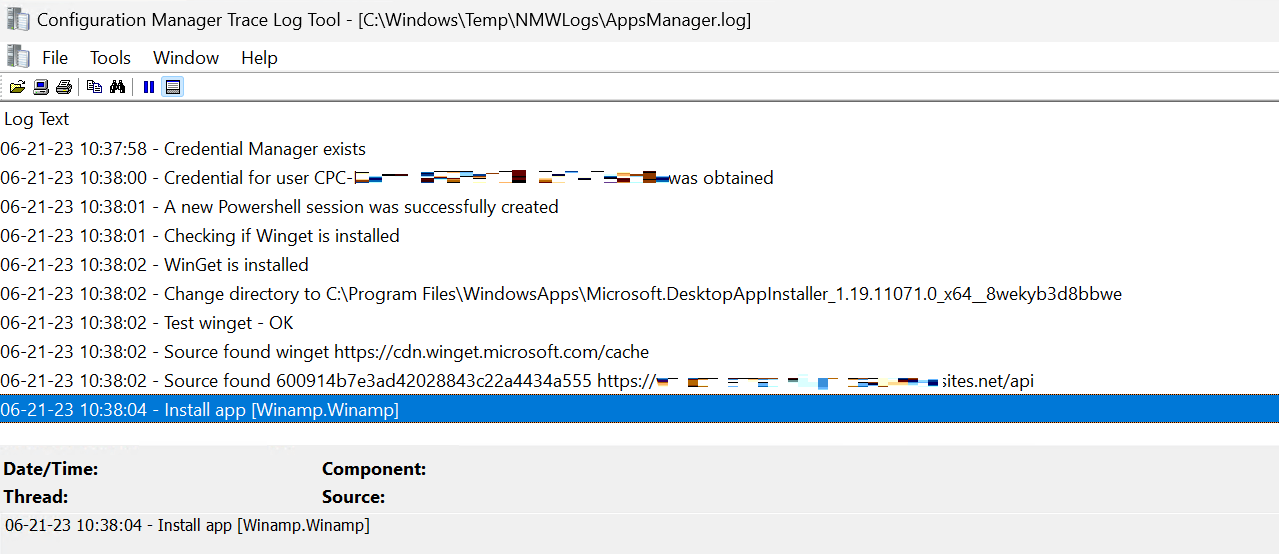
You can check a logfile on the endpoint to see what is happening. Just go to C:\Windows\Temp\NMWLogs and open AppsManager.log.
Another troubleshooting tip is that you can easily check in which step an error might occur. Is something wrong in NME or Microsoft Intune? Remember that NME will create (temporary) groups so go to Endpoints, All devices and click on the endpoint you are troubleshooting. The overview screen will show you the group memberships of the device:
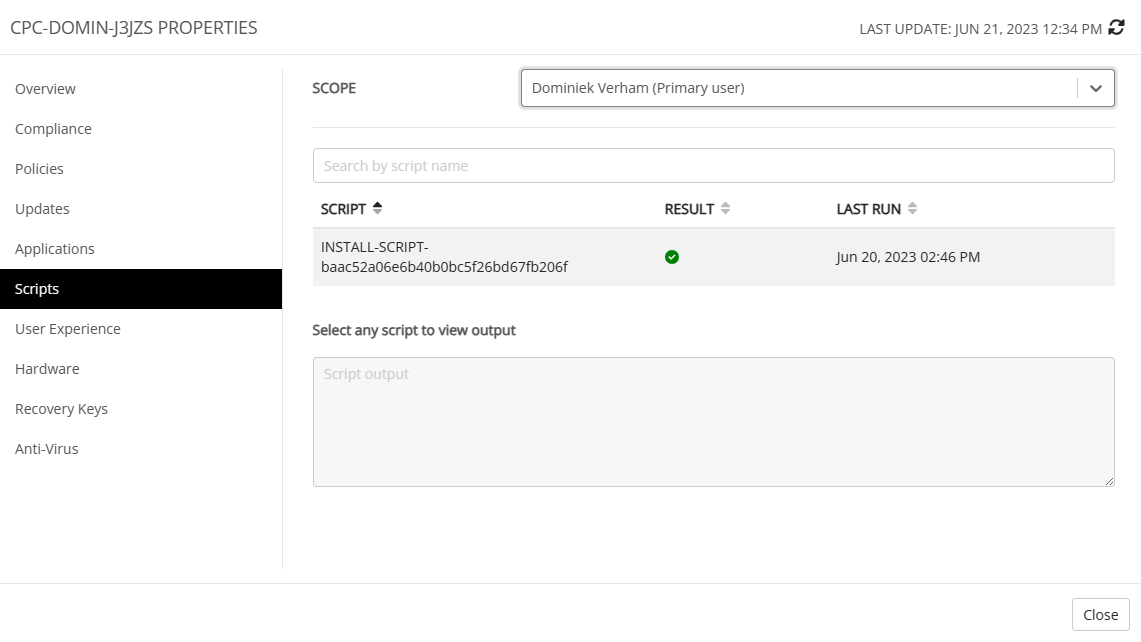
NME will also prepare some Powershell scripts. These should be visible in the Scripts tab.
Repositories
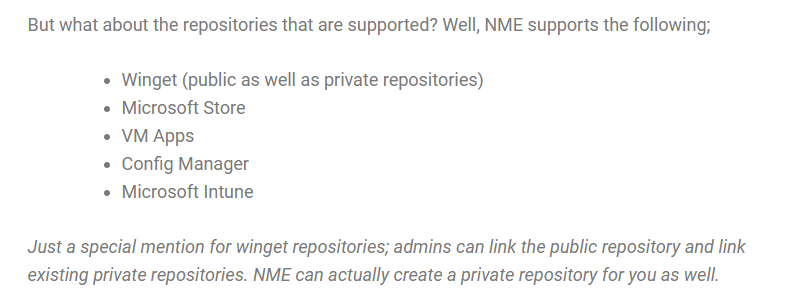
I wrote a short introduction in my previous post;
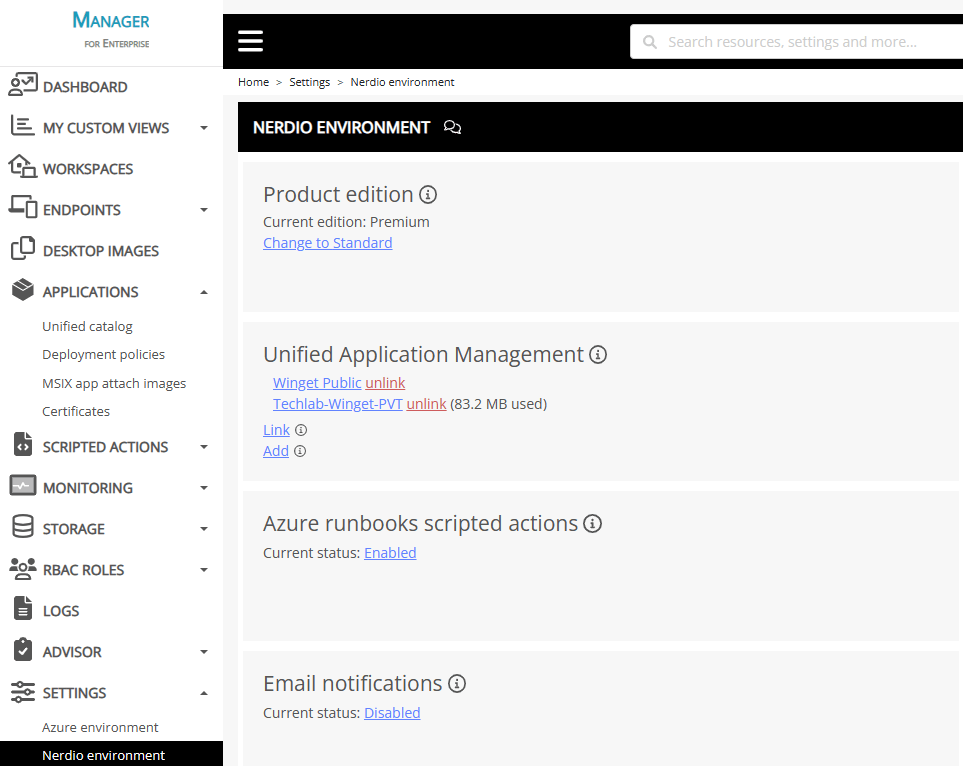
Yes, Nerdio Manager for Enterprise can create a private winget repository for you. Let’s have look on how that works. Go to Settings, Nerdio Environment. You can find a box titled Unified Application Management.
My NME instance has two repos. The public winget repo is added by default and I experimented a bit with creating a private winget repo.
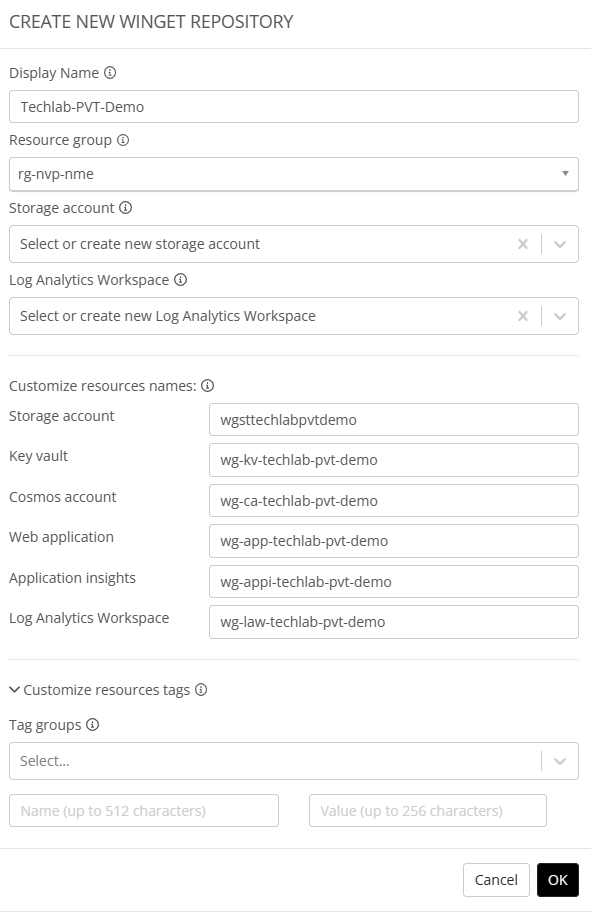
Admins can add their existing private winget repo or create a new one. Click the add button and you will get the following window:
Creating the repo is extemely simple as you only need to;
- Provide a display name and select a resource group.
- Select an existing storage account and LAW or let NME create one for you.
- Accept the default NME values for the resource names or change them if you like.
- Add some tags if you like.
- Click the button to create the private winget repo.
You might get the message that the provider Microsoft.DocumentDB is not registered.
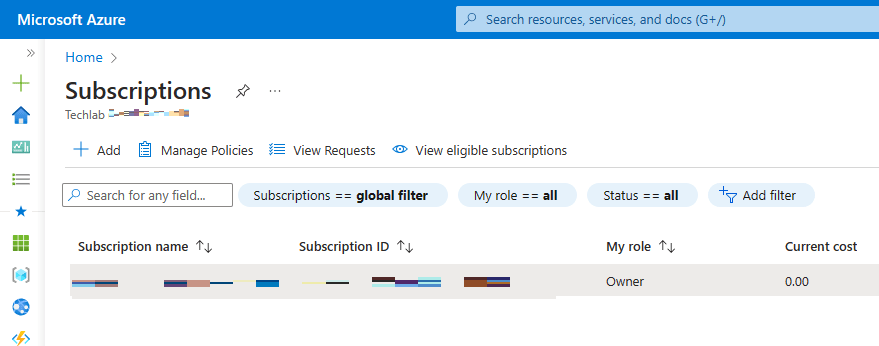
Let’s fix that! Don’t click away from NME or close the window or you will need to fill in the boxes at a later time. Instead open up a second tab and go the the Azure portal and search for subscriptions. Click on the subscription where NME resides.
From the subscription, go to Settings, Resource Providers and search for something like Microsoft.DocumentDB.
You can register the provider using the Register button in the ribbon. It’s already registered in my subscription since I tested before.
Just give it some time to register and then head back to NME. You can now create the private winget repo and it will popup in the Unified Application Management box.
Importing your own apps
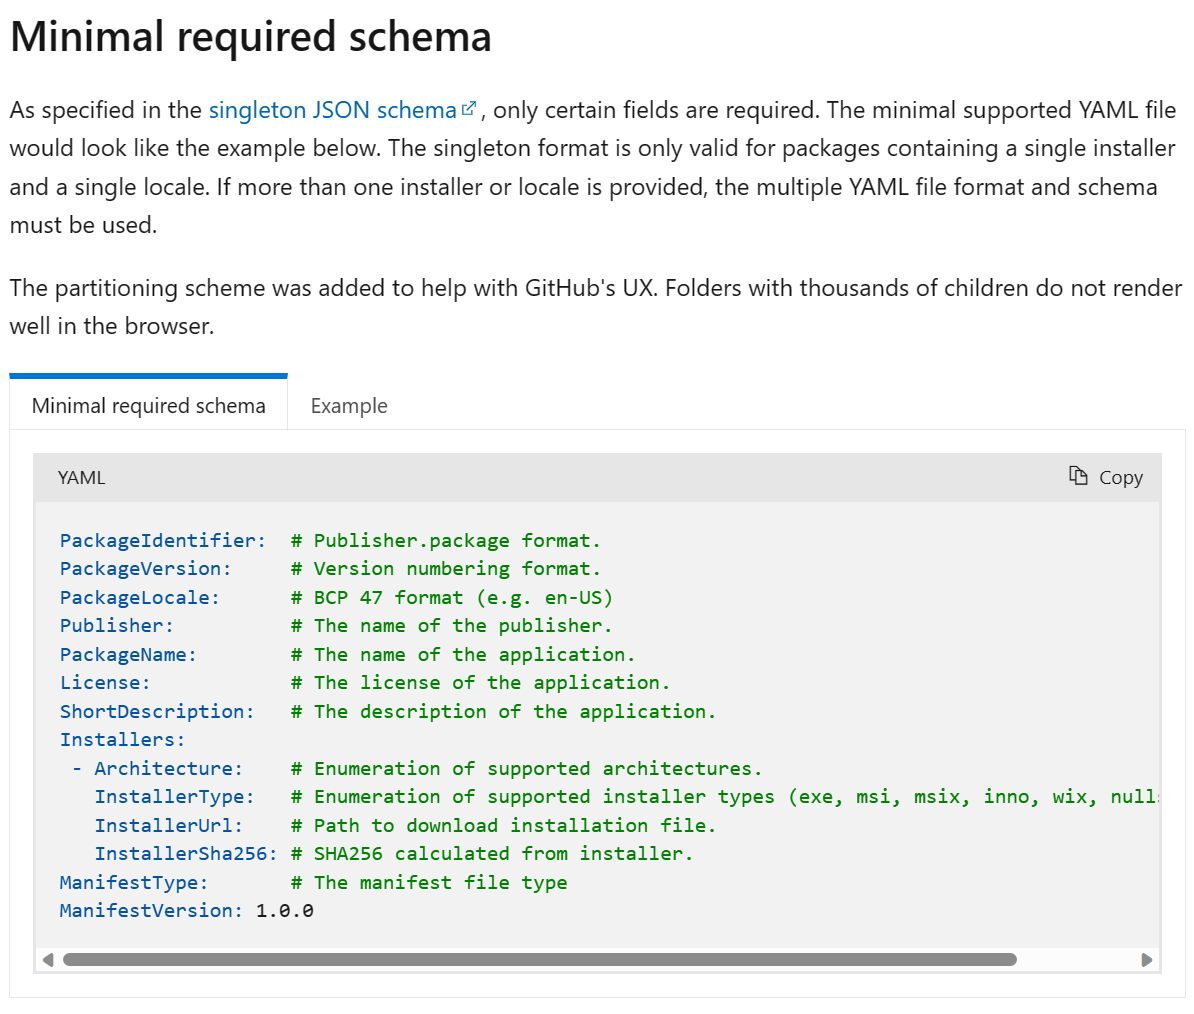
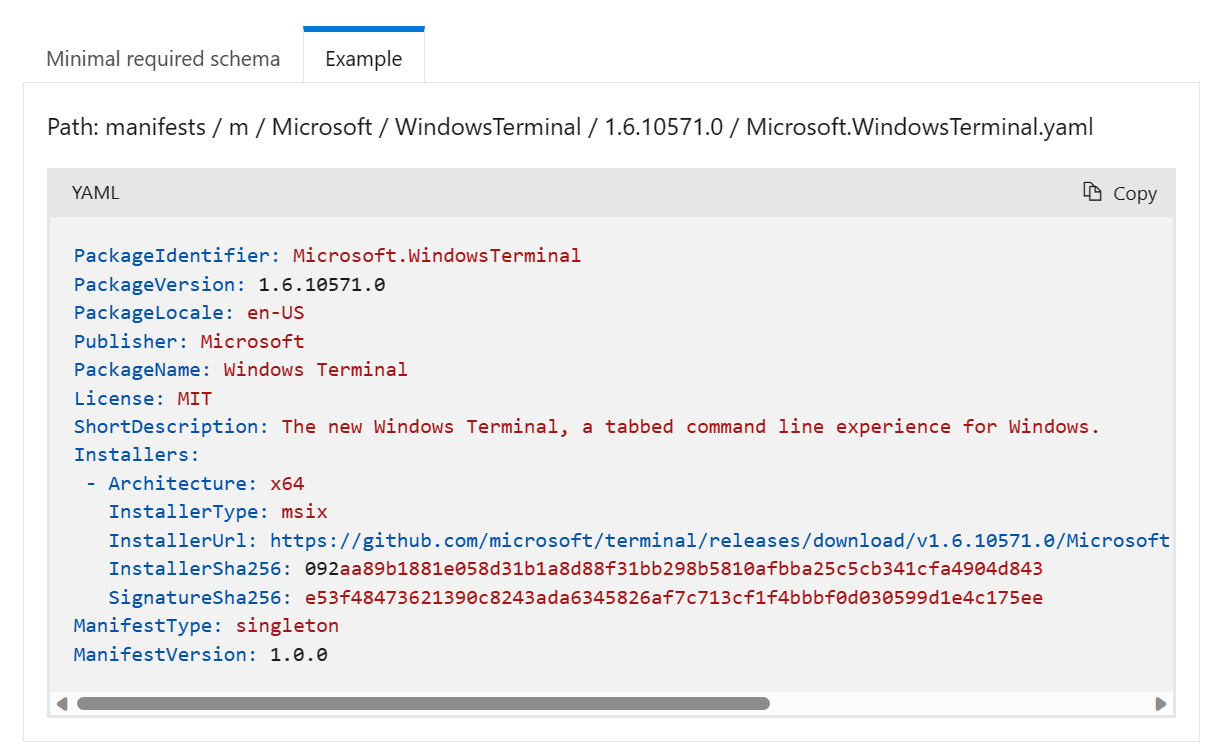
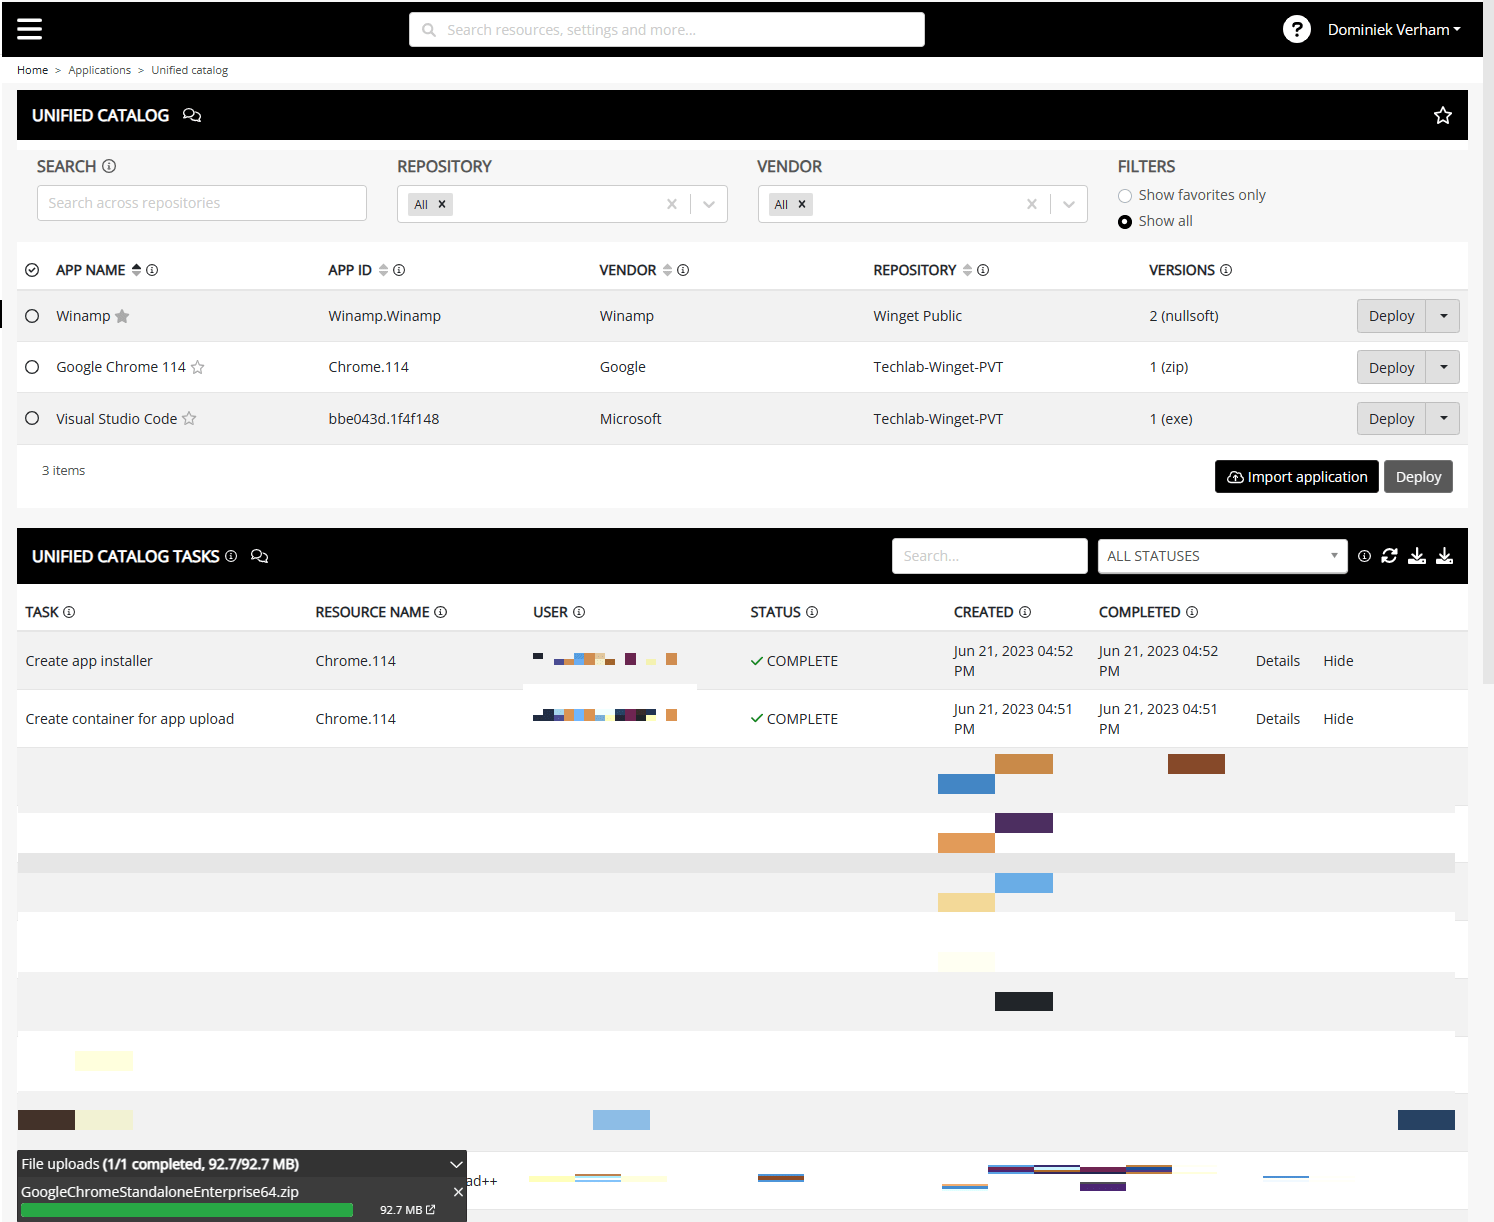
You probably noticed the Import application button in the Unified Catalog. This button will help you to create and upload your own package into your private winget repository. While doing so you have to provide a couple of details that winget packages require. You can find more information here.
Microsoft provided us with an example:
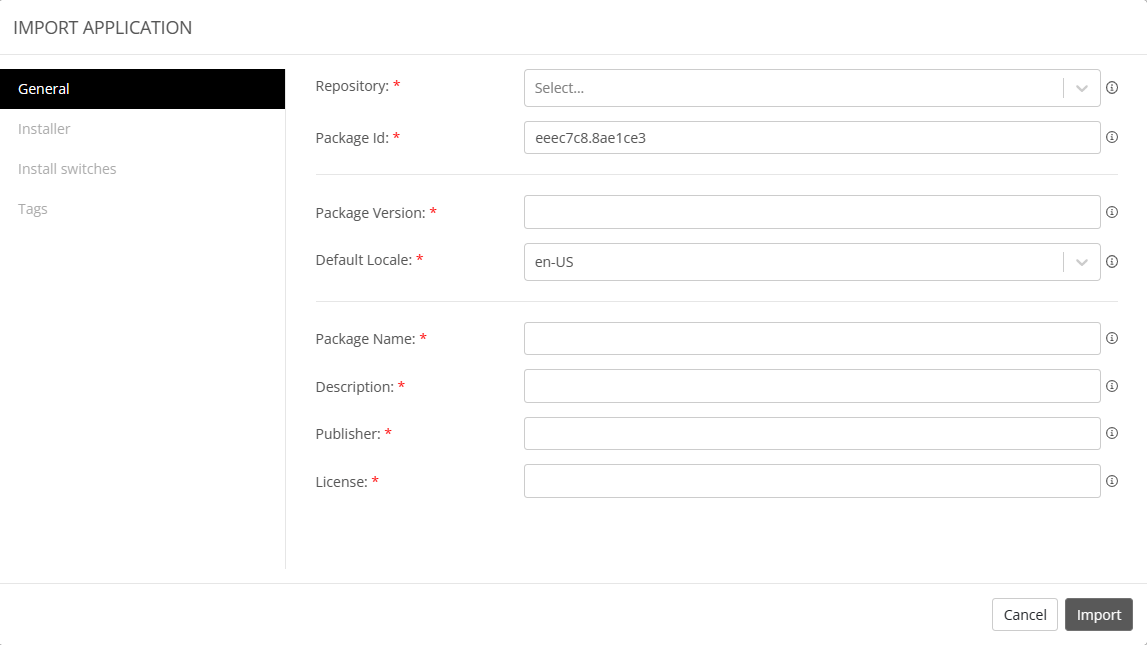
We should see the same kind of values during the import process of Nerdio. Let’s get to it! The import application screen looks like this:
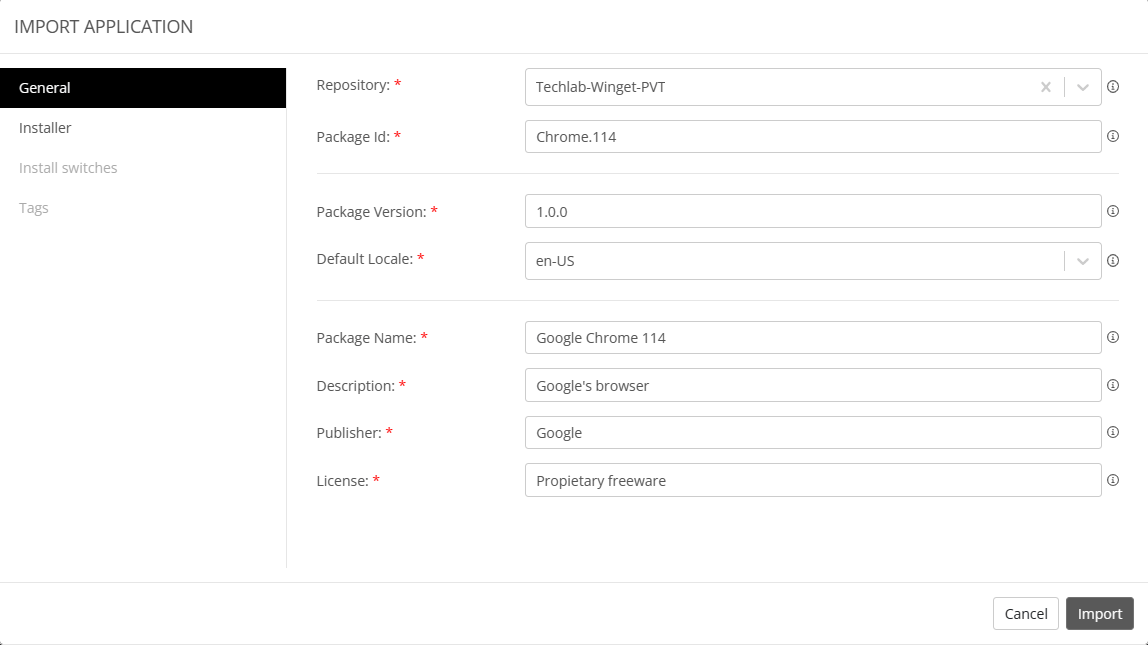
The goal here is to select your private winget repo and fill in the blanks. If you have any doubt on how to fill in the values, just have a look at the Microsoft example. I found it pretty helpful and I ended up with something like this:
The import button looks enabled, but it really is disabled until you filled in the required fields on the other menu items. So at this point you have to click on Installer to continue.
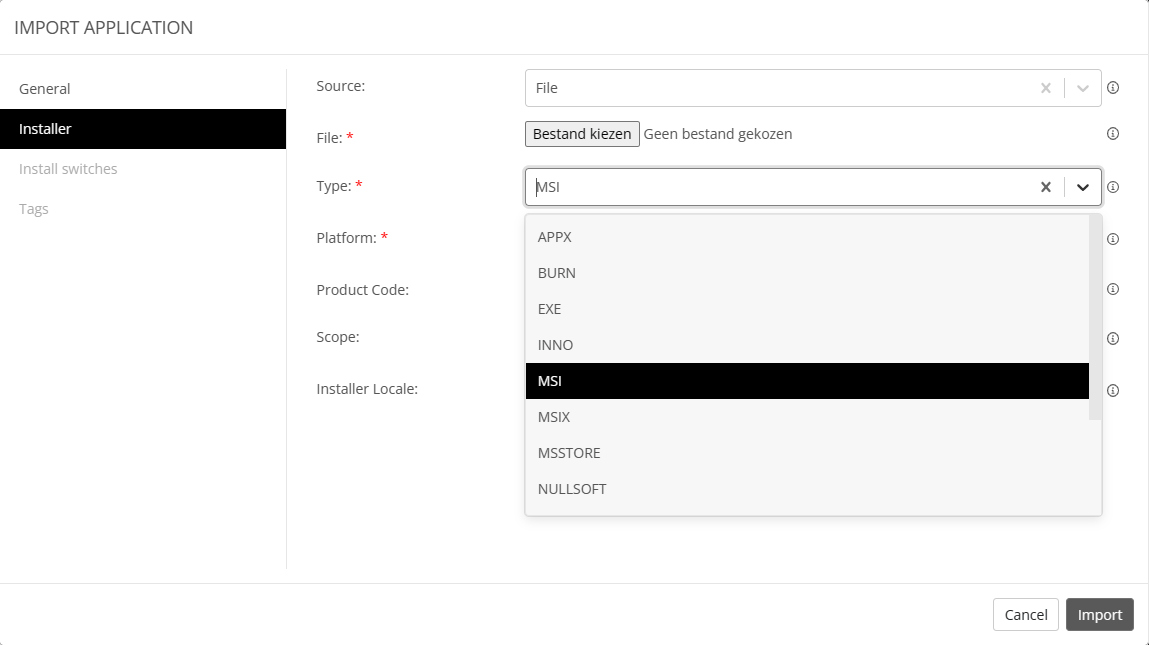
I clicked on the Type dropdown box to give you an idea of the types of installers you can provide.
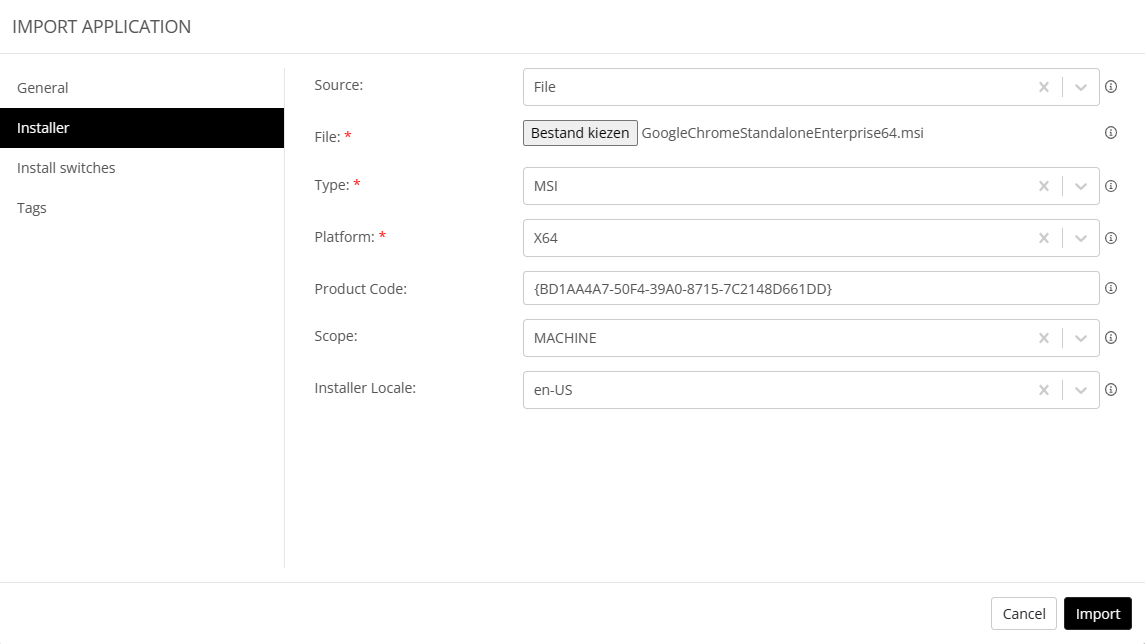
Click the button to upload the .MSI file and select MSI as the type and x64 as the platform.
Should you use a .zip file then you’ll get an extra property which is called relative file path. This is the path within the zip archive where the installer is located. I won’t see this property since I’m using a .msi file and not a .zip file.
The portable command alias is not applicable here.
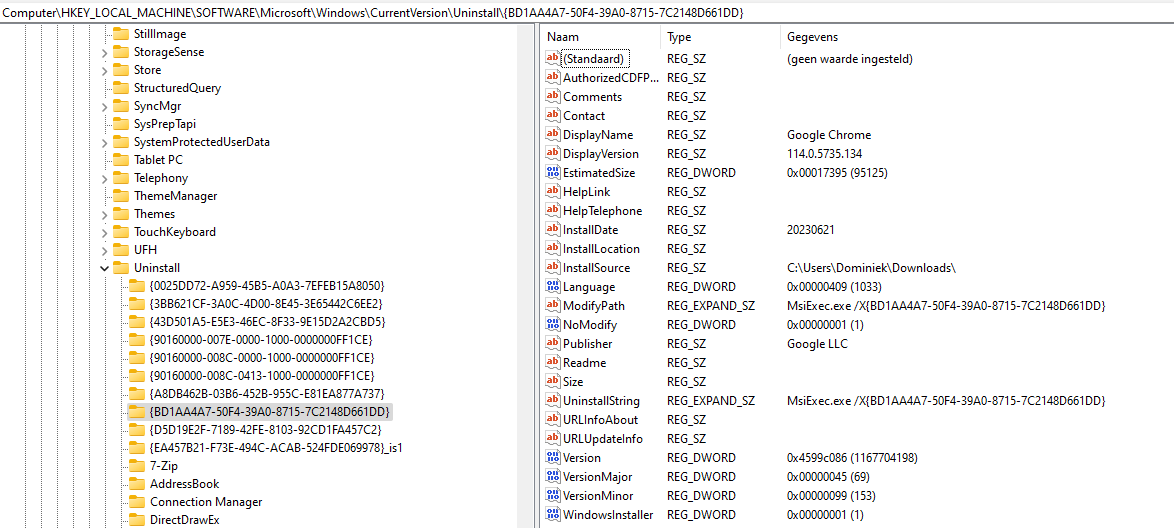
The product code is optional but still fun to dig up and fill in. It’s pretty easy to find using the registry or Powershell. Just install the app in a demo VM of your choice and check the registry or use one of the many Powershell scripts out there to locate the product code.
I ended up with something like this once everything was filled in:
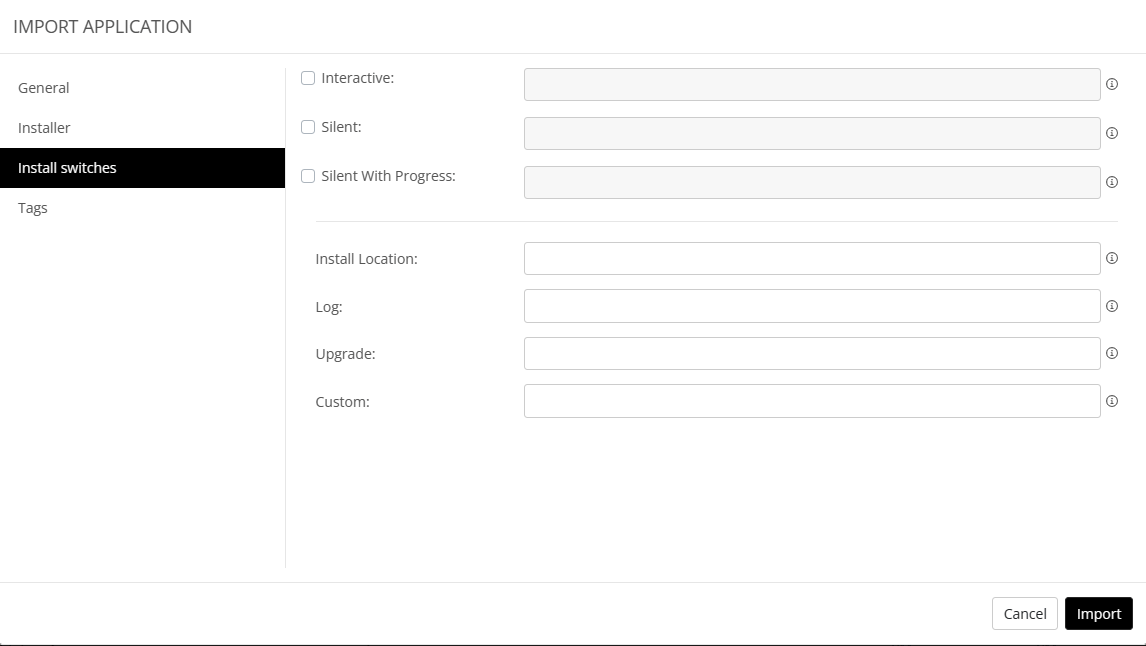
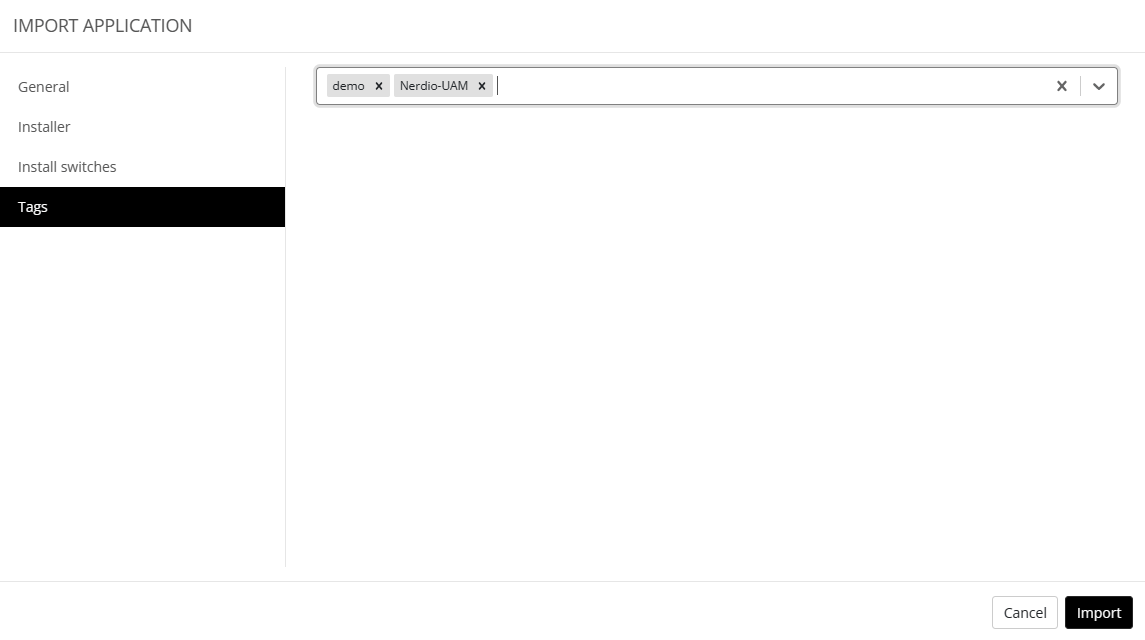
On to the third step; Install switches. These are optional and I think more applicable to .exe’s. So I will leave this empty and proceed to the fourth and final step; tags!
And finally the Tags step:
It feels like there is a summery screen missing here but I would highly recommend to take a minute to admire your awesome work and click that Import button! Now it’s just a case of giving NME time to do it’s magic. As always you’ll have a task in the Unified Catalog Tasks screen and you’ll see a message in the bottom that shows the upload progress. You’ll end up with something like this (I’ve blurred the unimportant bits);
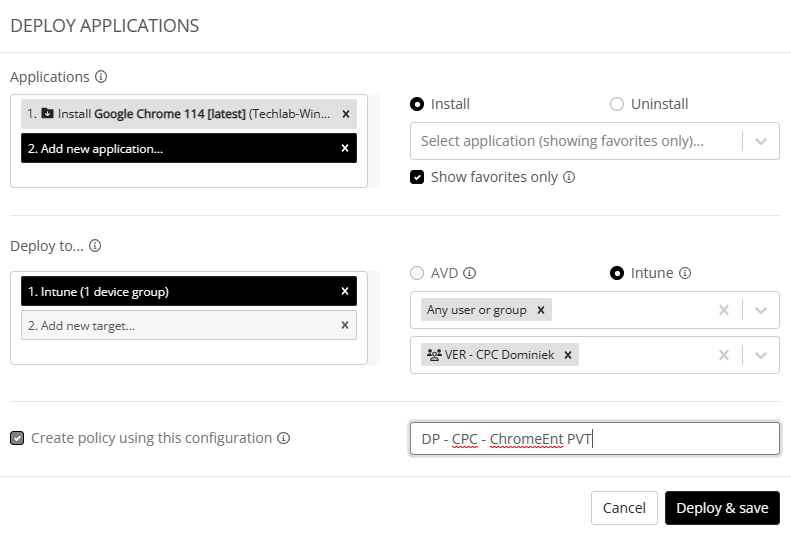
Let’s see if we can deploy the Chrome browser to our Cloud PC. I won’t repeat all the steps because these have been covered earlier in this post. But here’s what I ended up with;
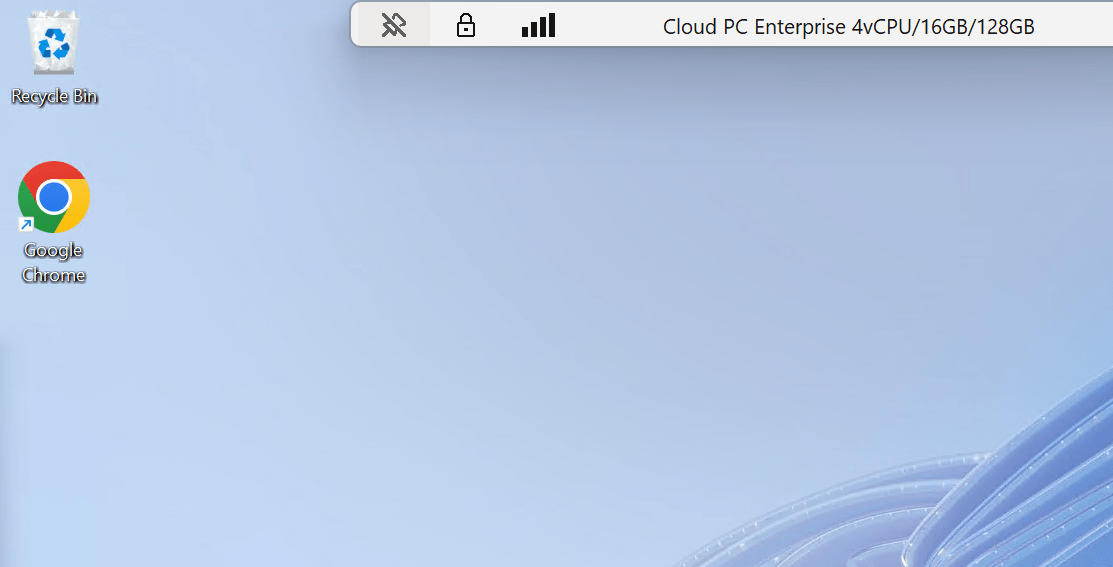
Give NME and Microsoft Intune a bit of time or sync the endpoint with Intune to speed things up.
Things are looking good in my demo environment.
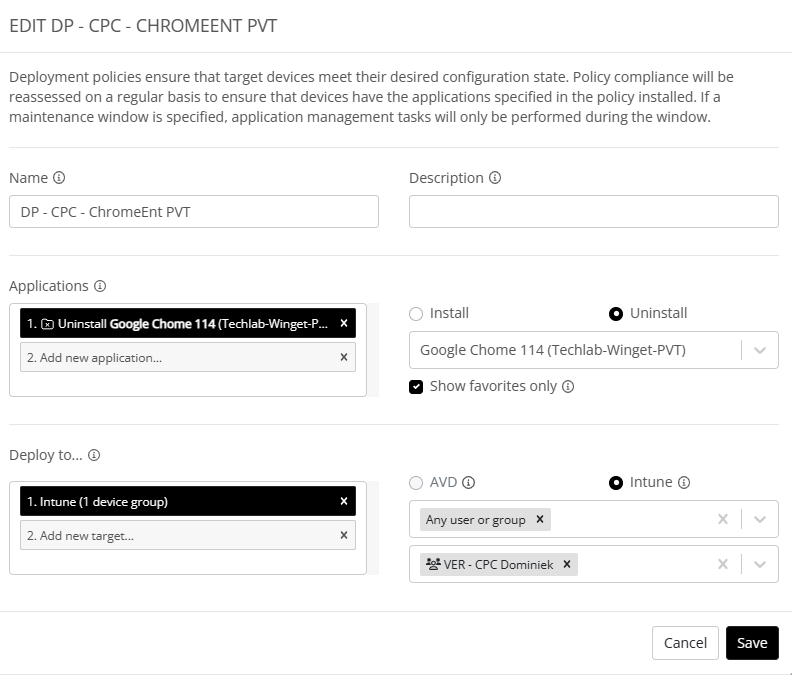
But what if you want to uninstall the app on your endpoint? Well, just switch the install mode to uninstall in the deployment policy and click the save button;
That wraps up the deepdive into Nerdio’s Unified Application Management feature. Personally I love the feature but I would definitely recommend to play around with it if you are looking to implement it in your environment. I hope my experiences with UAM help you to get a better understanding on how things work. Happy deploying!
Resources
I used the following resources for this post:
Introducing Unified Application Management by Nerdio – techlab.blog
Winget – Minimal required schema
Release Notes – Nerdio Manager for Enterprise
https://nmw.zendesk.com/hc/en-us/articles/360045731614-Release-Notes
Share this:
- Click to share on LinkedIn (Opens in new window) LinkedIn
- Click to share on X (Opens in new window) X
- Click to share on Facebook (Opens in new window) Facebook
- Click to share on WhatsApp (Opens in new window) WhatsApp
- Click to share on Telegram (Opens in new window) Telegram
- Click to print (Opens in new window) Print


