What’s up, everyone!
If you are using Azure Virtual Desktop then you probably have a ritual in place that helps you update and manage your image. There are a couple of ways to do so and this week I will take a look a really cool one; custom image templates. Custom image templates basically allow admins to define a template on how a custom image should look like. Once completed, admins can submit the template to the Azure Image Builder service which in turn will actually build the image as specified in the template. I’m really looking forward to get hands-on with this feature! Let’s get to it!
Prerequisites
The following are prerequisites if you want to follow along:
- A valid Azure subscription
- The following resource providers need to be registered on your subscription:
- Microsoft.DesktopVirtualization
- Microsoft.VirtualMachineImages
- Microsoft.Storage
- Microsoft.Compute
- Microsoft.Network
- Microsoft.KeyVault
- A resource group to store custom image templates and images
- A user-managed identity
- Create a custom role
- Assign the custom role to the managed identity
Creating a custom image template - Part 1
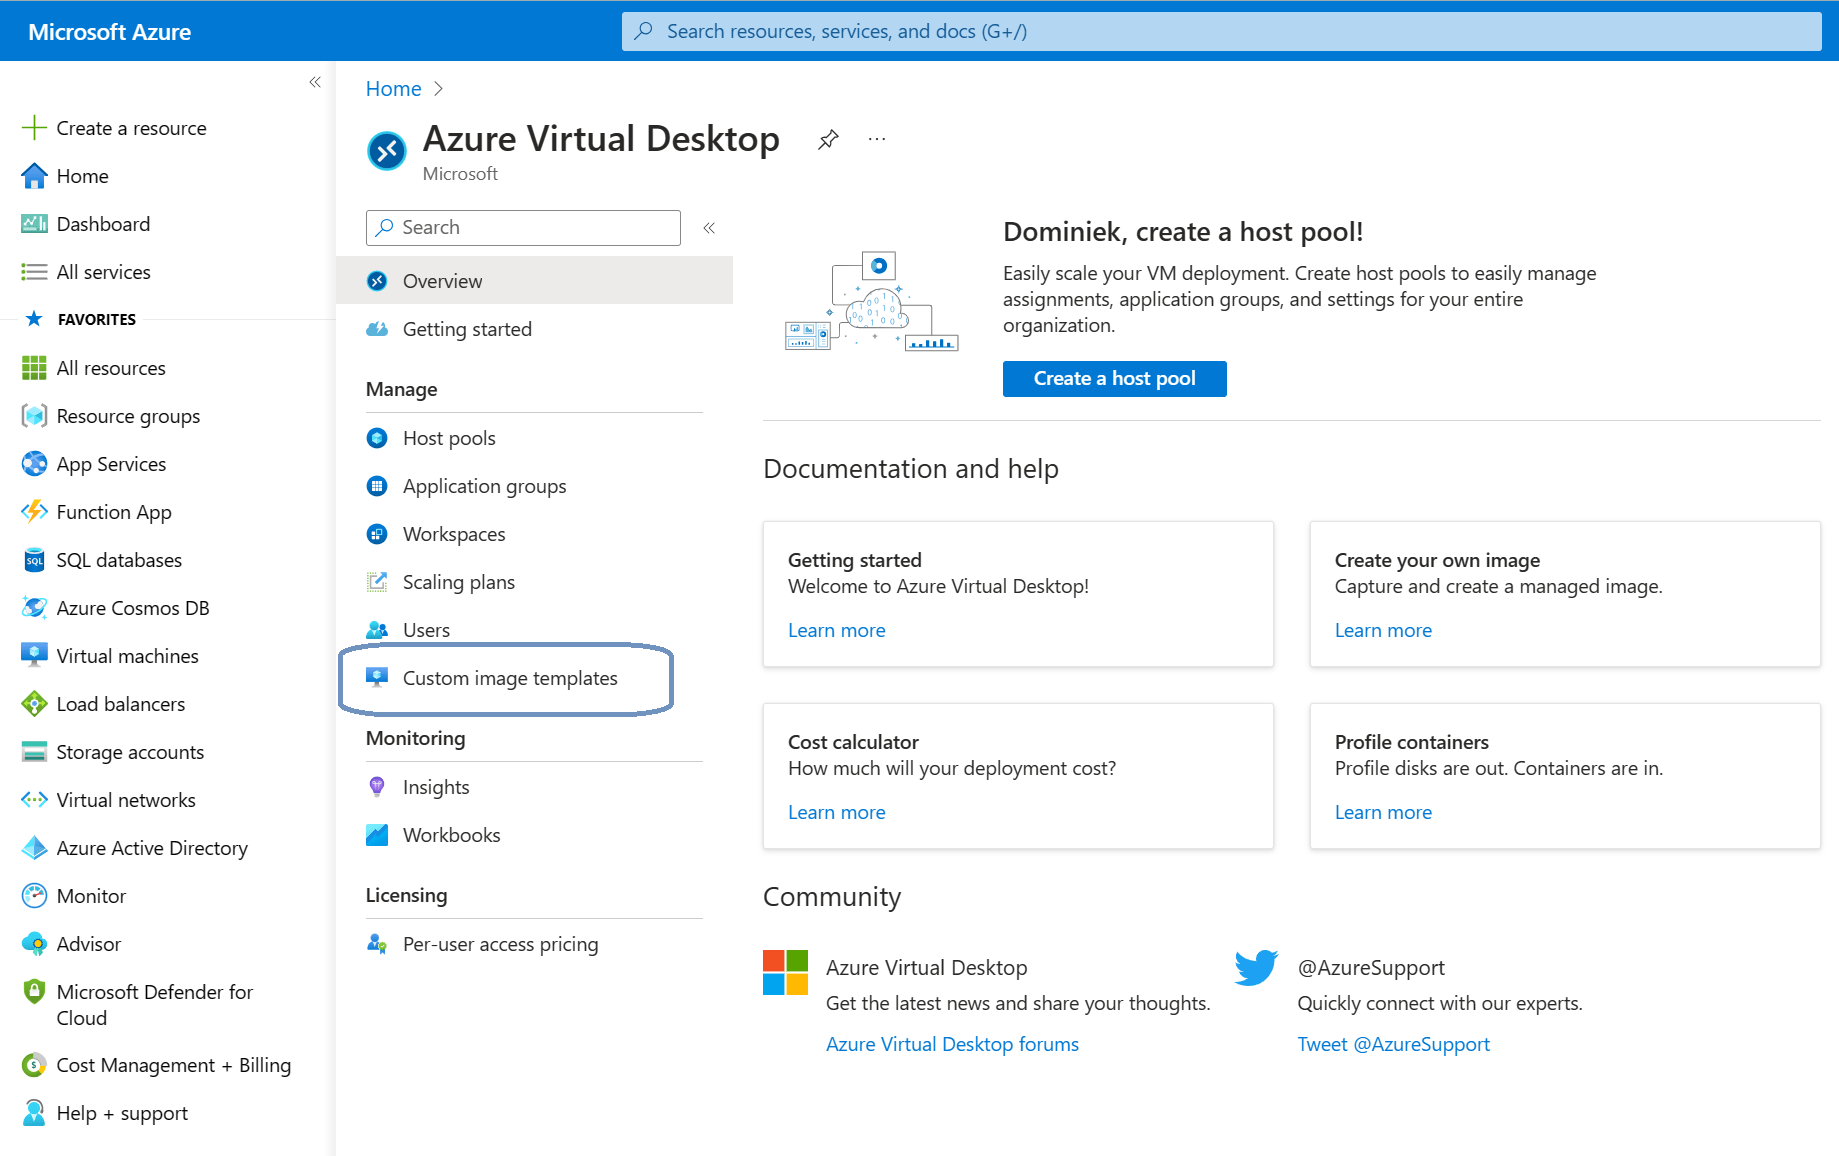
Sign in to the Azure portal and search for Azure Virtual Desktop, Manage, Custom image templates.
In this blade we can create, edit or delete custom image templates and we can submit our template to Azure Image Builder if we want to actually create an image.
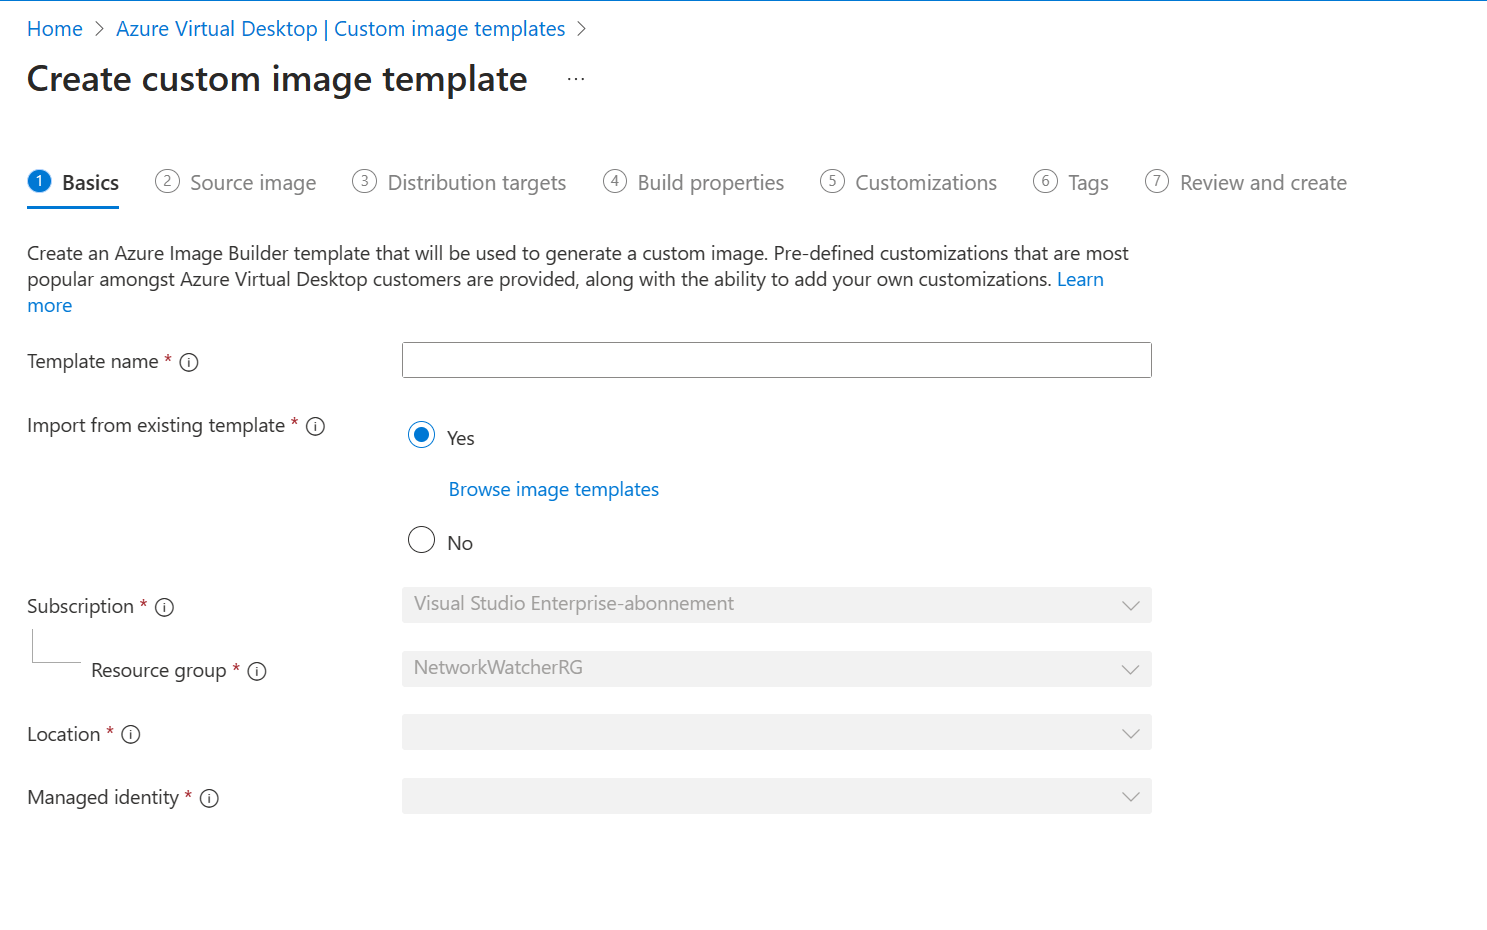
Let’s create our first custom image template and click on the + Add custom image template button in the ribbon.
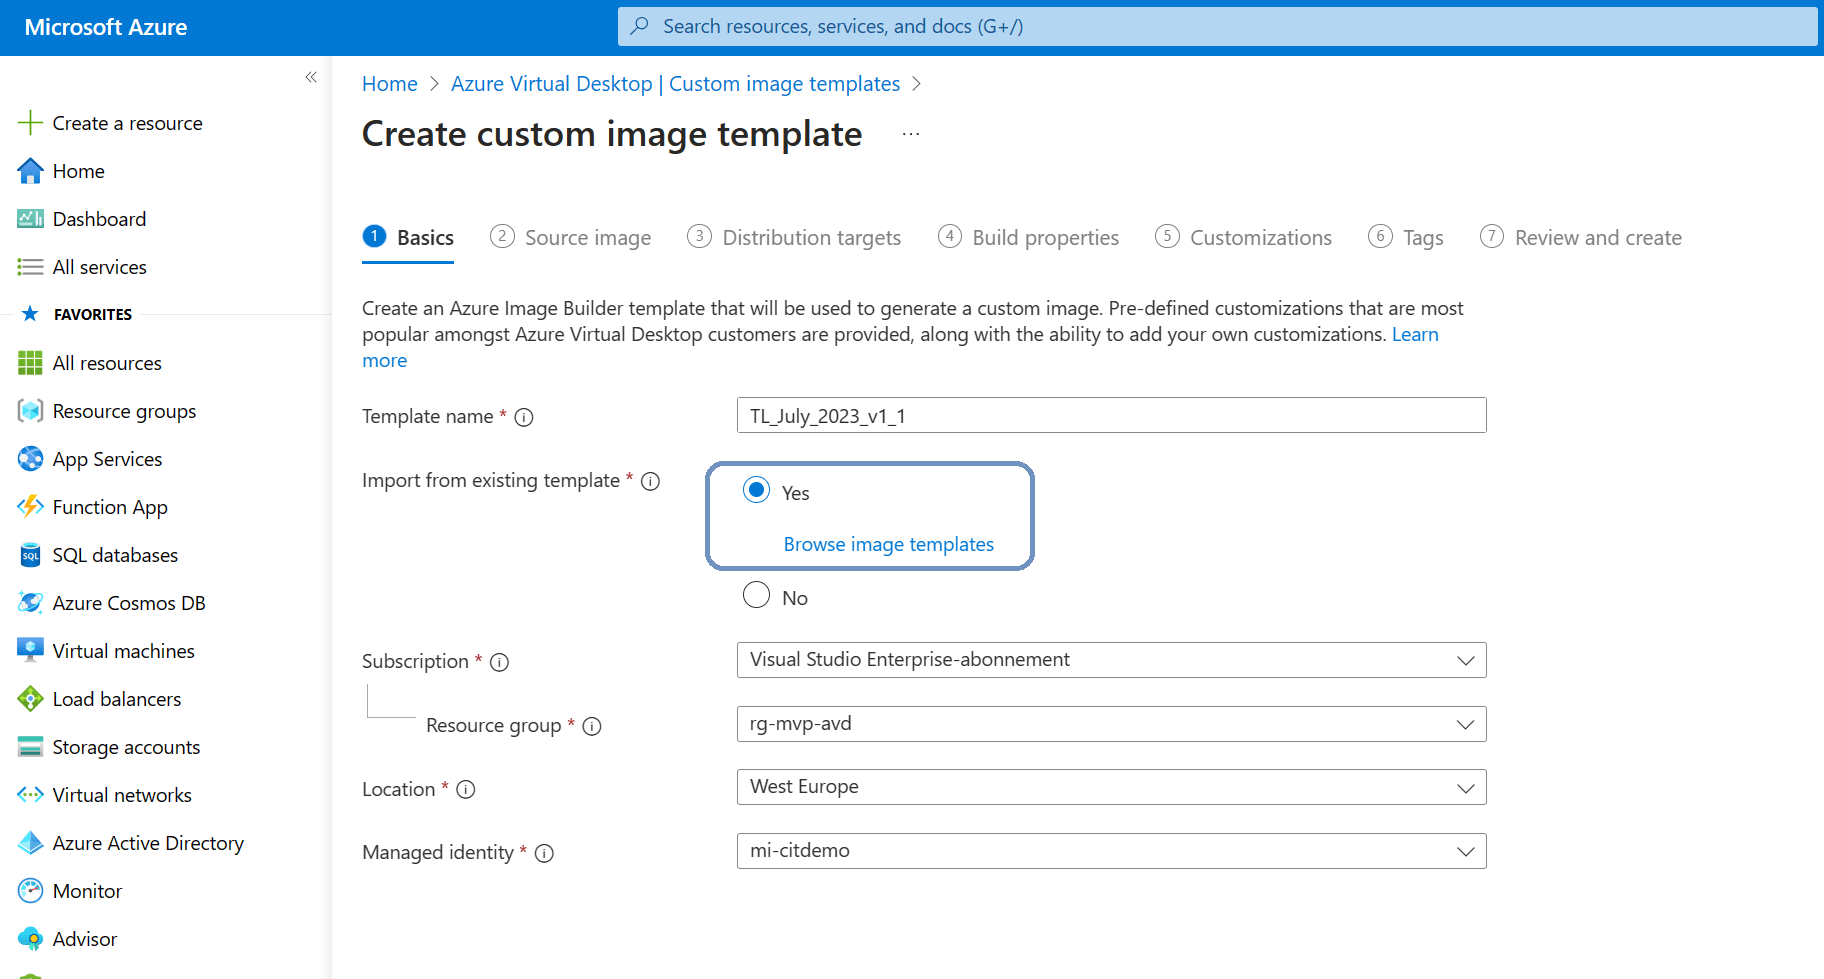
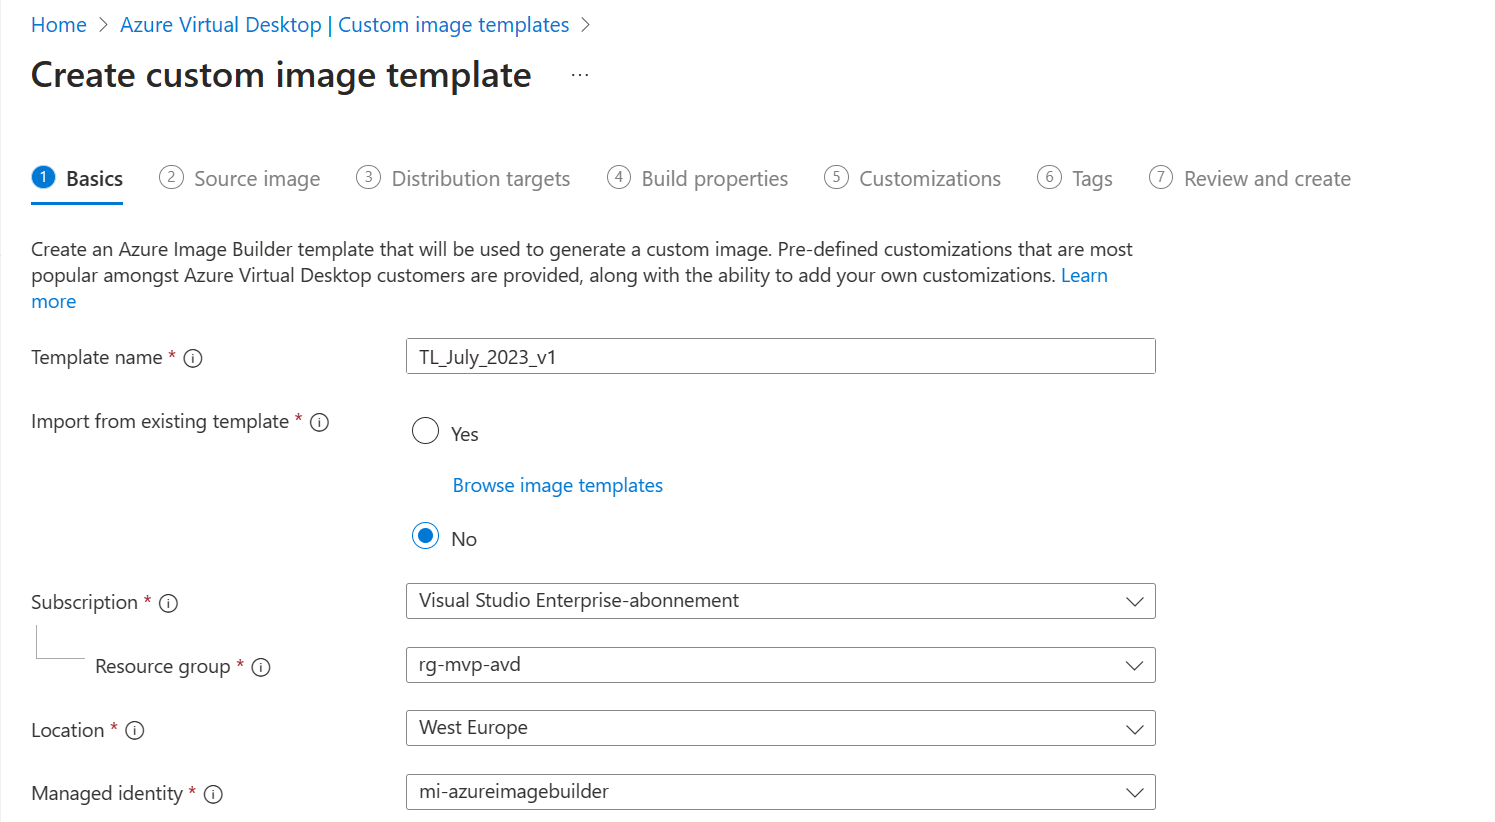
In the 1 Basics tab we can;
- Provide a name for the template
- Choose if you want to re-use an existing template or start from scratch
- Choose a subscription and resource group
- Select the location
- Select the Managed Identity
Once completed you should end up with something like this:
We should probably look at a couple of things before we continue. I already played around with Azure Image Builder before which means I already registered the necessary resource providers and created a user-managed identity and assigned a custom role to it.
Let’s take a moment to walk you through these steps. If you’ve already completed these prerequisites, you can skip to the part 2!
How to create the managed identity and define the permissions
First up, register the resource providers.
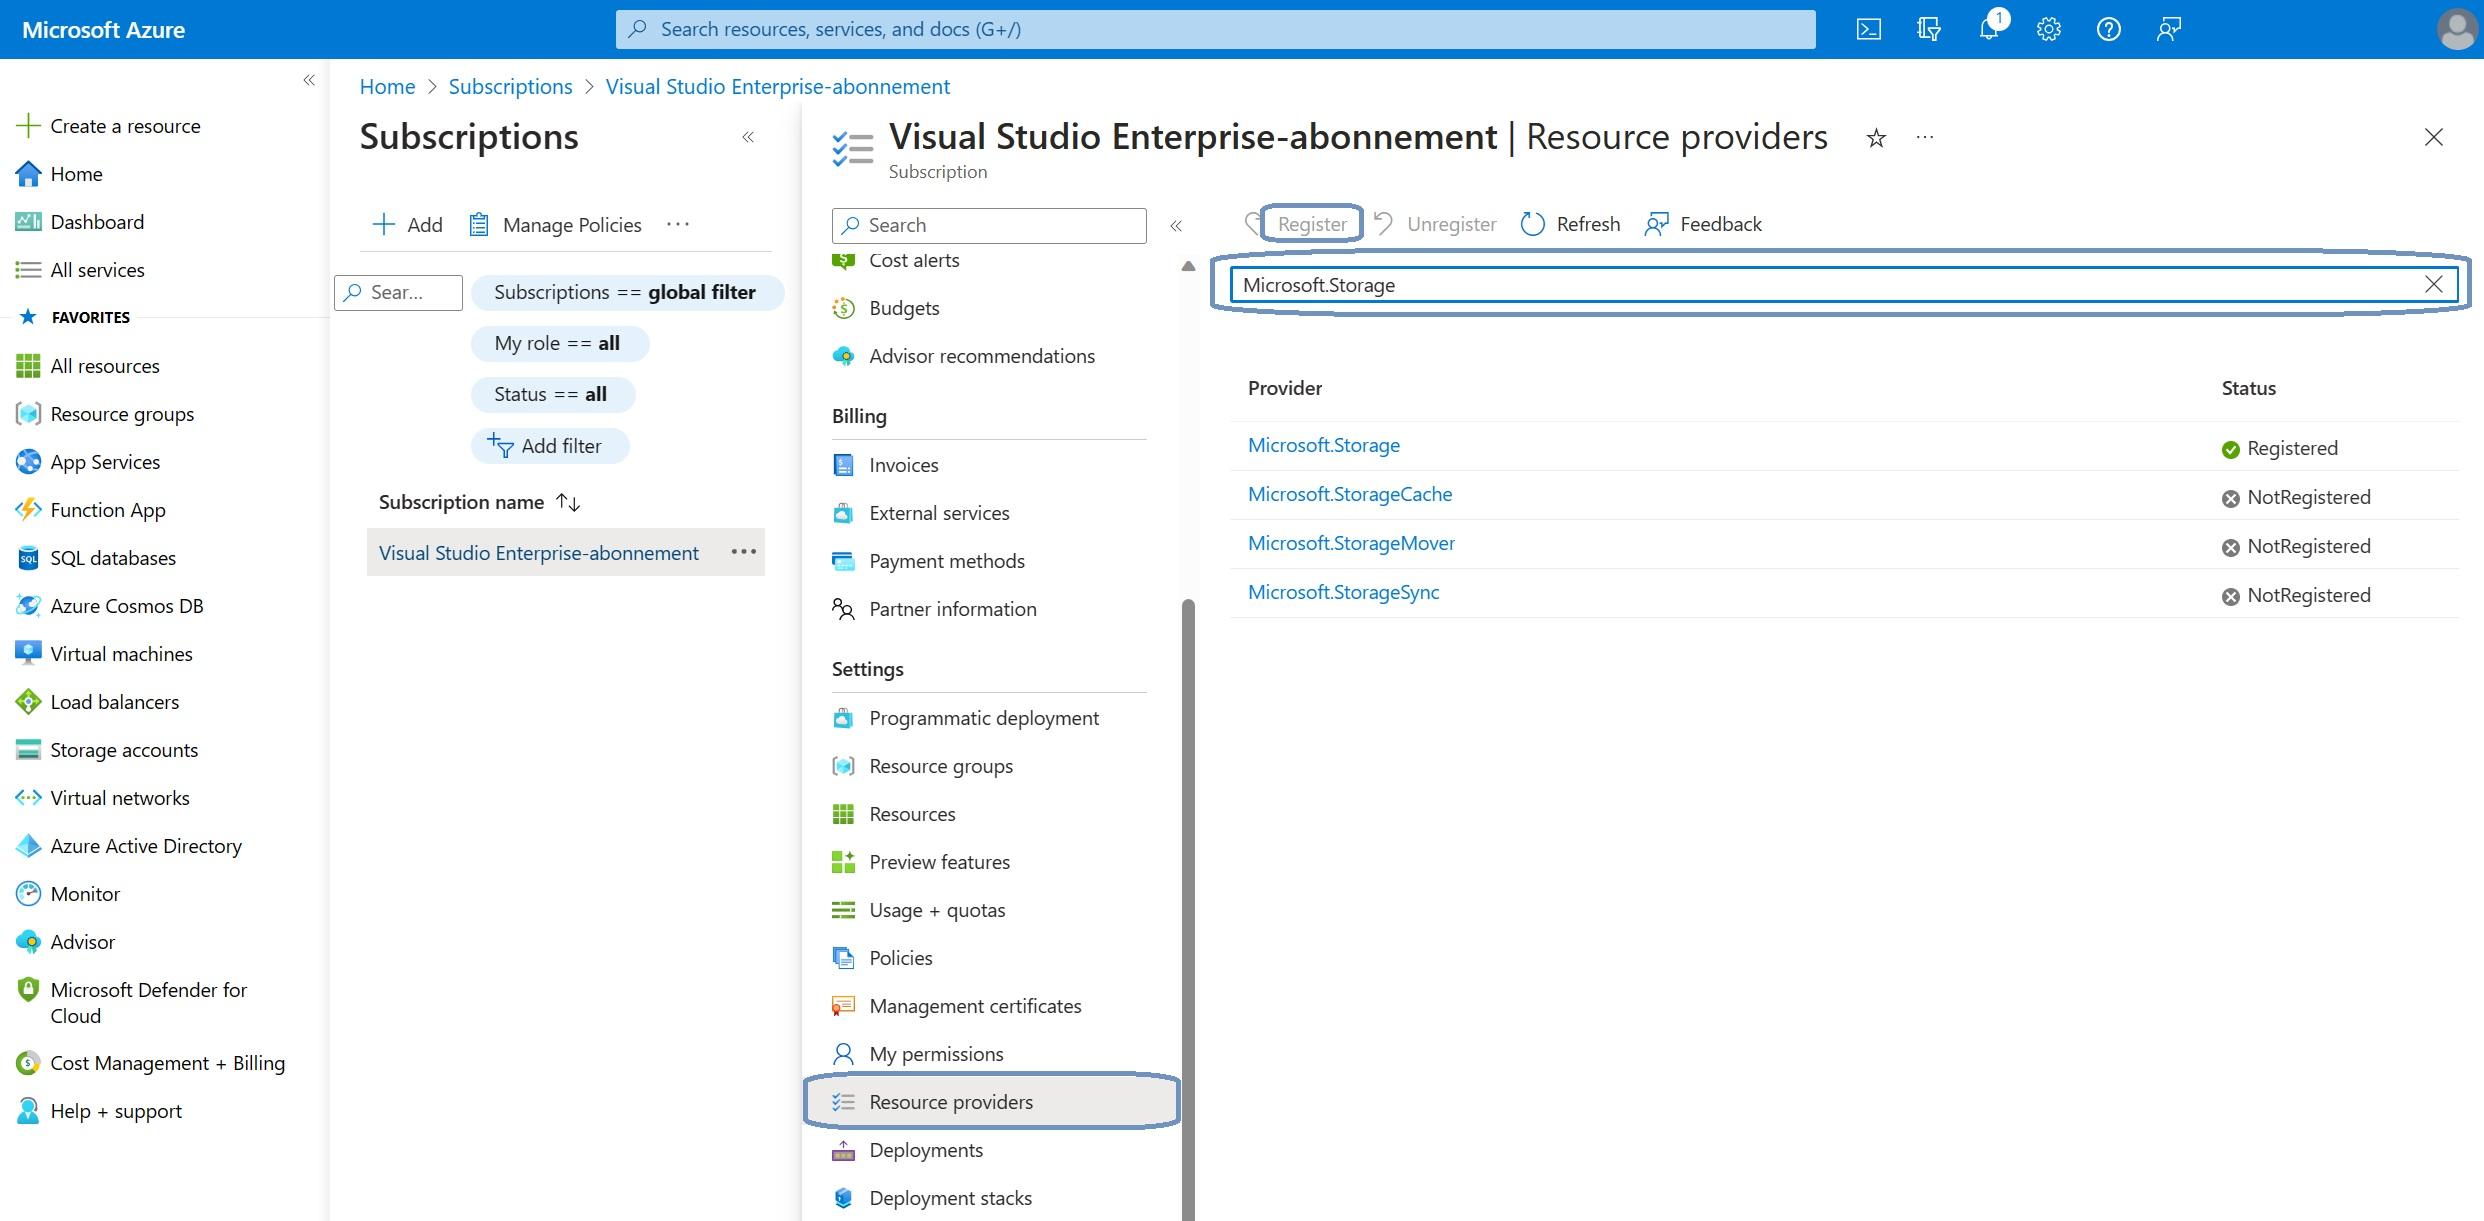
From the Azure portal, go to your Subscriptions and select the correct subscription, Settings, Resource providers.
Search for the resource provider you want to register in the search box and click the Register button. This might take a couple of moments for each resource provider. I’ve listed the required resource providers in the prerequisites section.
Next up is to create a user-managed identity and custom role.
There are a couple of ways to create a user-managed identity but I’ll stick to the Azure portal method. I’ll assume that you are already signed in to the Azure portal, search for Managed Identities.
I’ve already created a managed identity before so that pops up in this blade. Click the + Create button in the ribbon to create your own shiny managed identity.
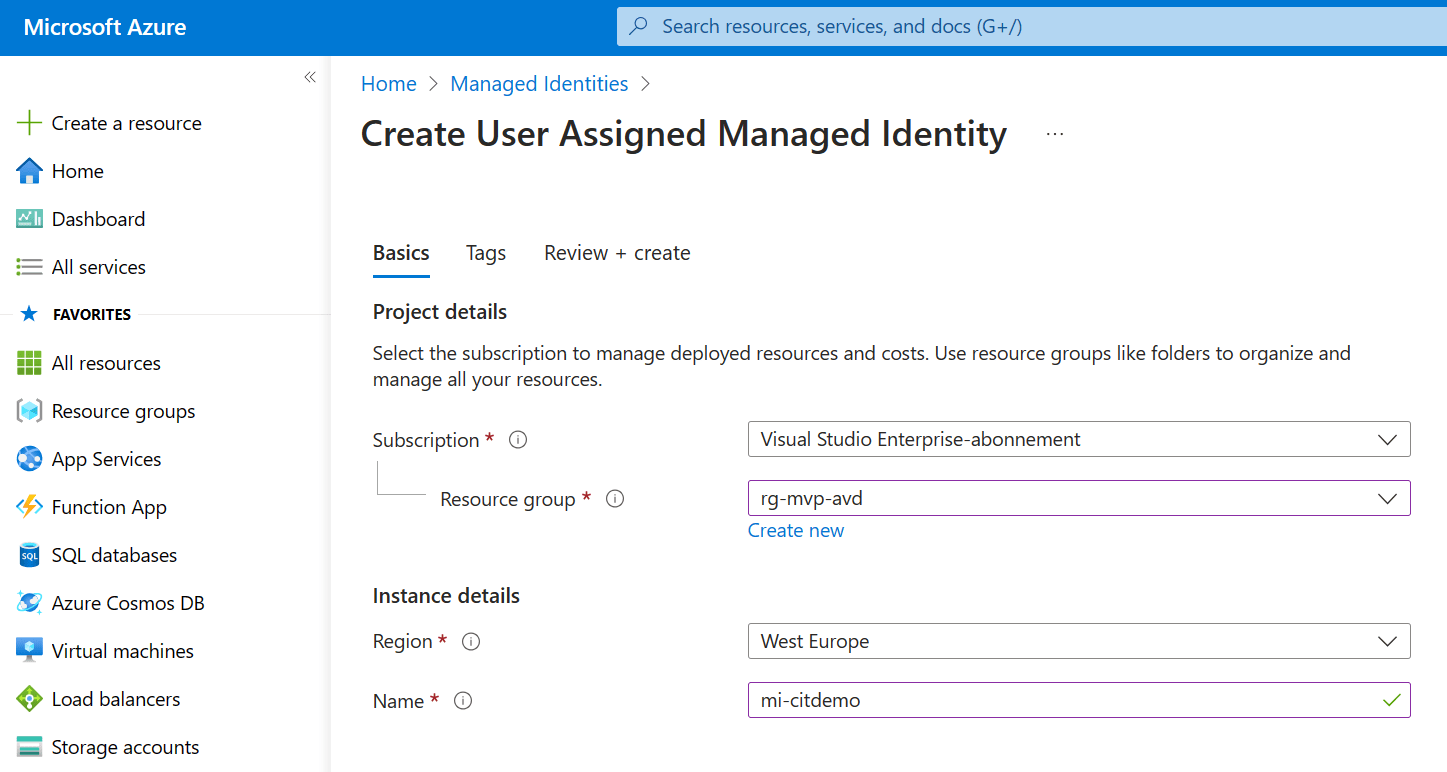
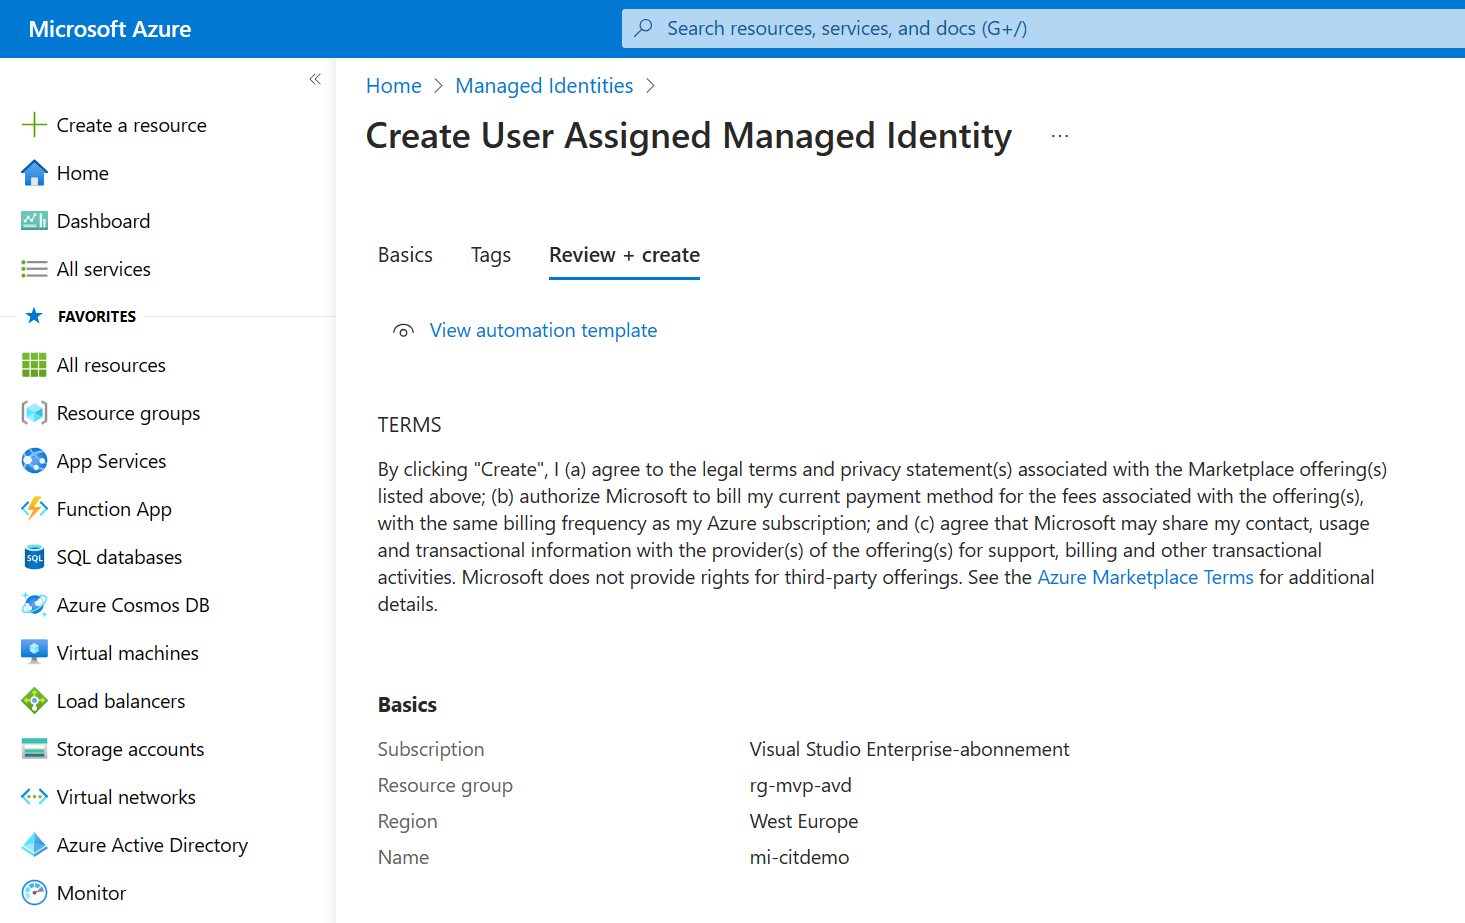
Creating a managed identity is pretty straightforward. Just;
- Select the subscription
- Select or create the resource group
- Select the region
- Enter a descriptive name
Just click Next and add the necessary tags. Next up I’d recommend to take a moment to admire your awesome work and click the Create button to finish up.
The deployment will complete in just a couple of moments. The last step is to create a custom role.
I created a custom role at the resource group level. If you want to setup the role in the same way, just go to the resource groups in the Azure portal and click on the respective resource group.
Click on Access control (IAM) and select Roles in the ribbon.
Click the + Add button to add a custom role.
Give the new role a descriptive name. Next up is to decide how you want to create the new role. You can either clone an existing role, start from scratch or upload a JSON file with the necessary information. For this demo I’ll start from scratch.
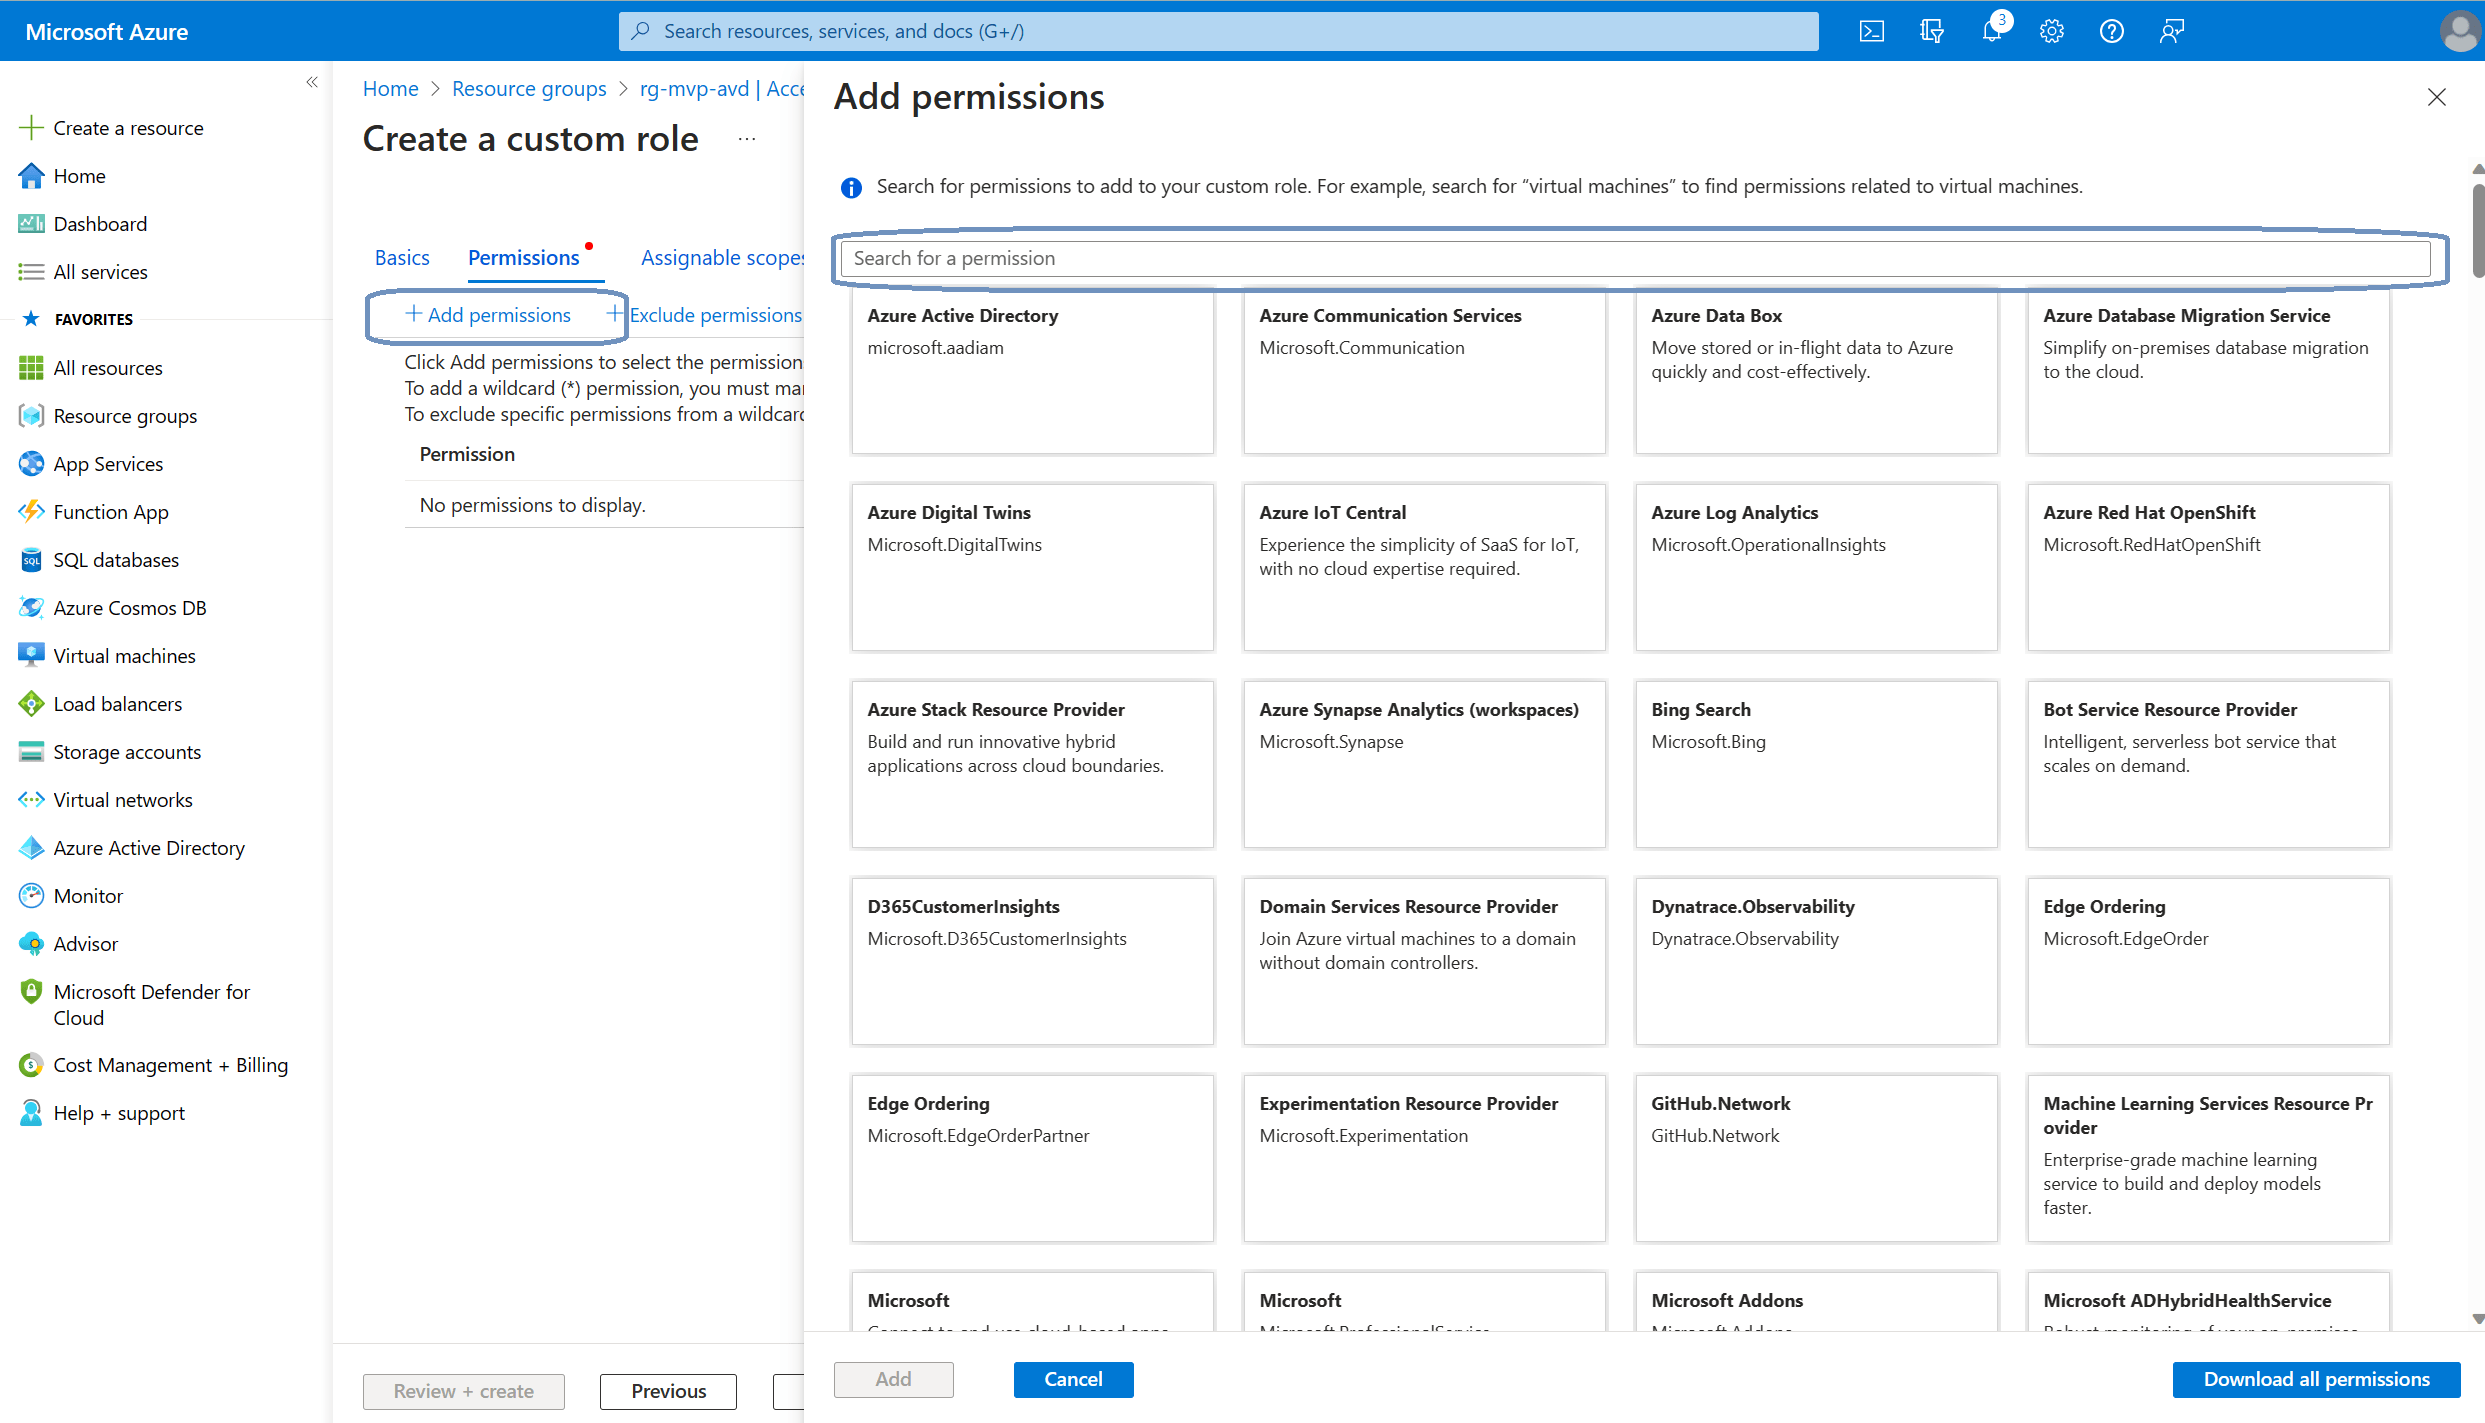
Click the + Add permissions button in the ribbon. This is where we add the required permissions. The way this works is that you can use the search bar to find the permissions. Which permissions do we need? Well, here’s what Microsoft Learn tells us:
Let’s search for Microsoft.Compute. The Microsoft.Compute resource provider pops up:
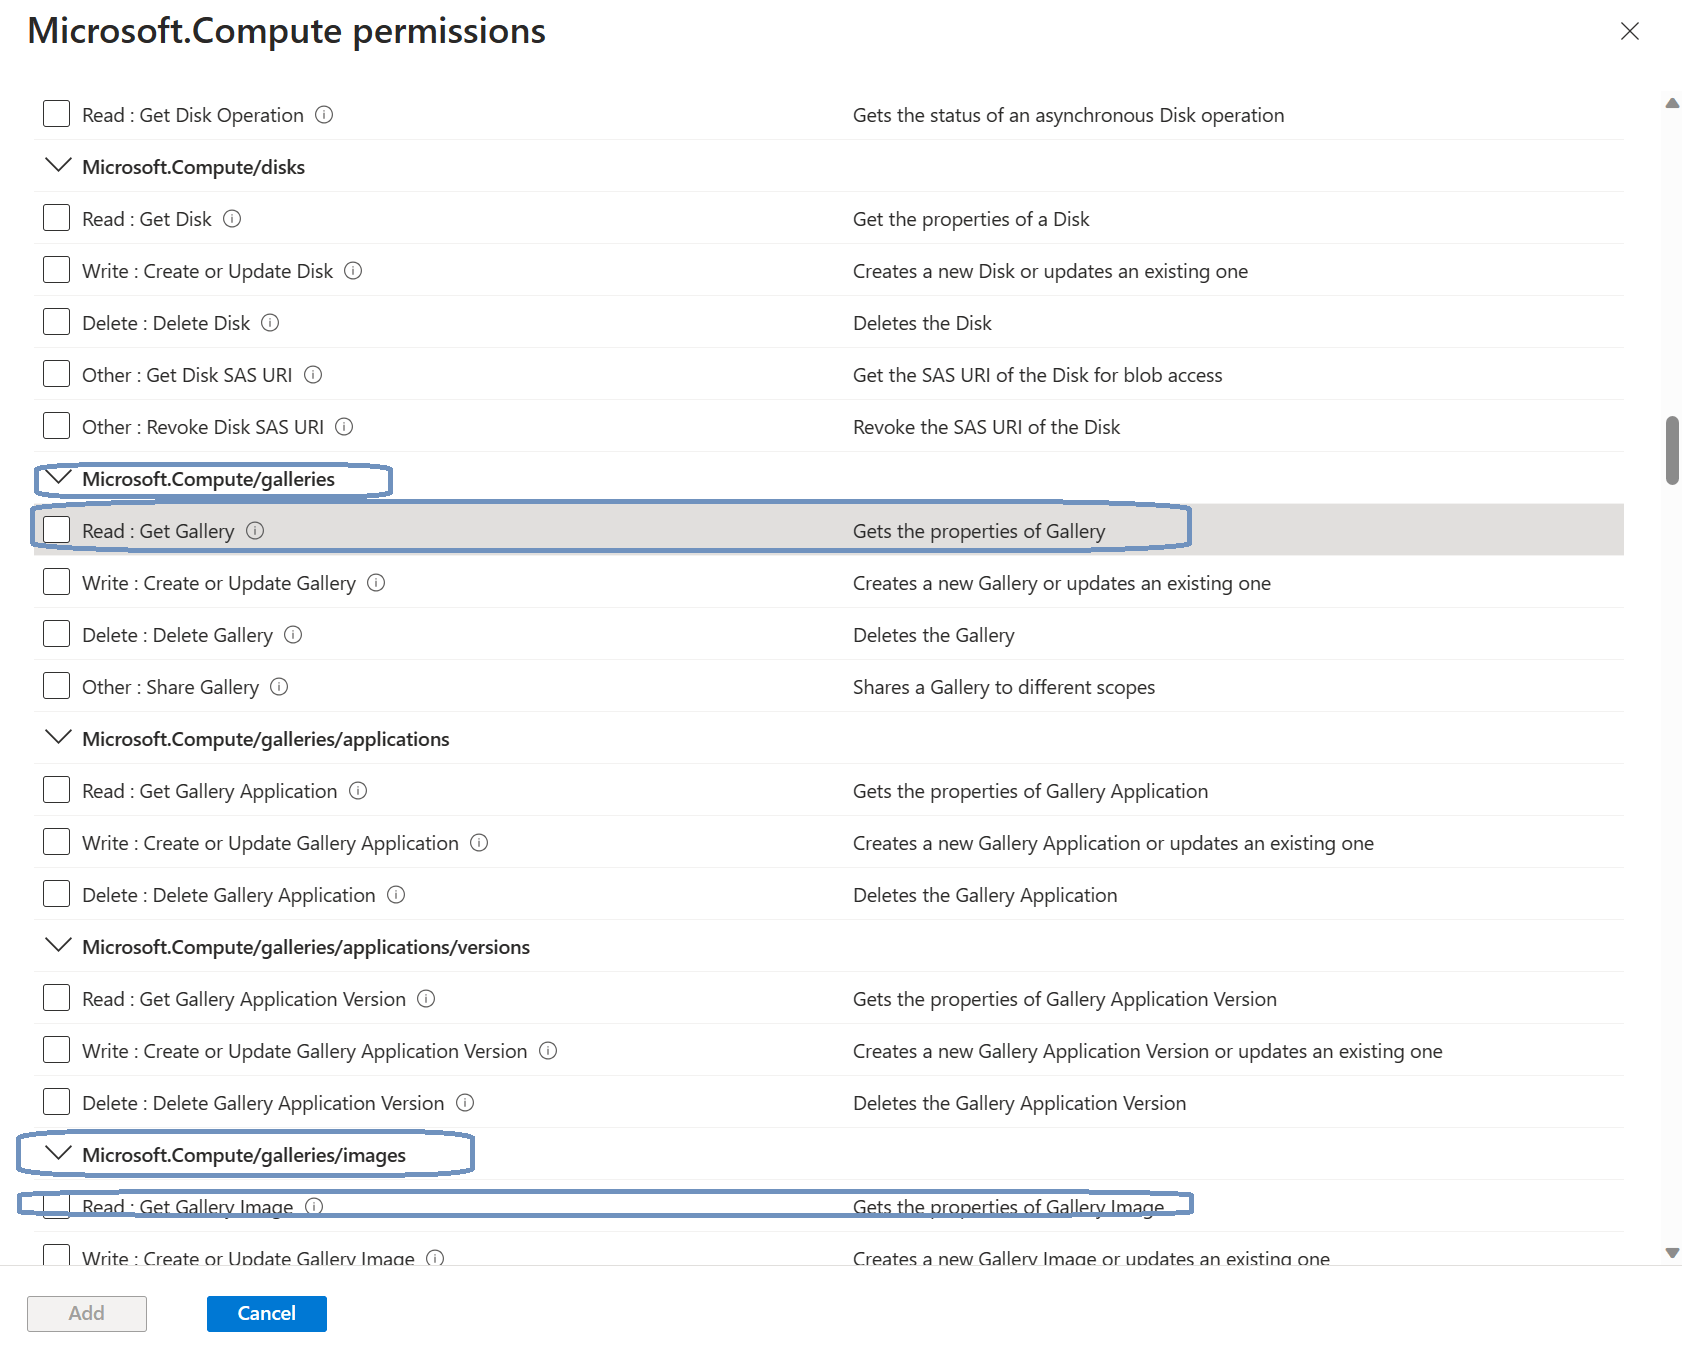
Click the box to get access to all the available permissions for Microsoft.Compute. Now it’s just a matter of matching the previously mentioned permissions to this role:
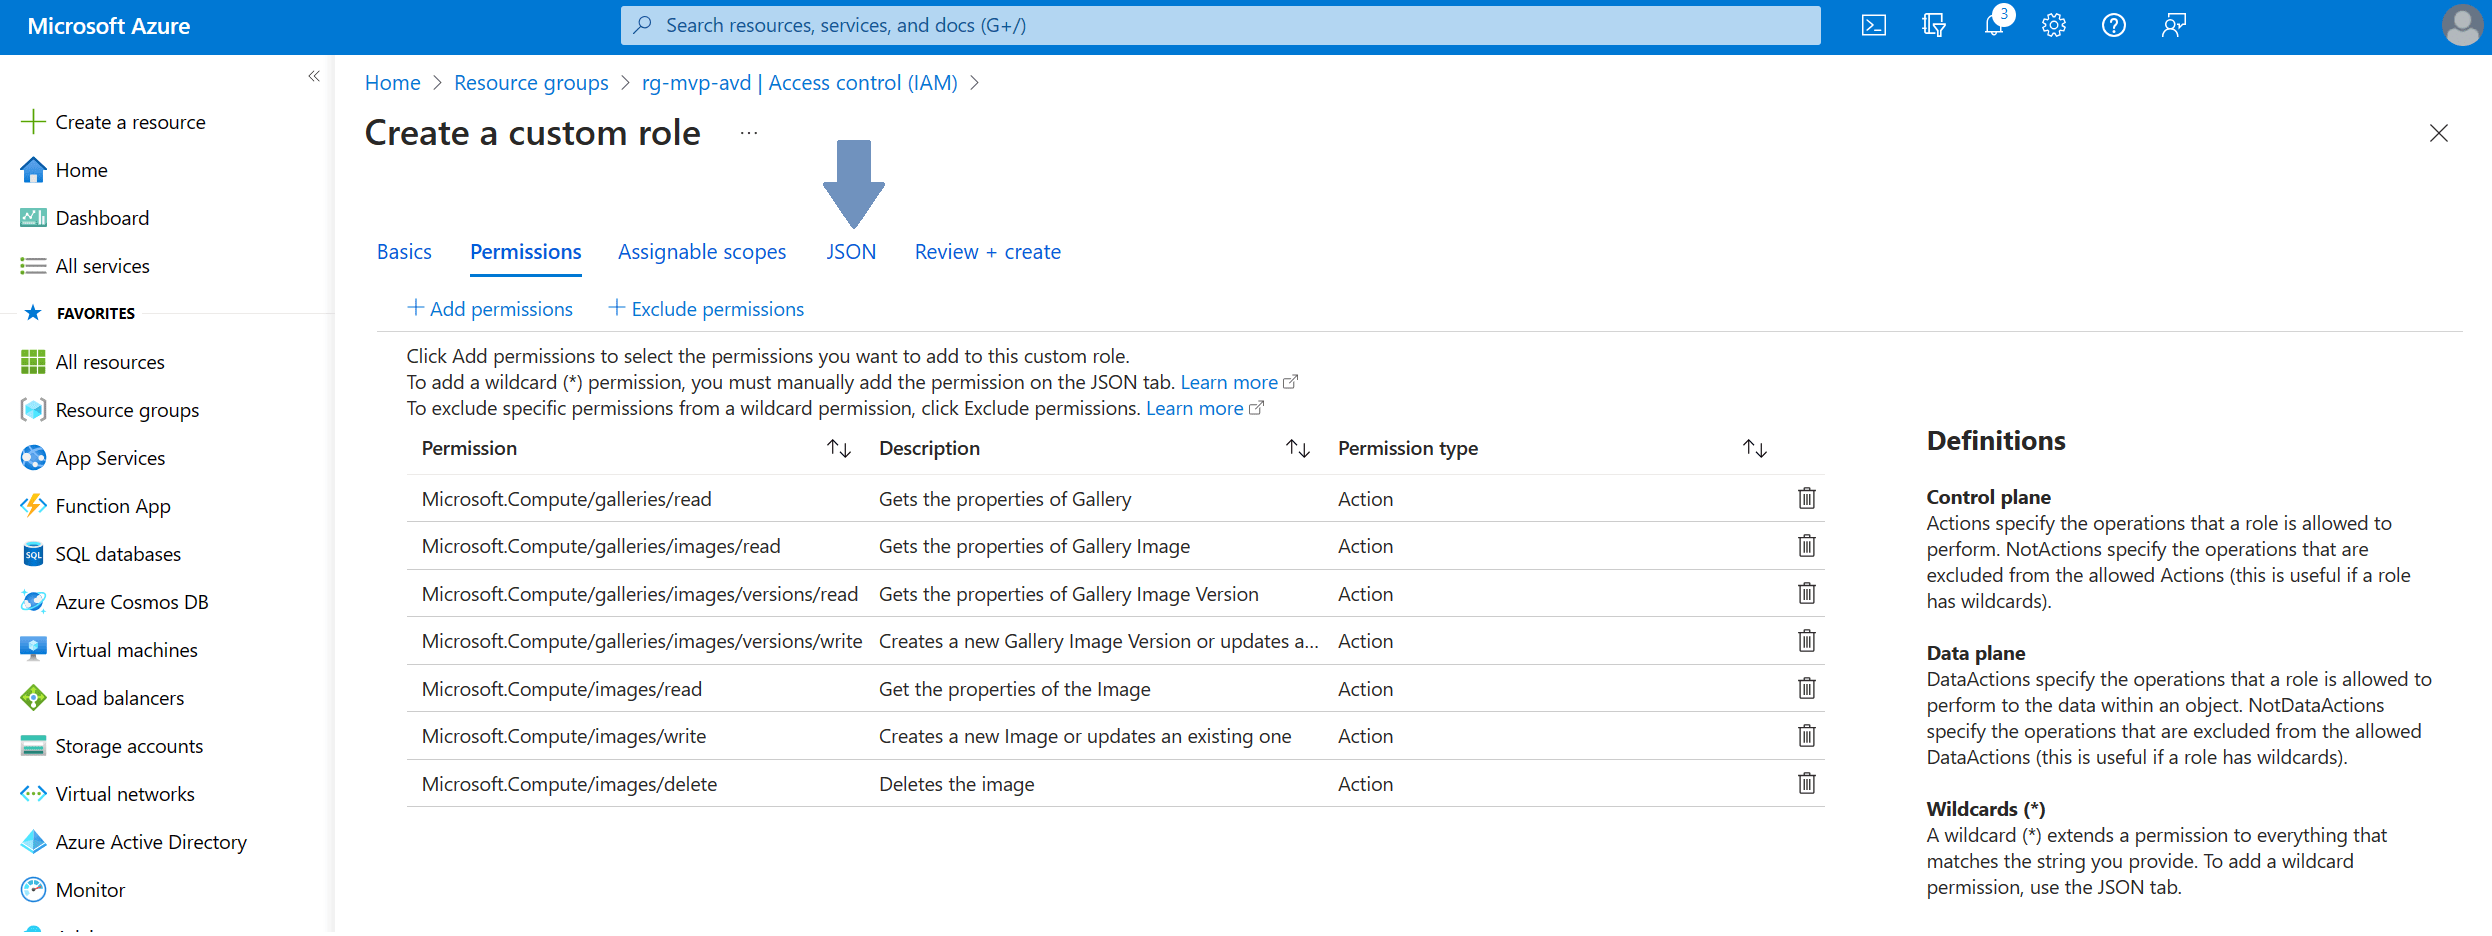
Once done you should end up with something like this:
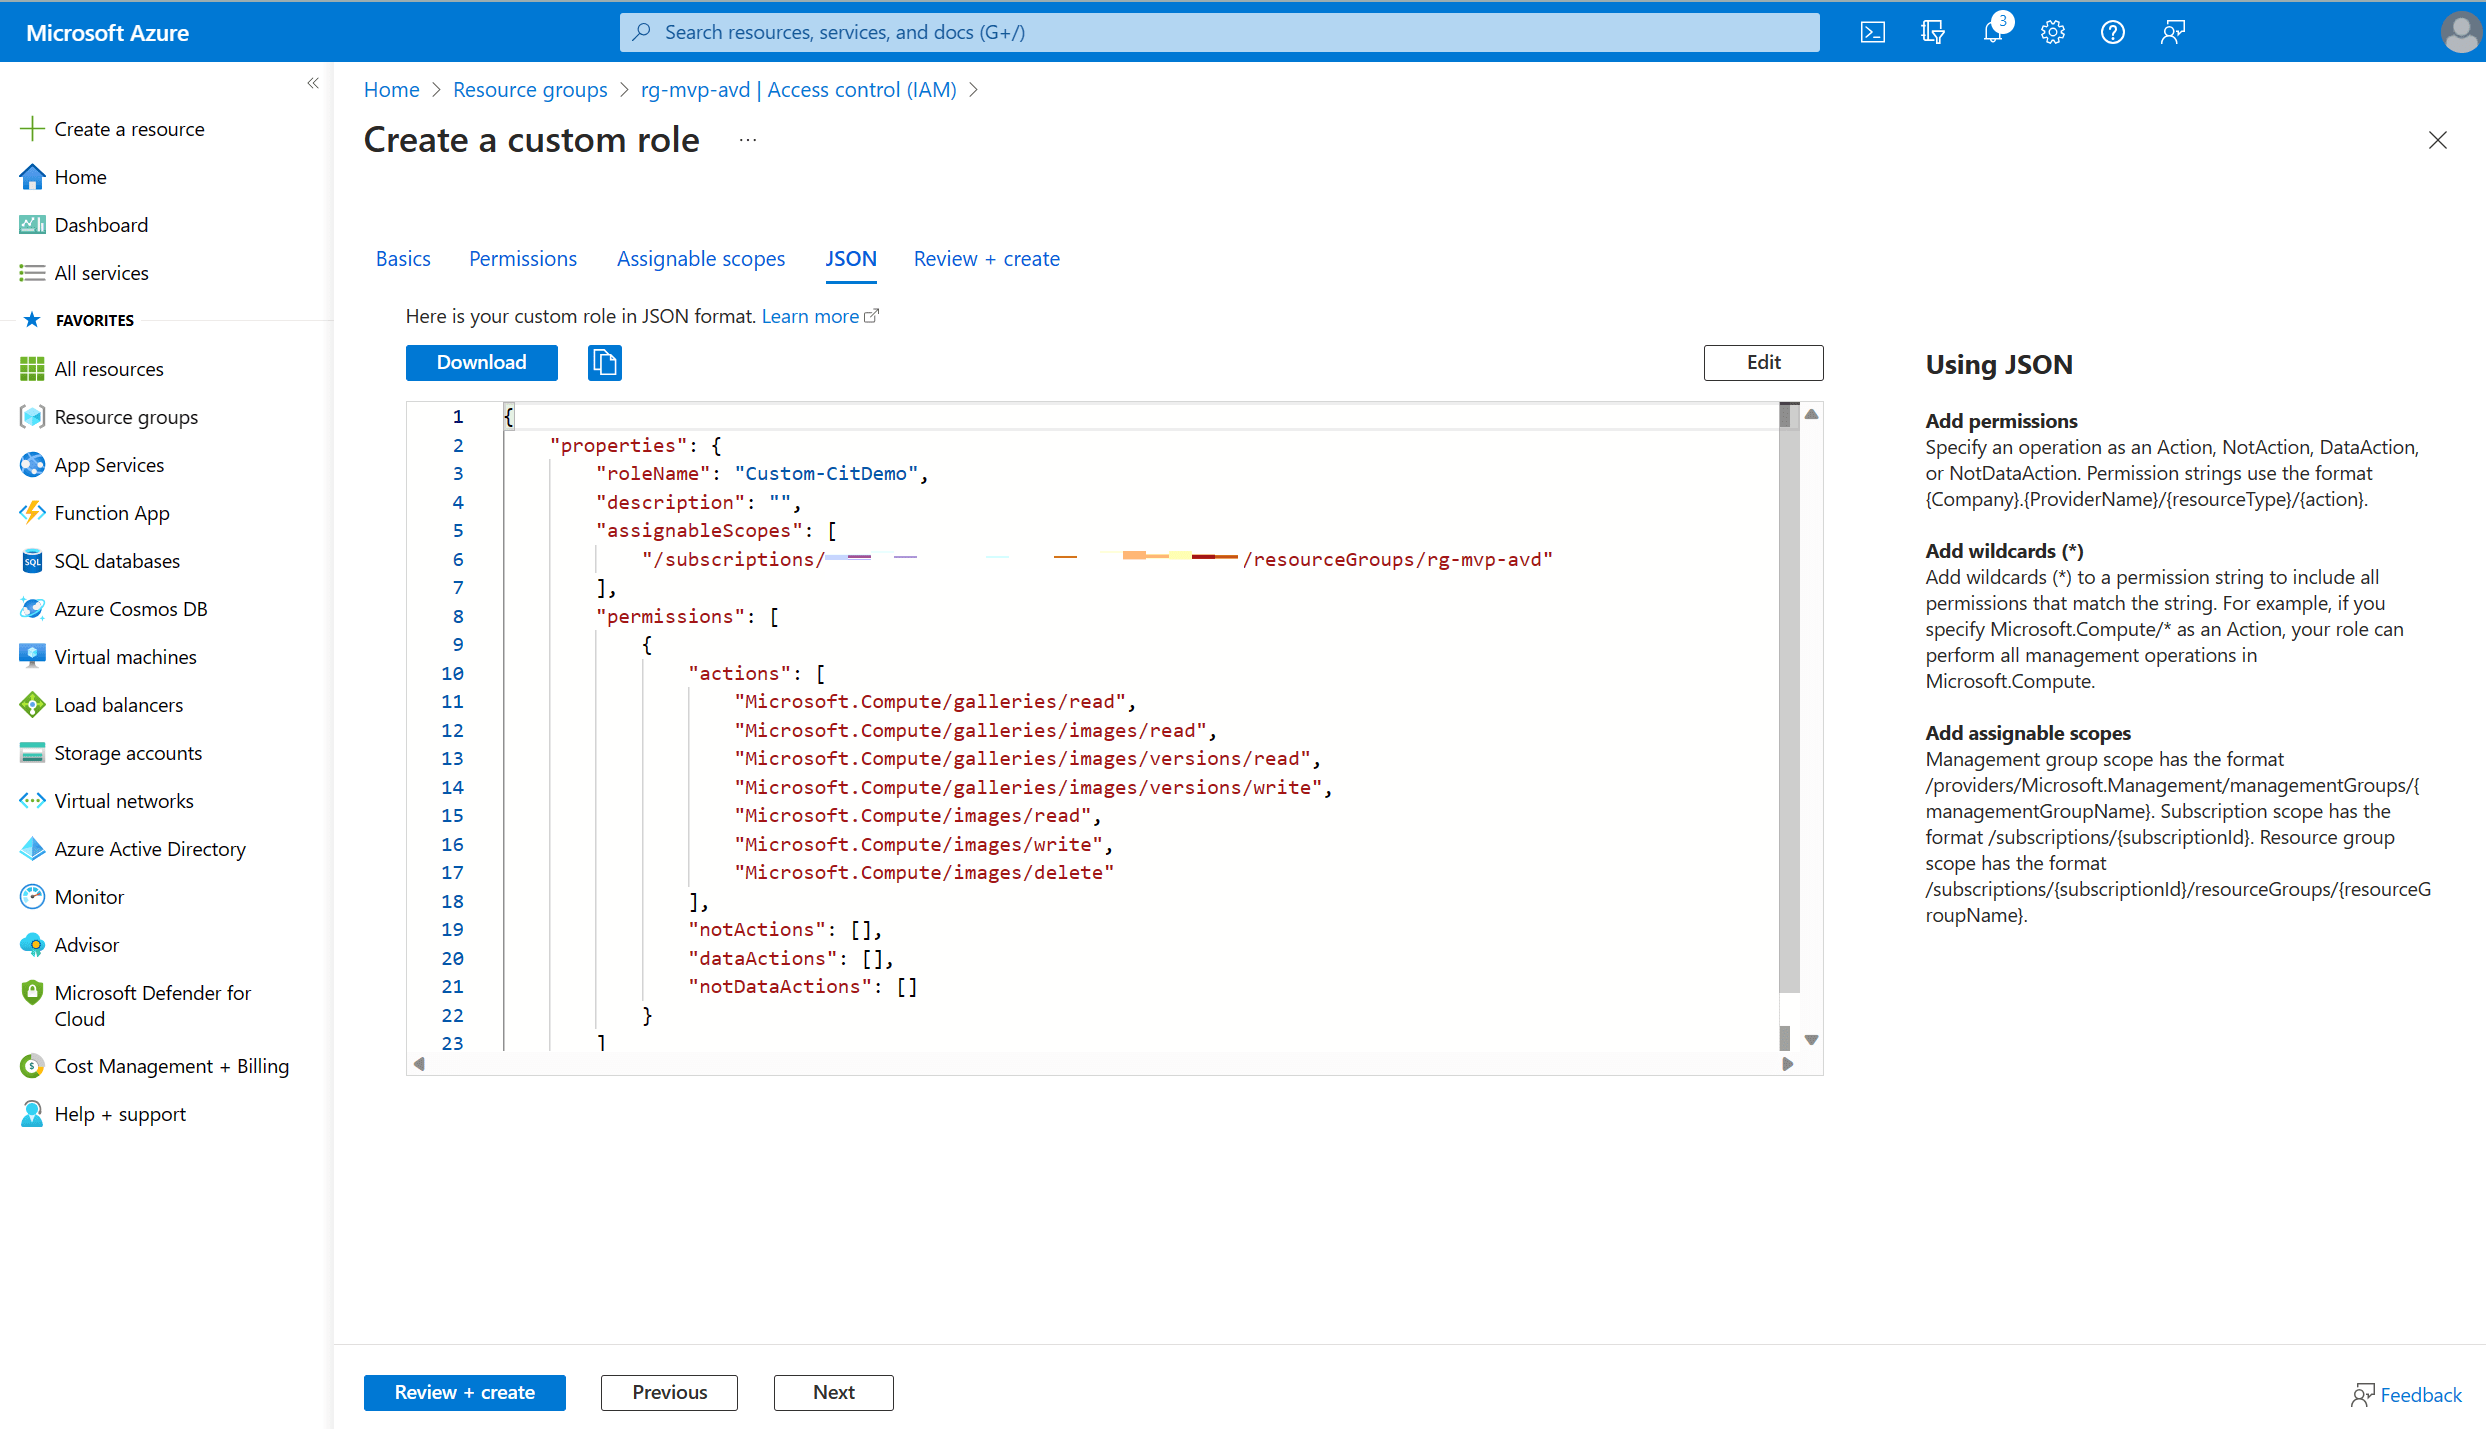
Remember we also had the option to create the new custom role using a JSON file? Well, you can have a look at that JSON file from this screen. Just click the JSON button in the ribbon.
You can download the file straight from the portal or just copy the contents.
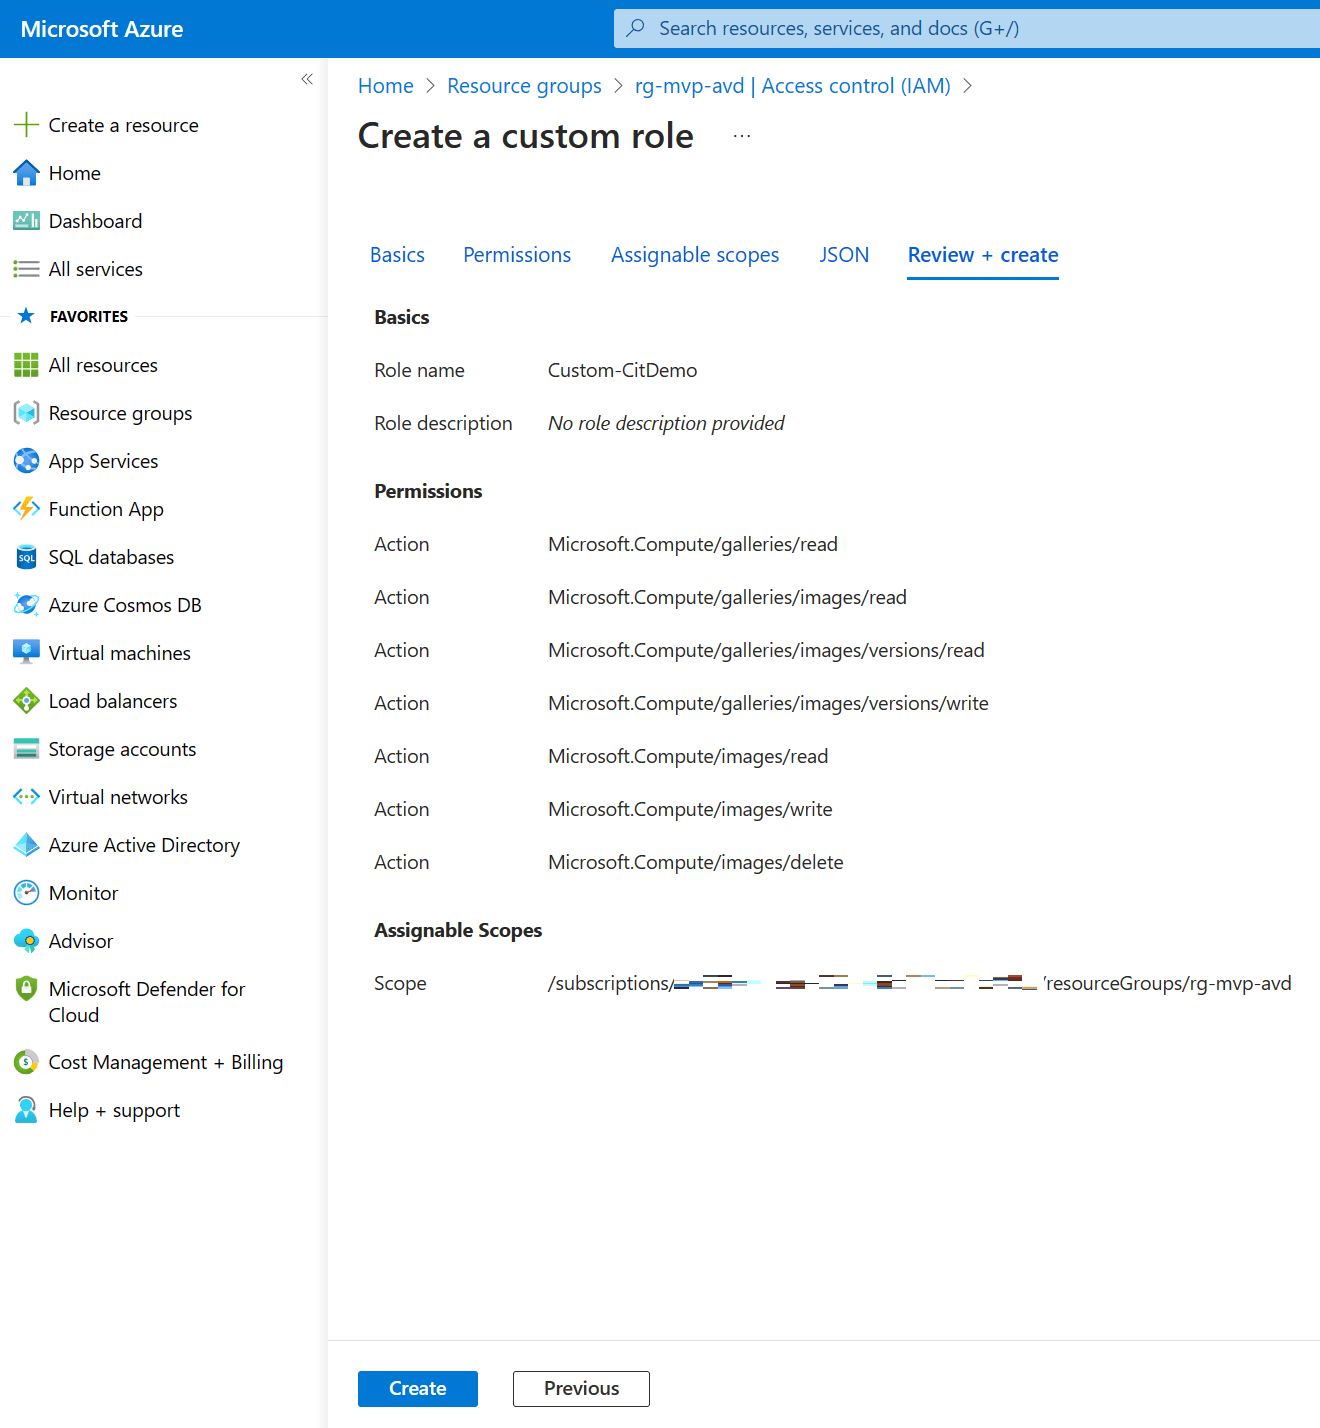
Click the Review + create button and take a moment to admire your awesome work. If you’re happy with it, click create to create the new custom role.
We just need to finish up by assigning the newly created role to the managed identity. After creating the role, we returned to the Access control (IAM) blade at the resource group level. This time we create a role assignment. Click the + Add button in the ribbon and click on Add role assignment.
Searching for the role is pretty easy. You can use the search bar or set a filter to just display custom roles. Click on the desired role and click Next.
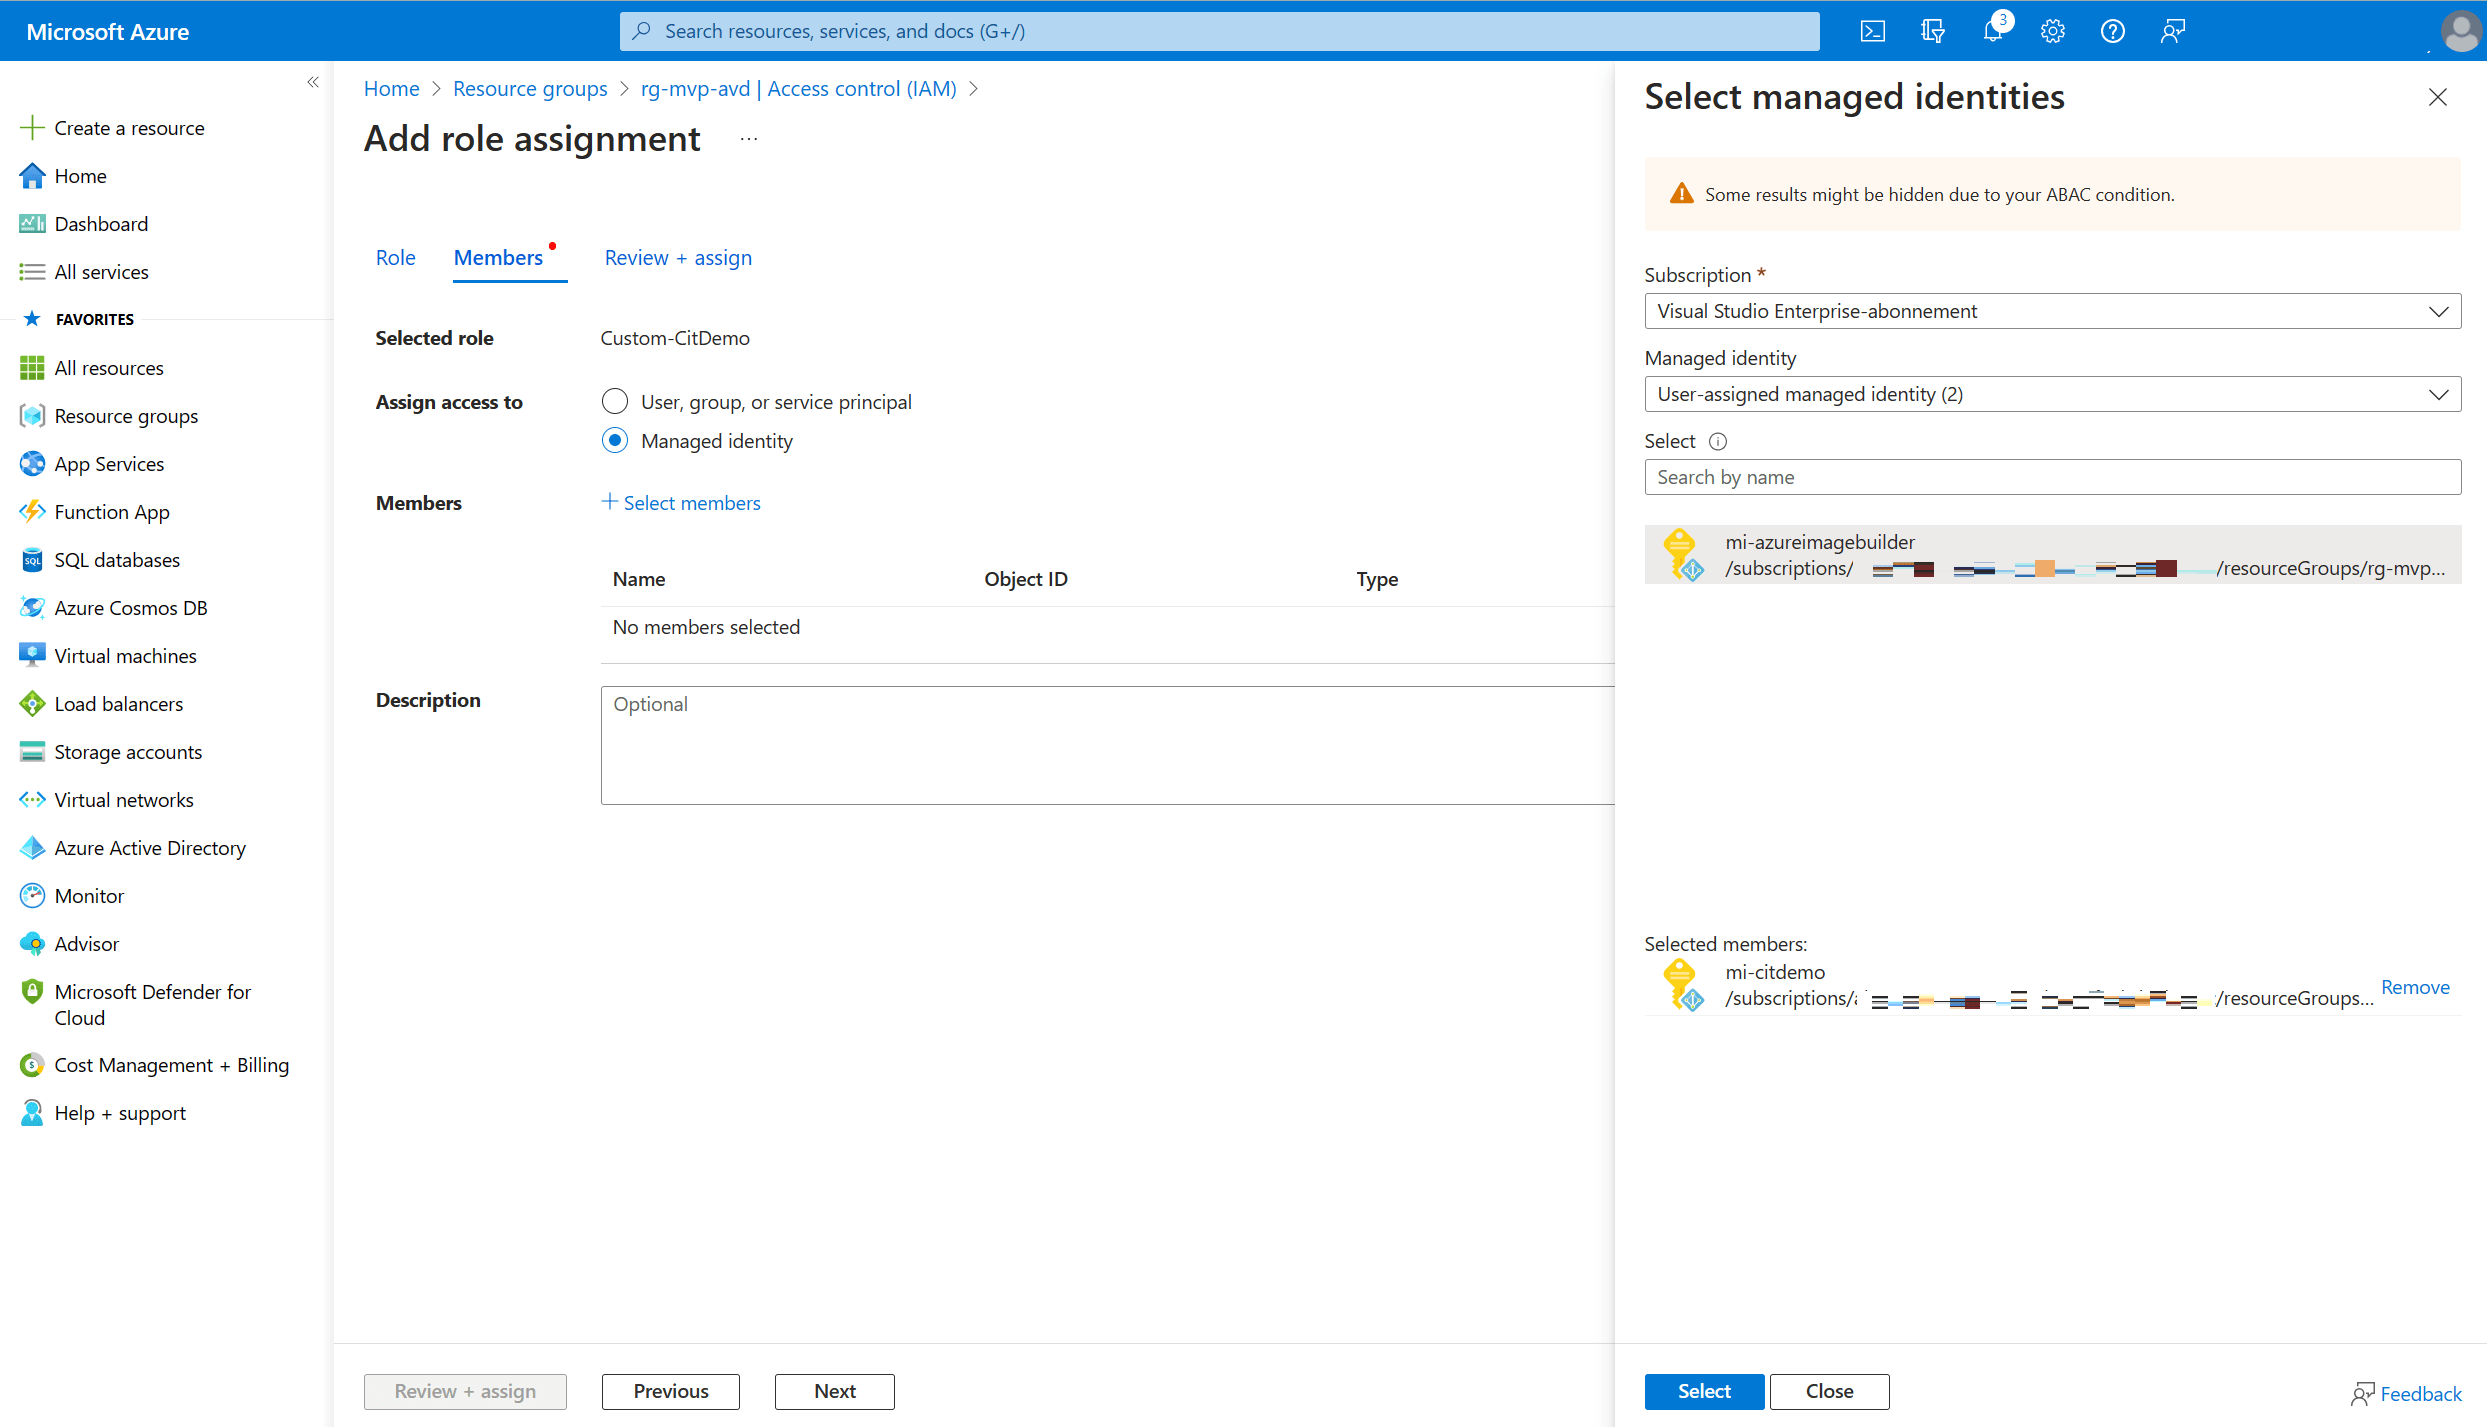
Make sure to select the Managed identity radio button in Assign access to.
Click on + Select members to open the select members blade.
Select the subscription containing the managed identity and select user-assigned managed identity in the managed identity dropdown list. And finish up by selecting the managed identity where you want to assign the custom role to.
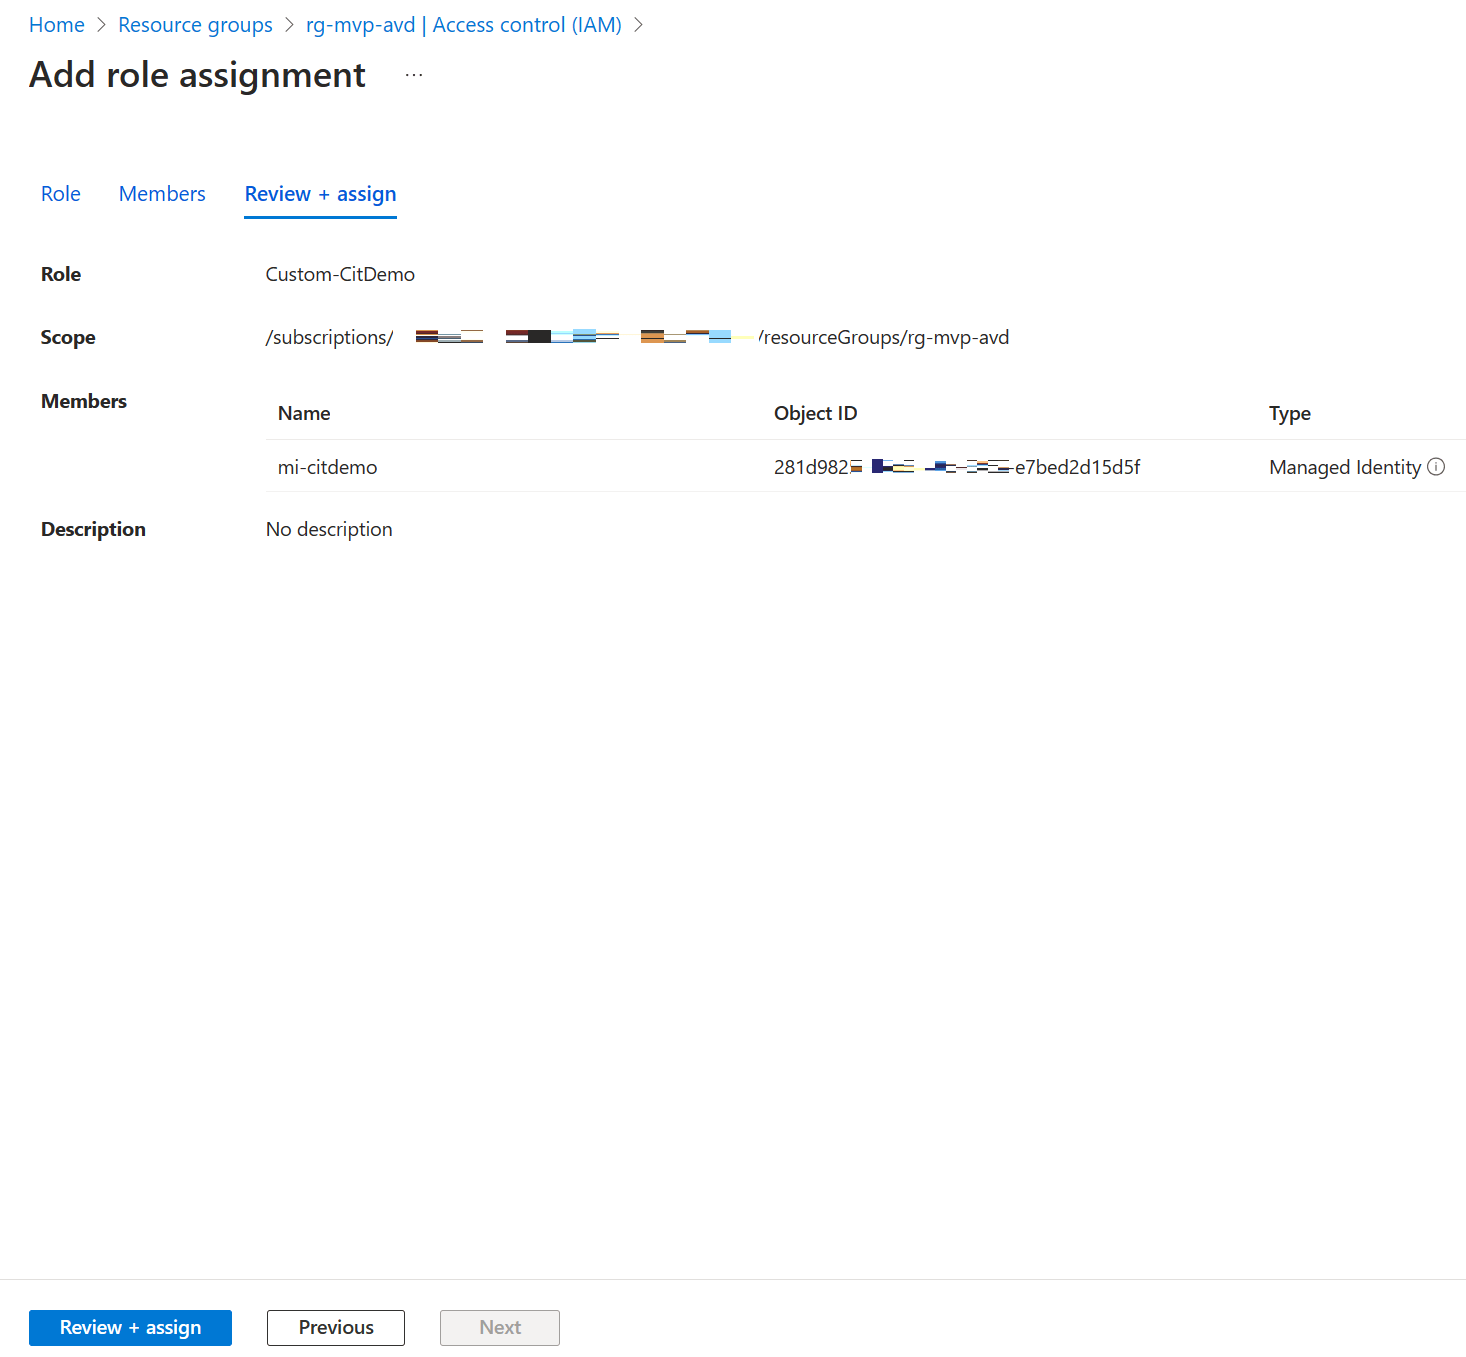
Take another second to admire your awesome work and finish up by clicking on the Review + assign button.
Creating a custom image template - Part 2
We left off pretty early in the process of creating our custom image template. Here’s a quick recap of the first step in the process:
Click Next to continue to the 2 Source image tab.
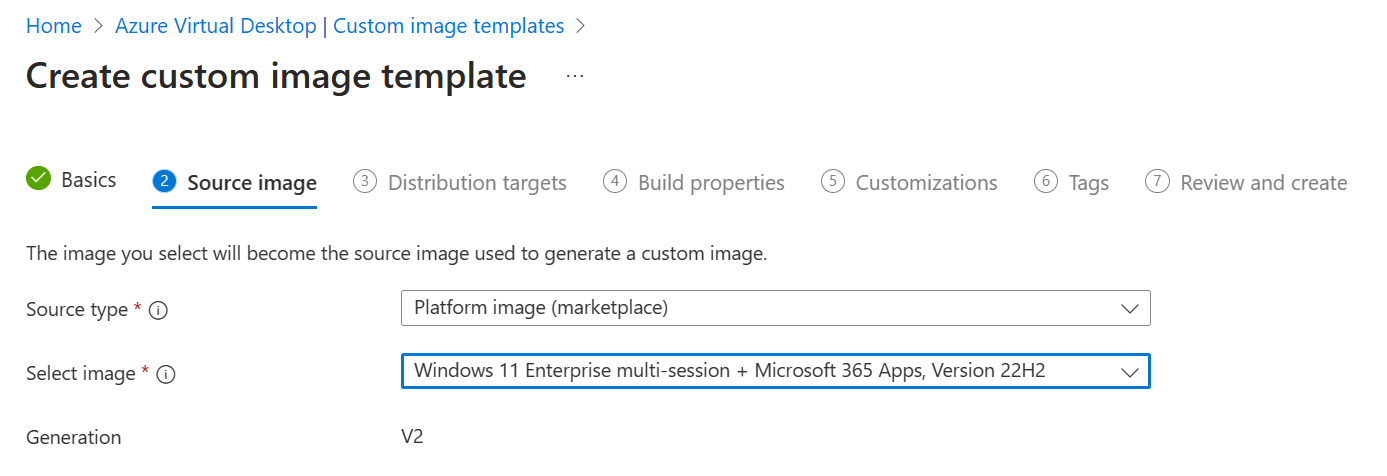
In this tab we can select our source type and image.
We can select one of three options as the source type:
- Platform image (marketplace)
- Managed image
- Azure Compute Gallery
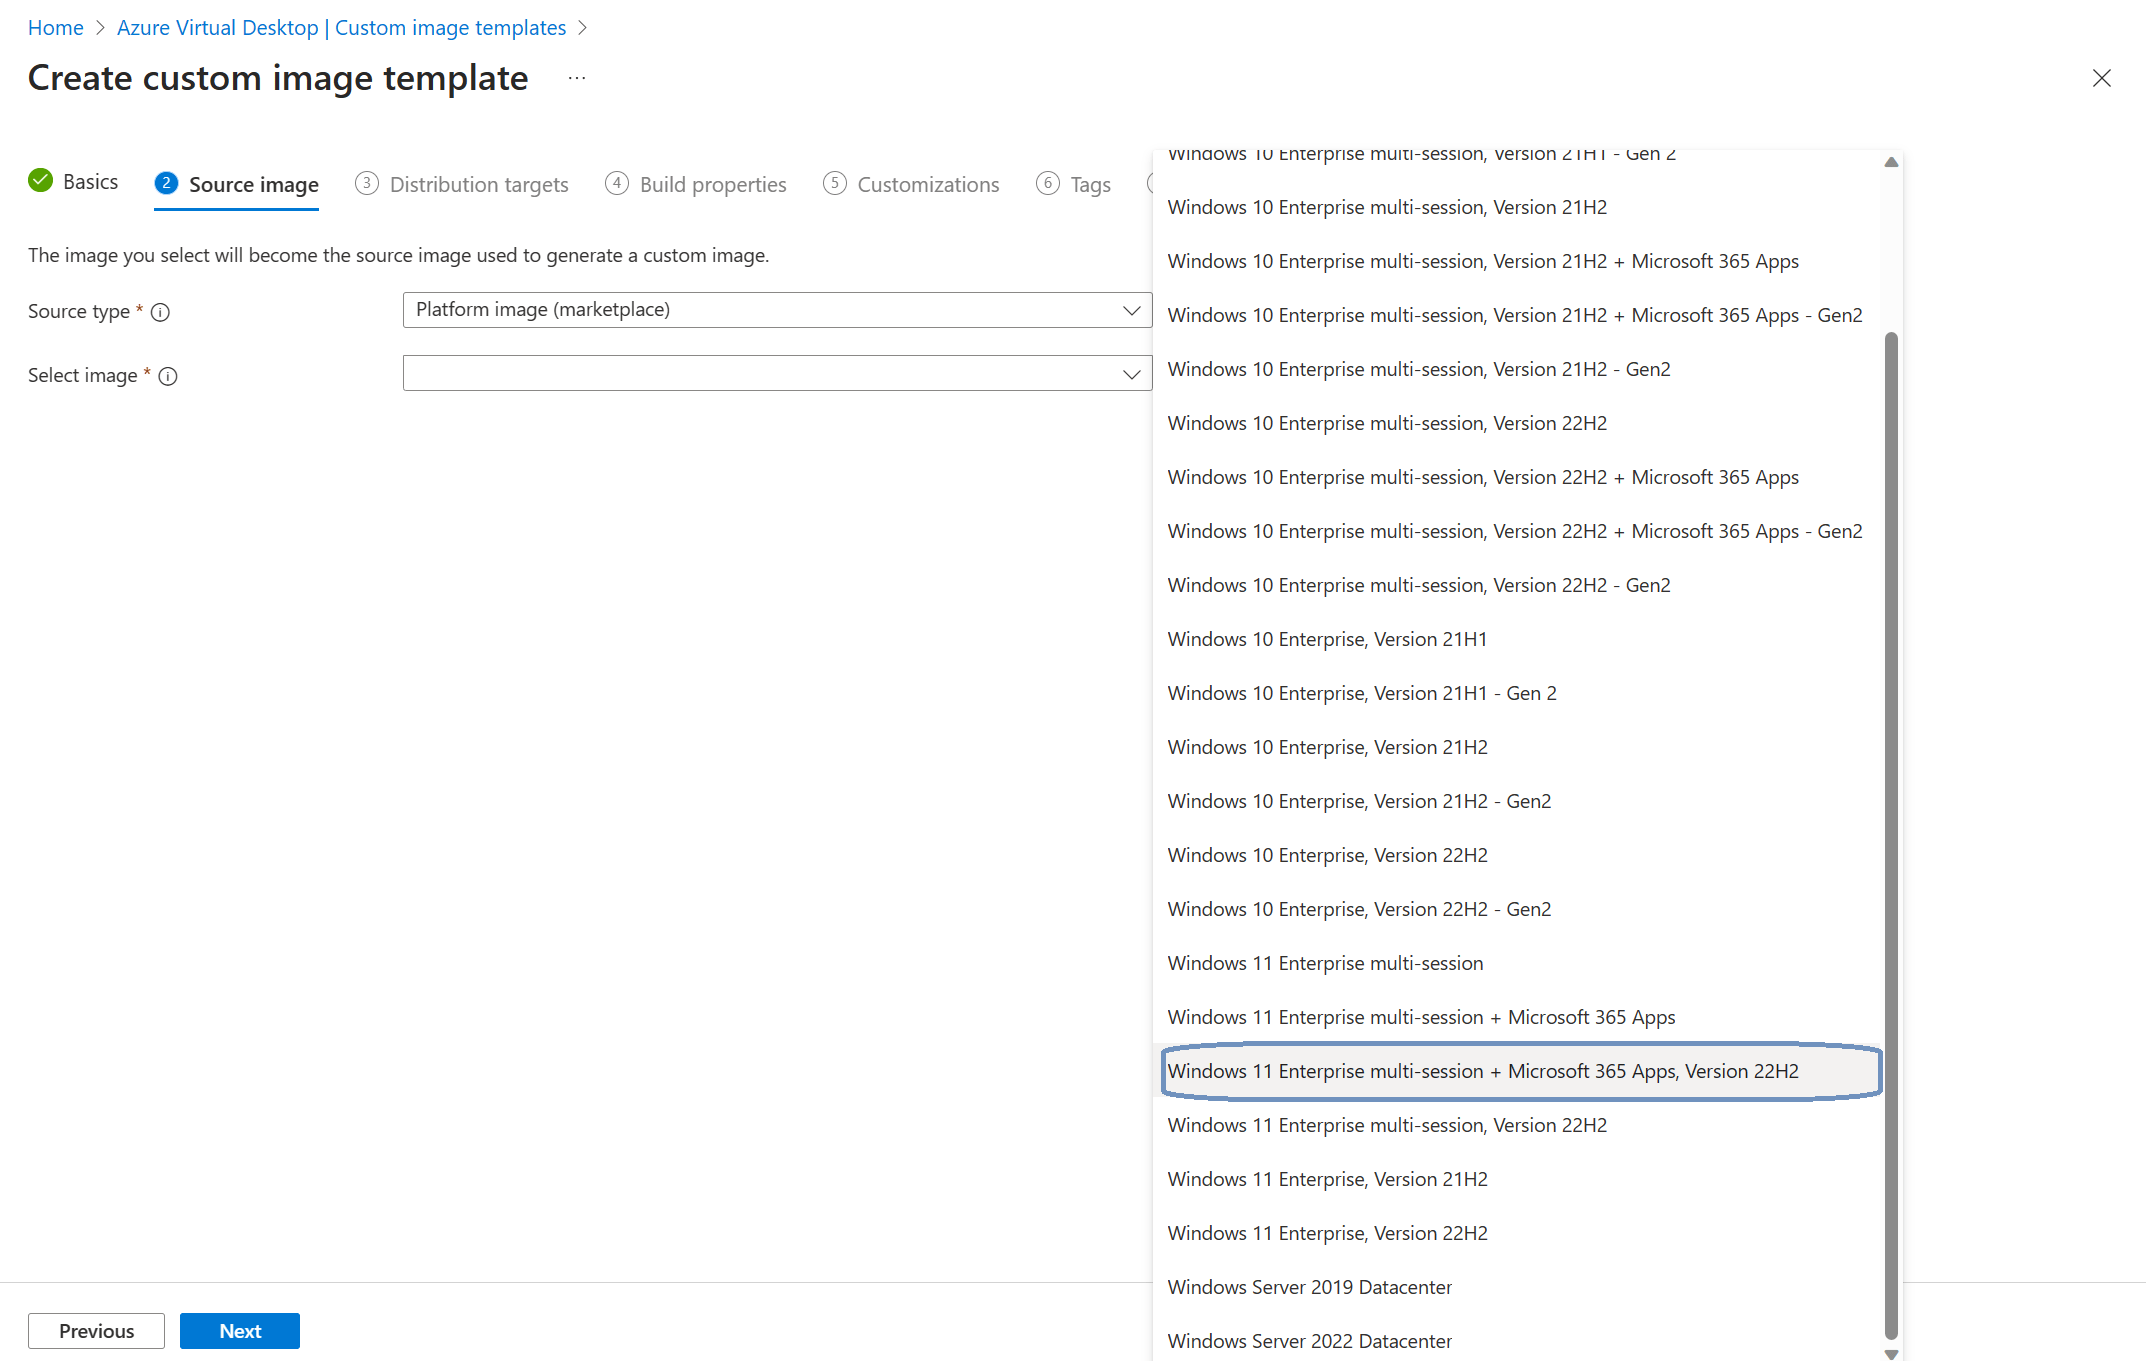
Selecting Platform image will allow you to select an image from the Azure marketplace. You can choose between various Windows 10, Windows 11 images with or without the Microsoft 365 Apps. You can also choose Windows server 2019 or 2022 Datacenter images.
Another way to go is to select an existing managed image. As an admin you can create your own VM in Azure and perform your customizations on it. You can capture that VM and save it as a managed image.
The third option is to use an image that is stored in an Azure Compute Gallery. Storing images in an Azure Compute Gallery has a couple of advantages. For example, you can distribute the image across multiple Azure regions.
For this demo I’ll use an image from the Azure marketplace.
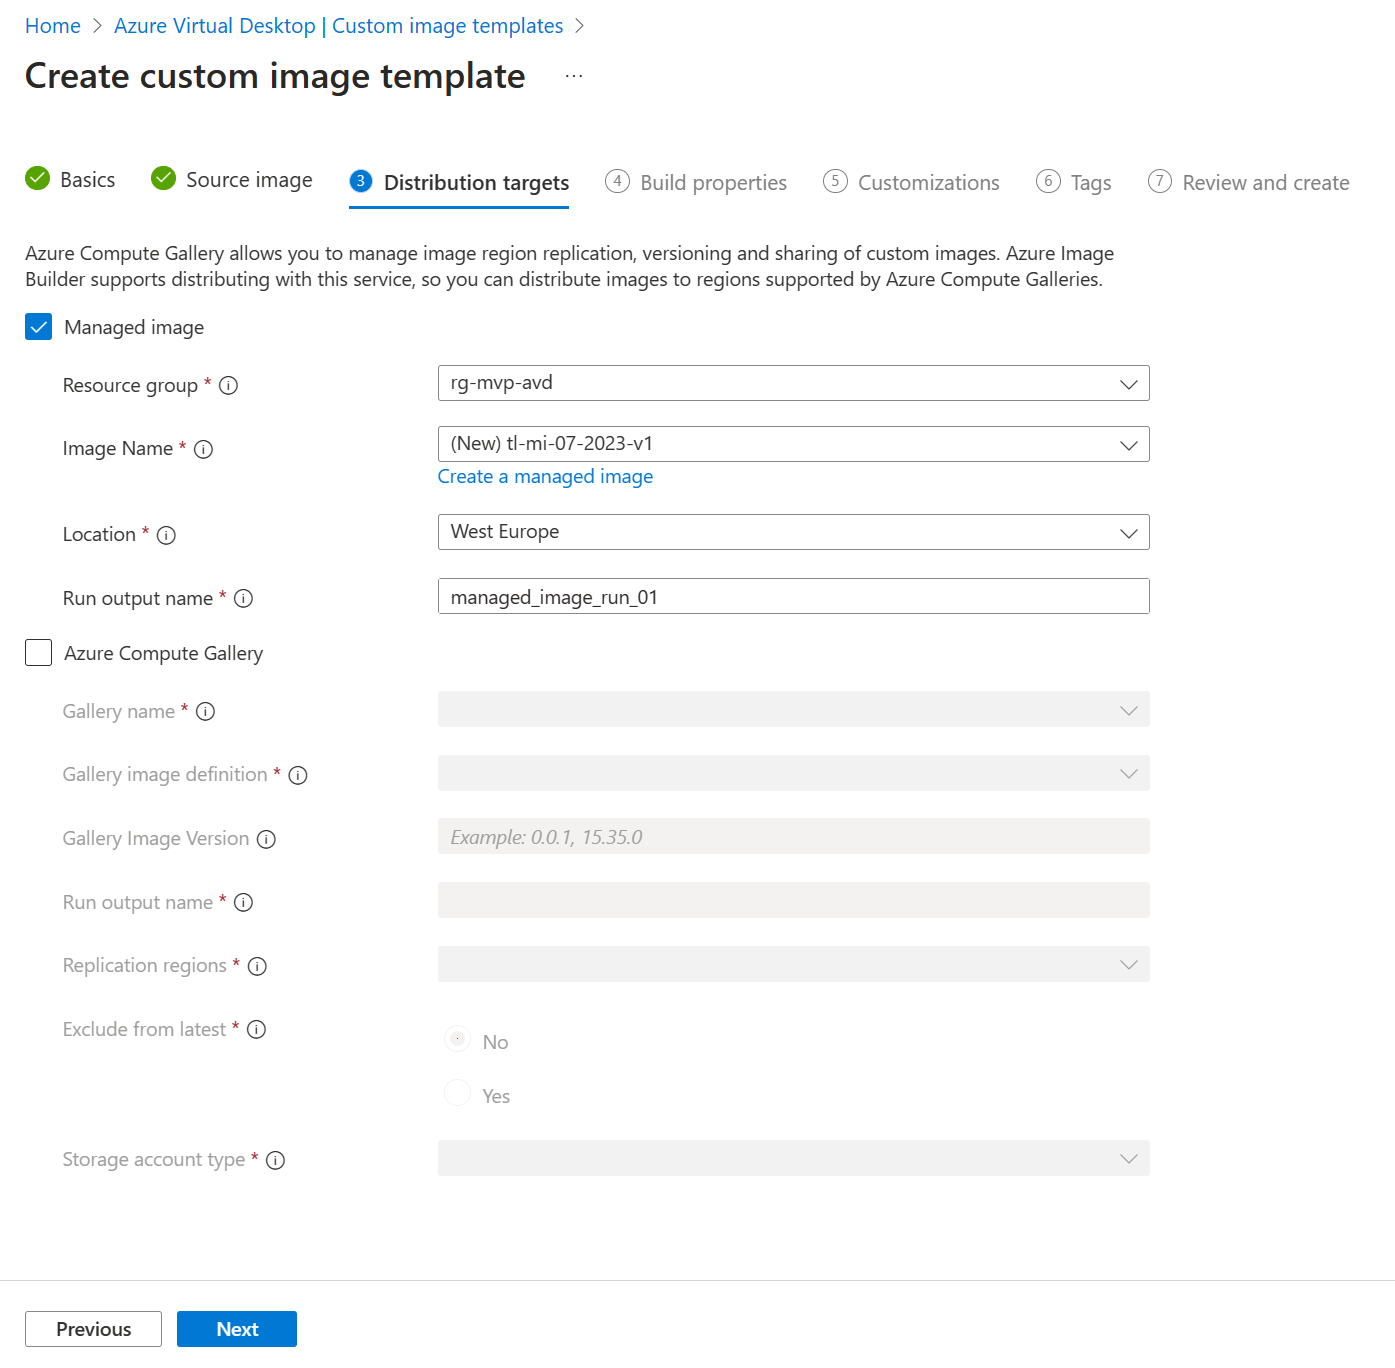
We just need to select our resource group and create a new managed image. Choose your location and define a run output name. I just used the Microsoft example for the run output name which is managed_image_run_01.
Click next to continue to 4 Build properties.
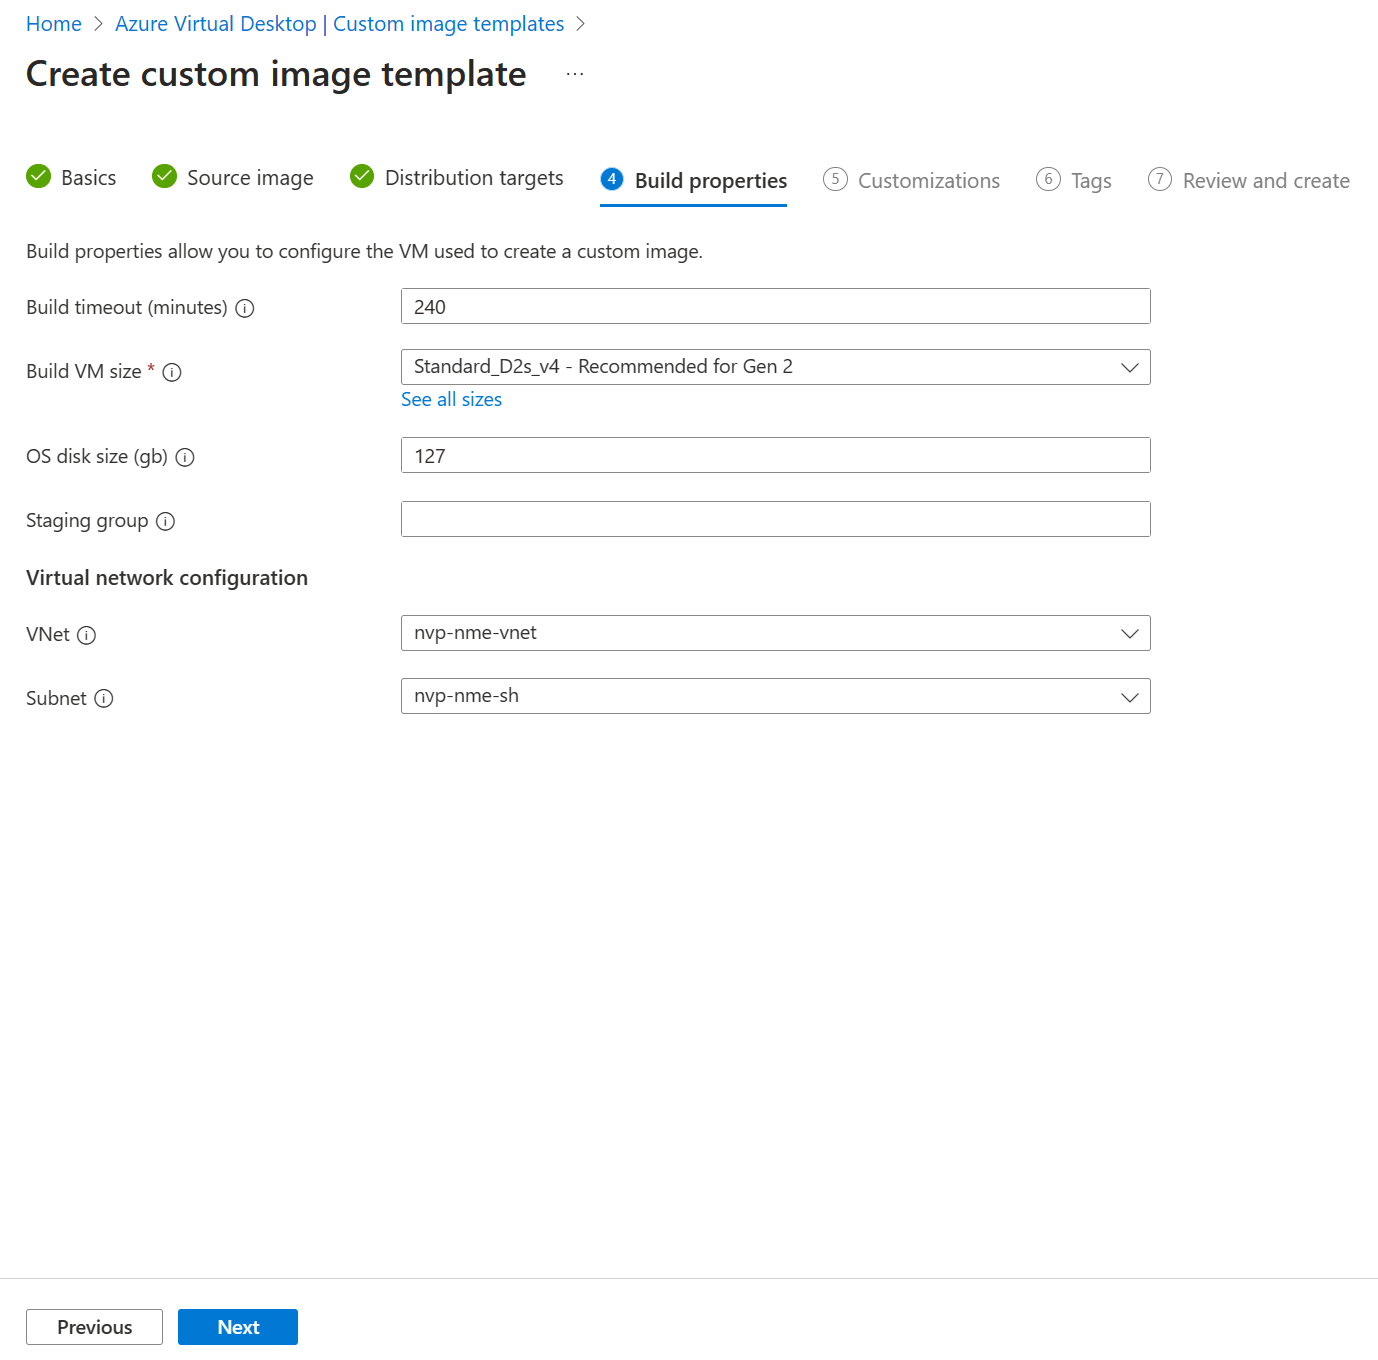
I used the defaults and just selected the correct VNet and subnet. Click next to continue to step 6 Customizations.
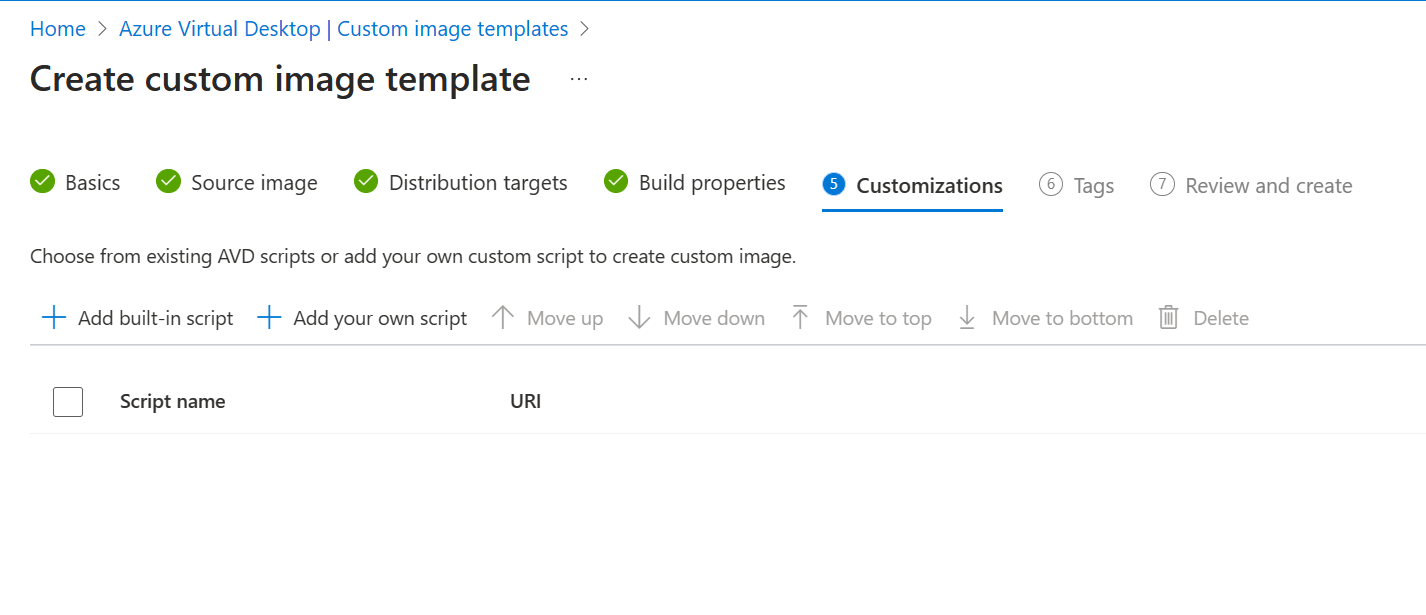
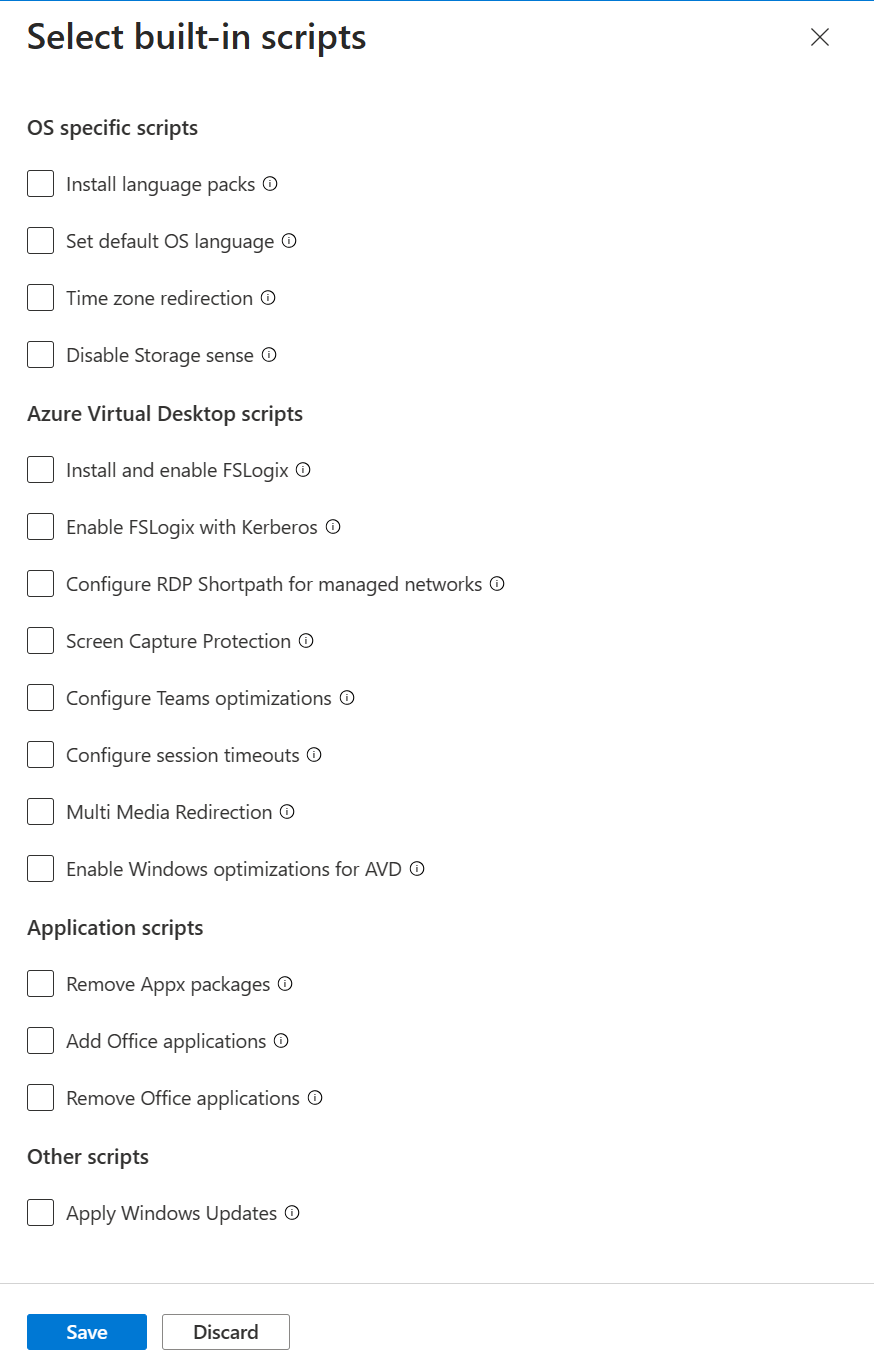
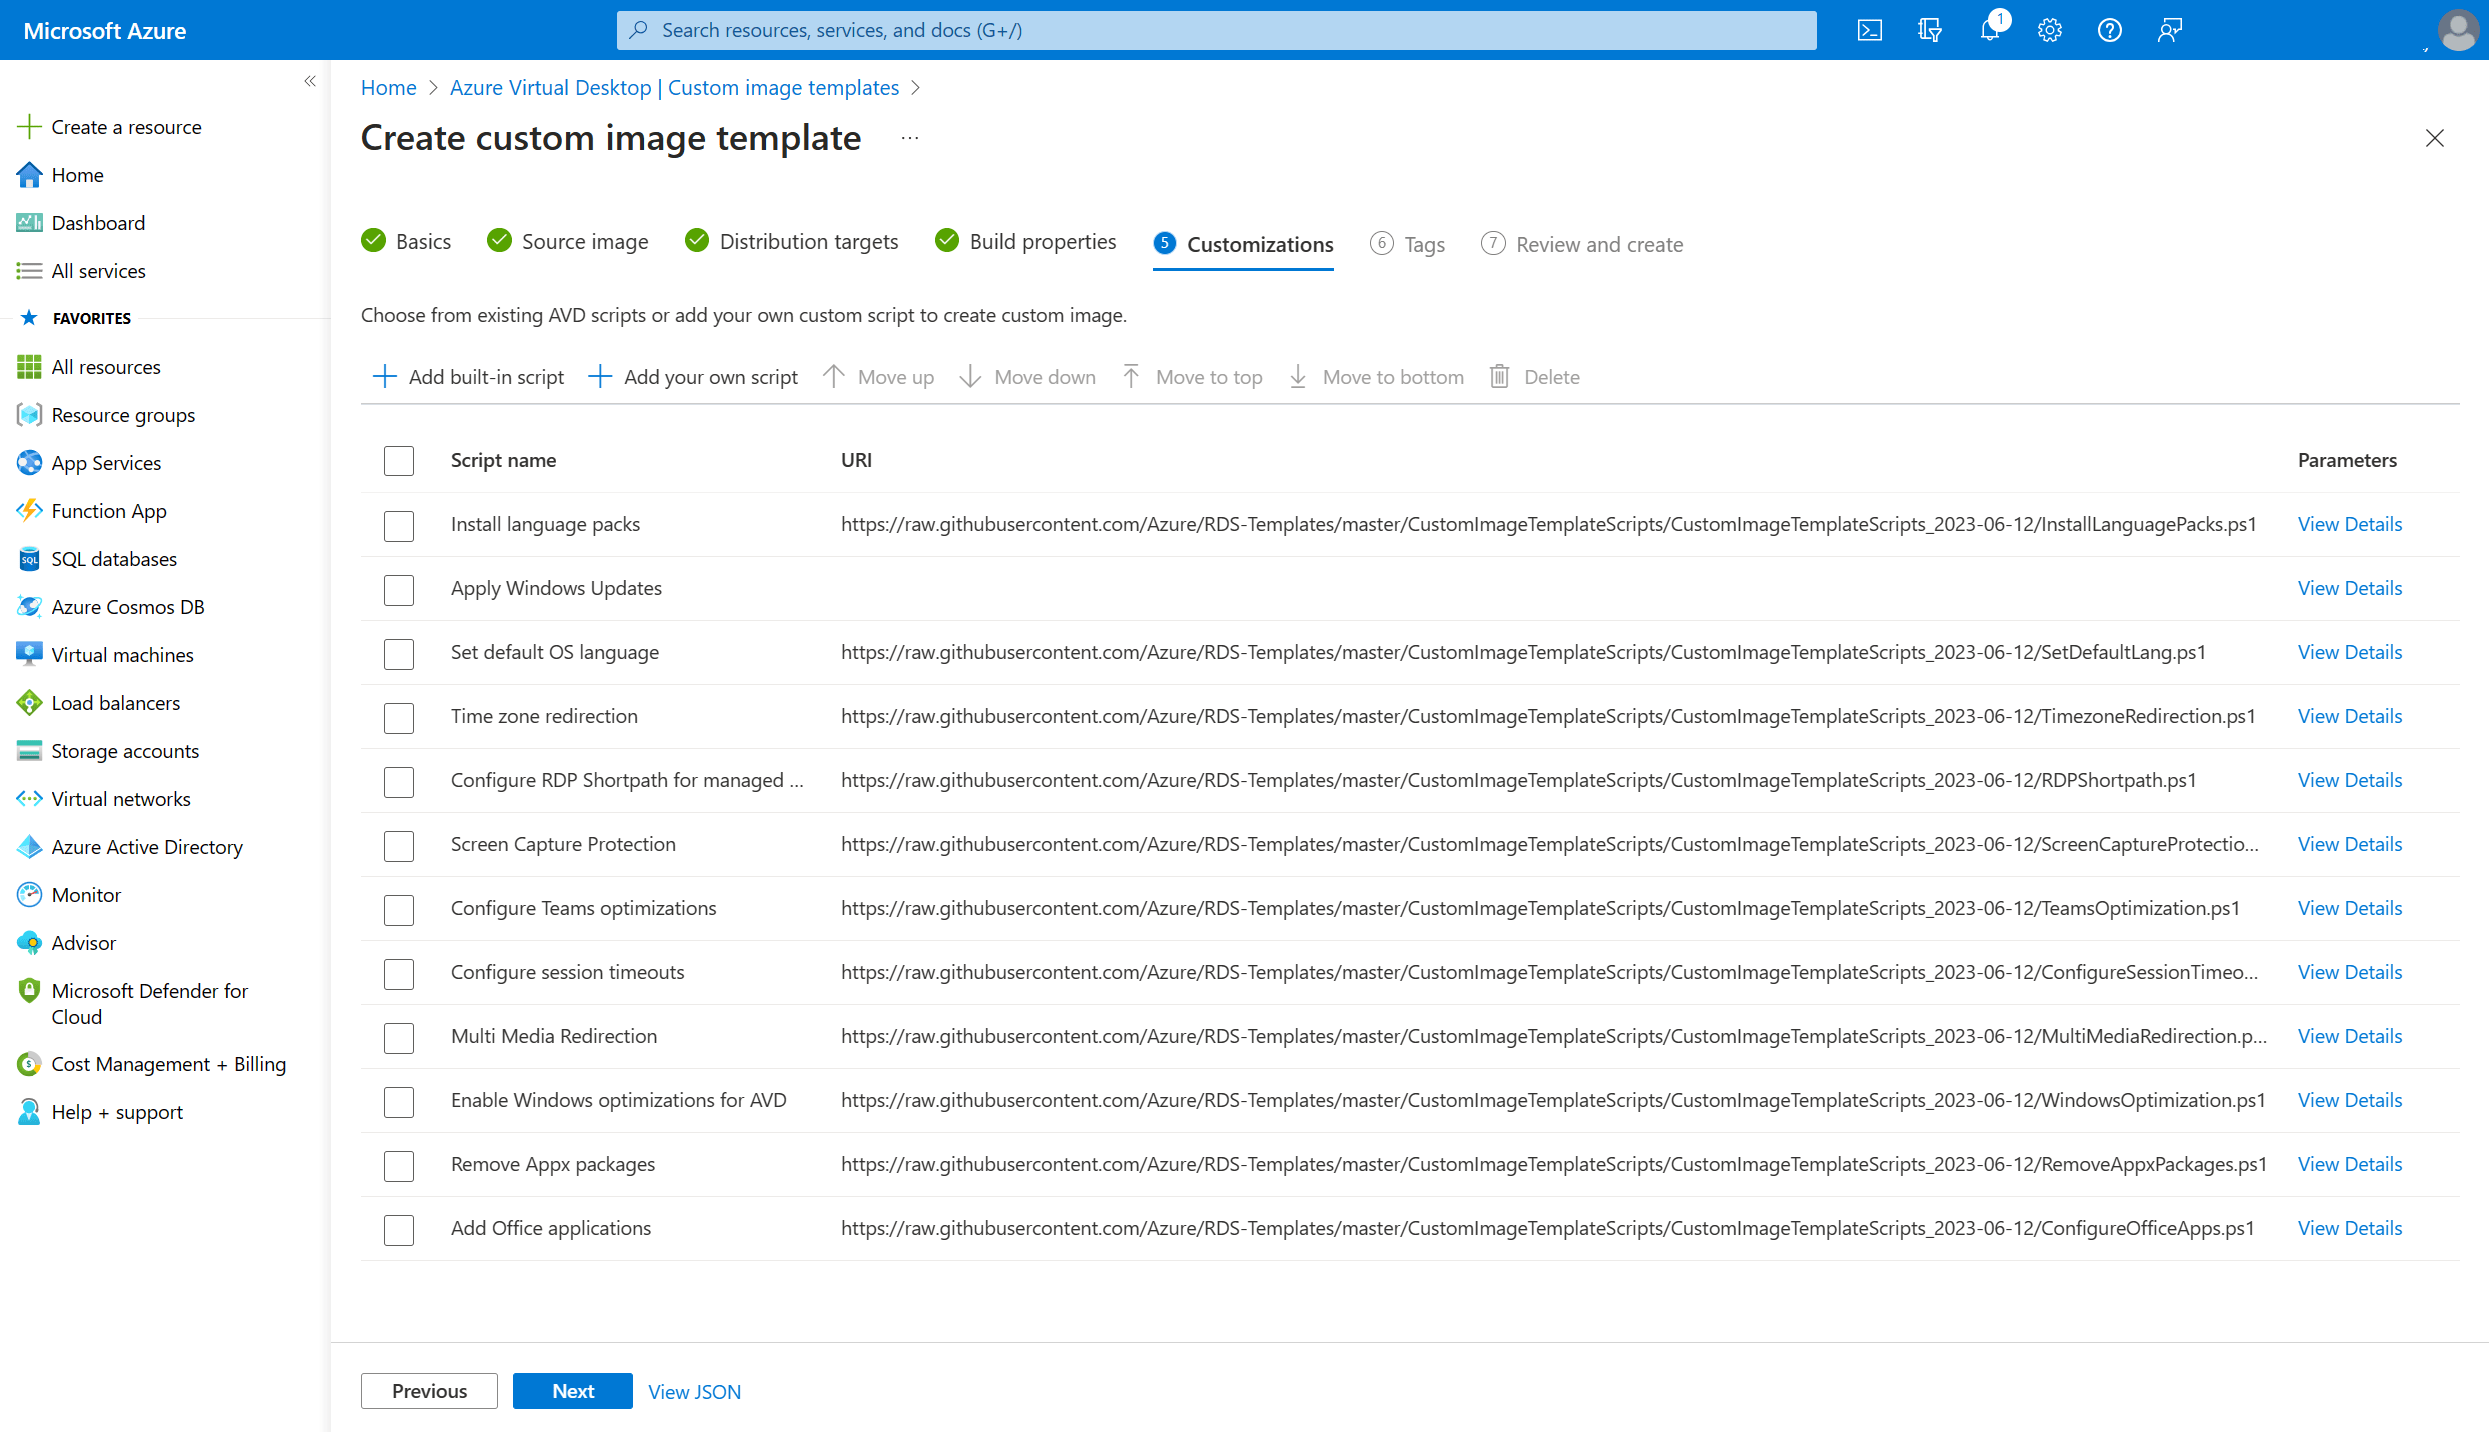
We can add our own scripts to customize the image, but I’d highly recommend to checkout the customizations that Microsoft already provided. Click the + built in script button in the ribbon to view all the available customizations. These are grouped into 4 categories;
- OS specific scripts
- Azure Virtual Desktop scripts
- Applications scripts
- Other scripts
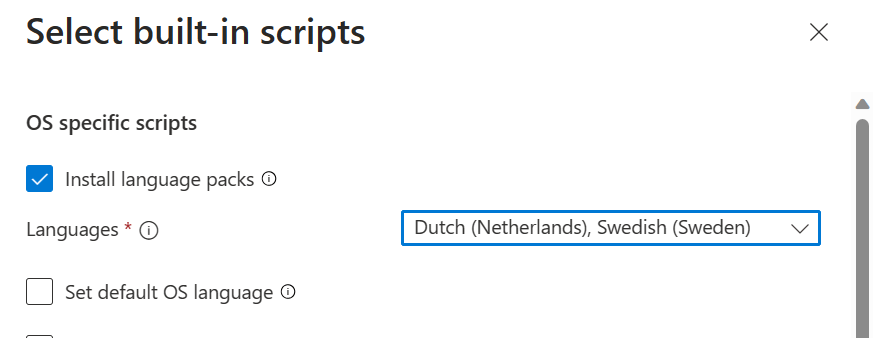
The way this works is that you can check the box for each script that you want to use. For instance if you want to install language packs, let’s say Dutch and Swedish, you can check the box for Install language packs and then search for the Dutch and Swedish language pack.
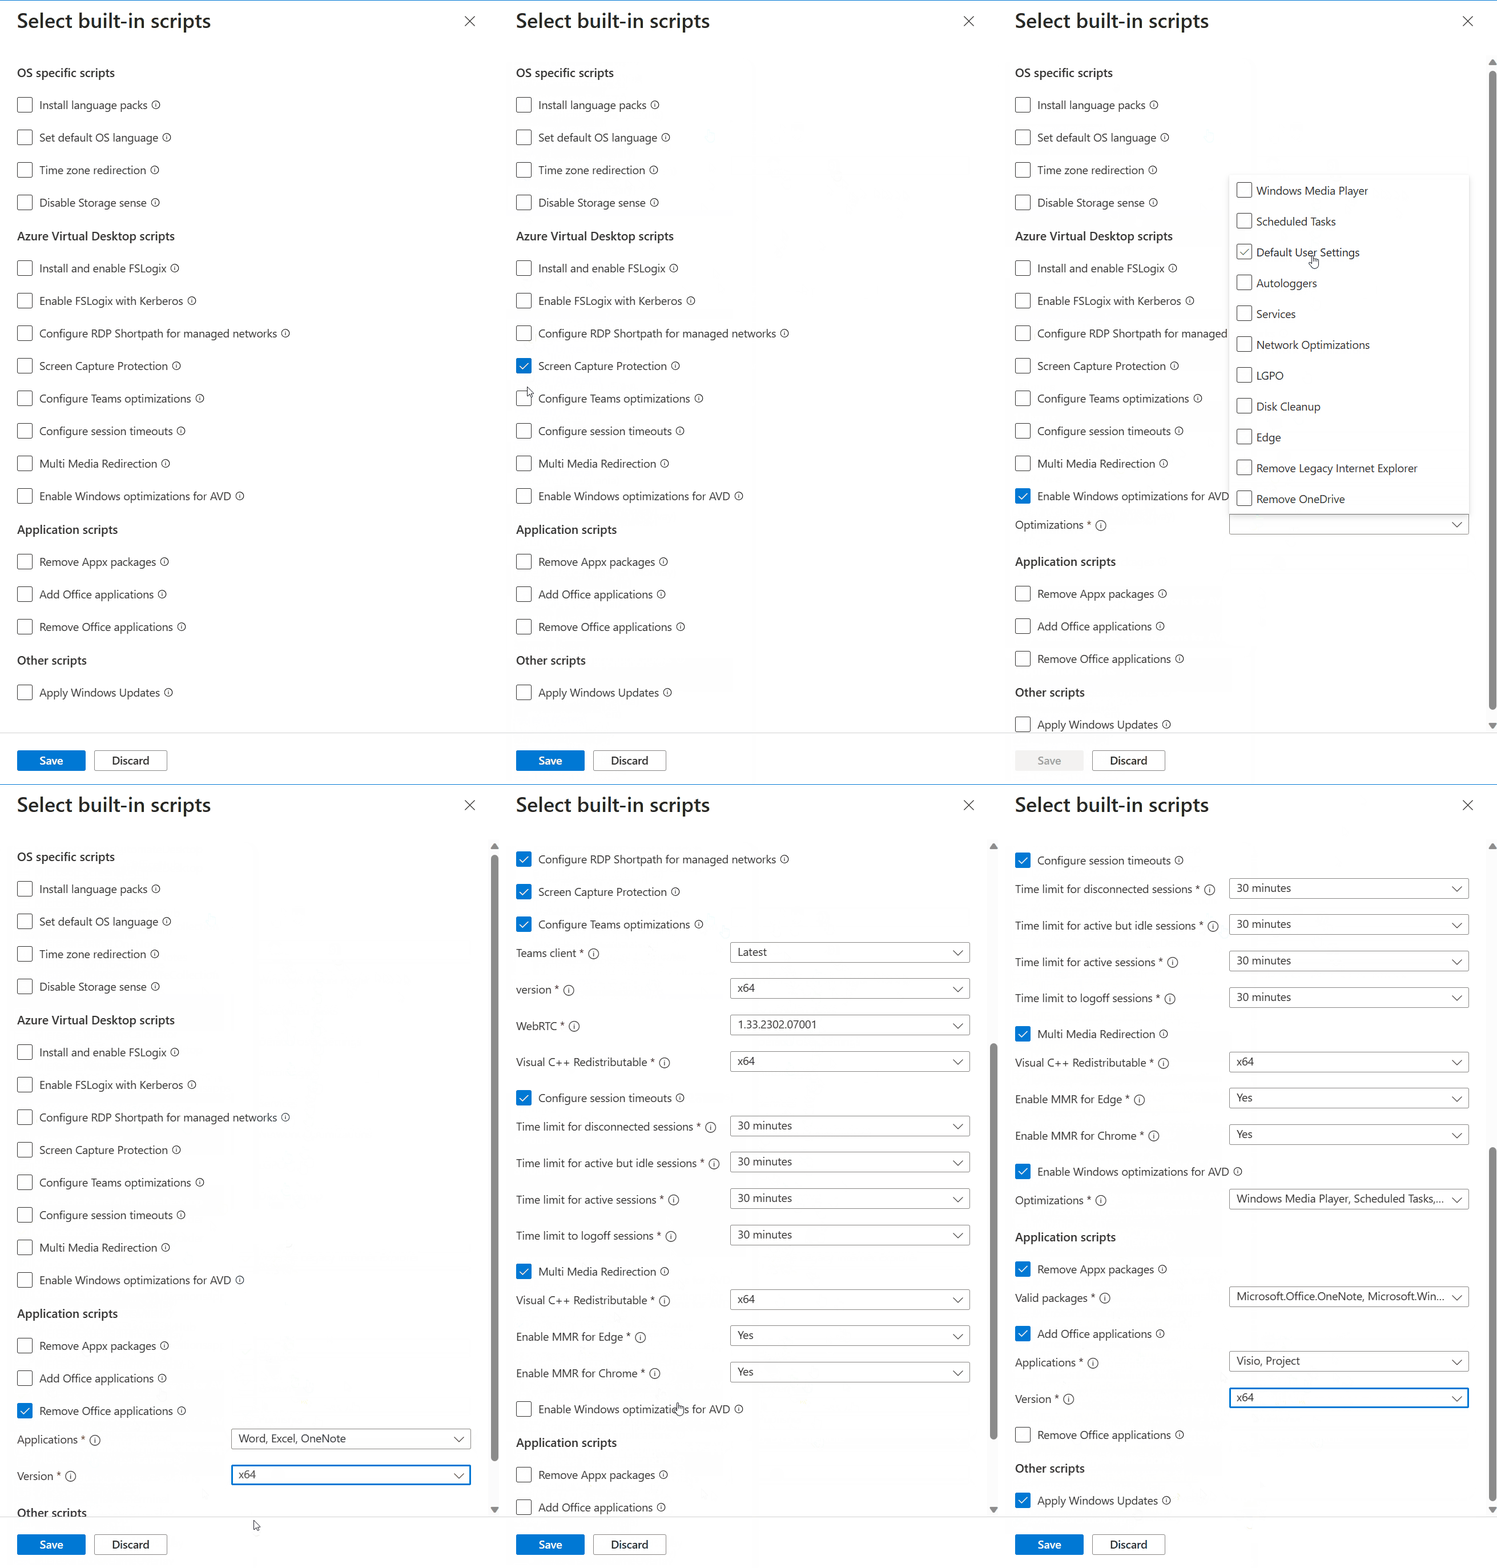
And there’s a lot of cool stuff to choose from! Here’s a small gif on the options that we currently have;
Make sure to configure the desired customization scripts you want to use for your image and click next.
In this overview you can see all the selected customization scripts. You can click the View Details button on the right side to more information on the customization.
Click next to continue to the tags tab.
Add tags if you want to and click next to go to the review and create screen.
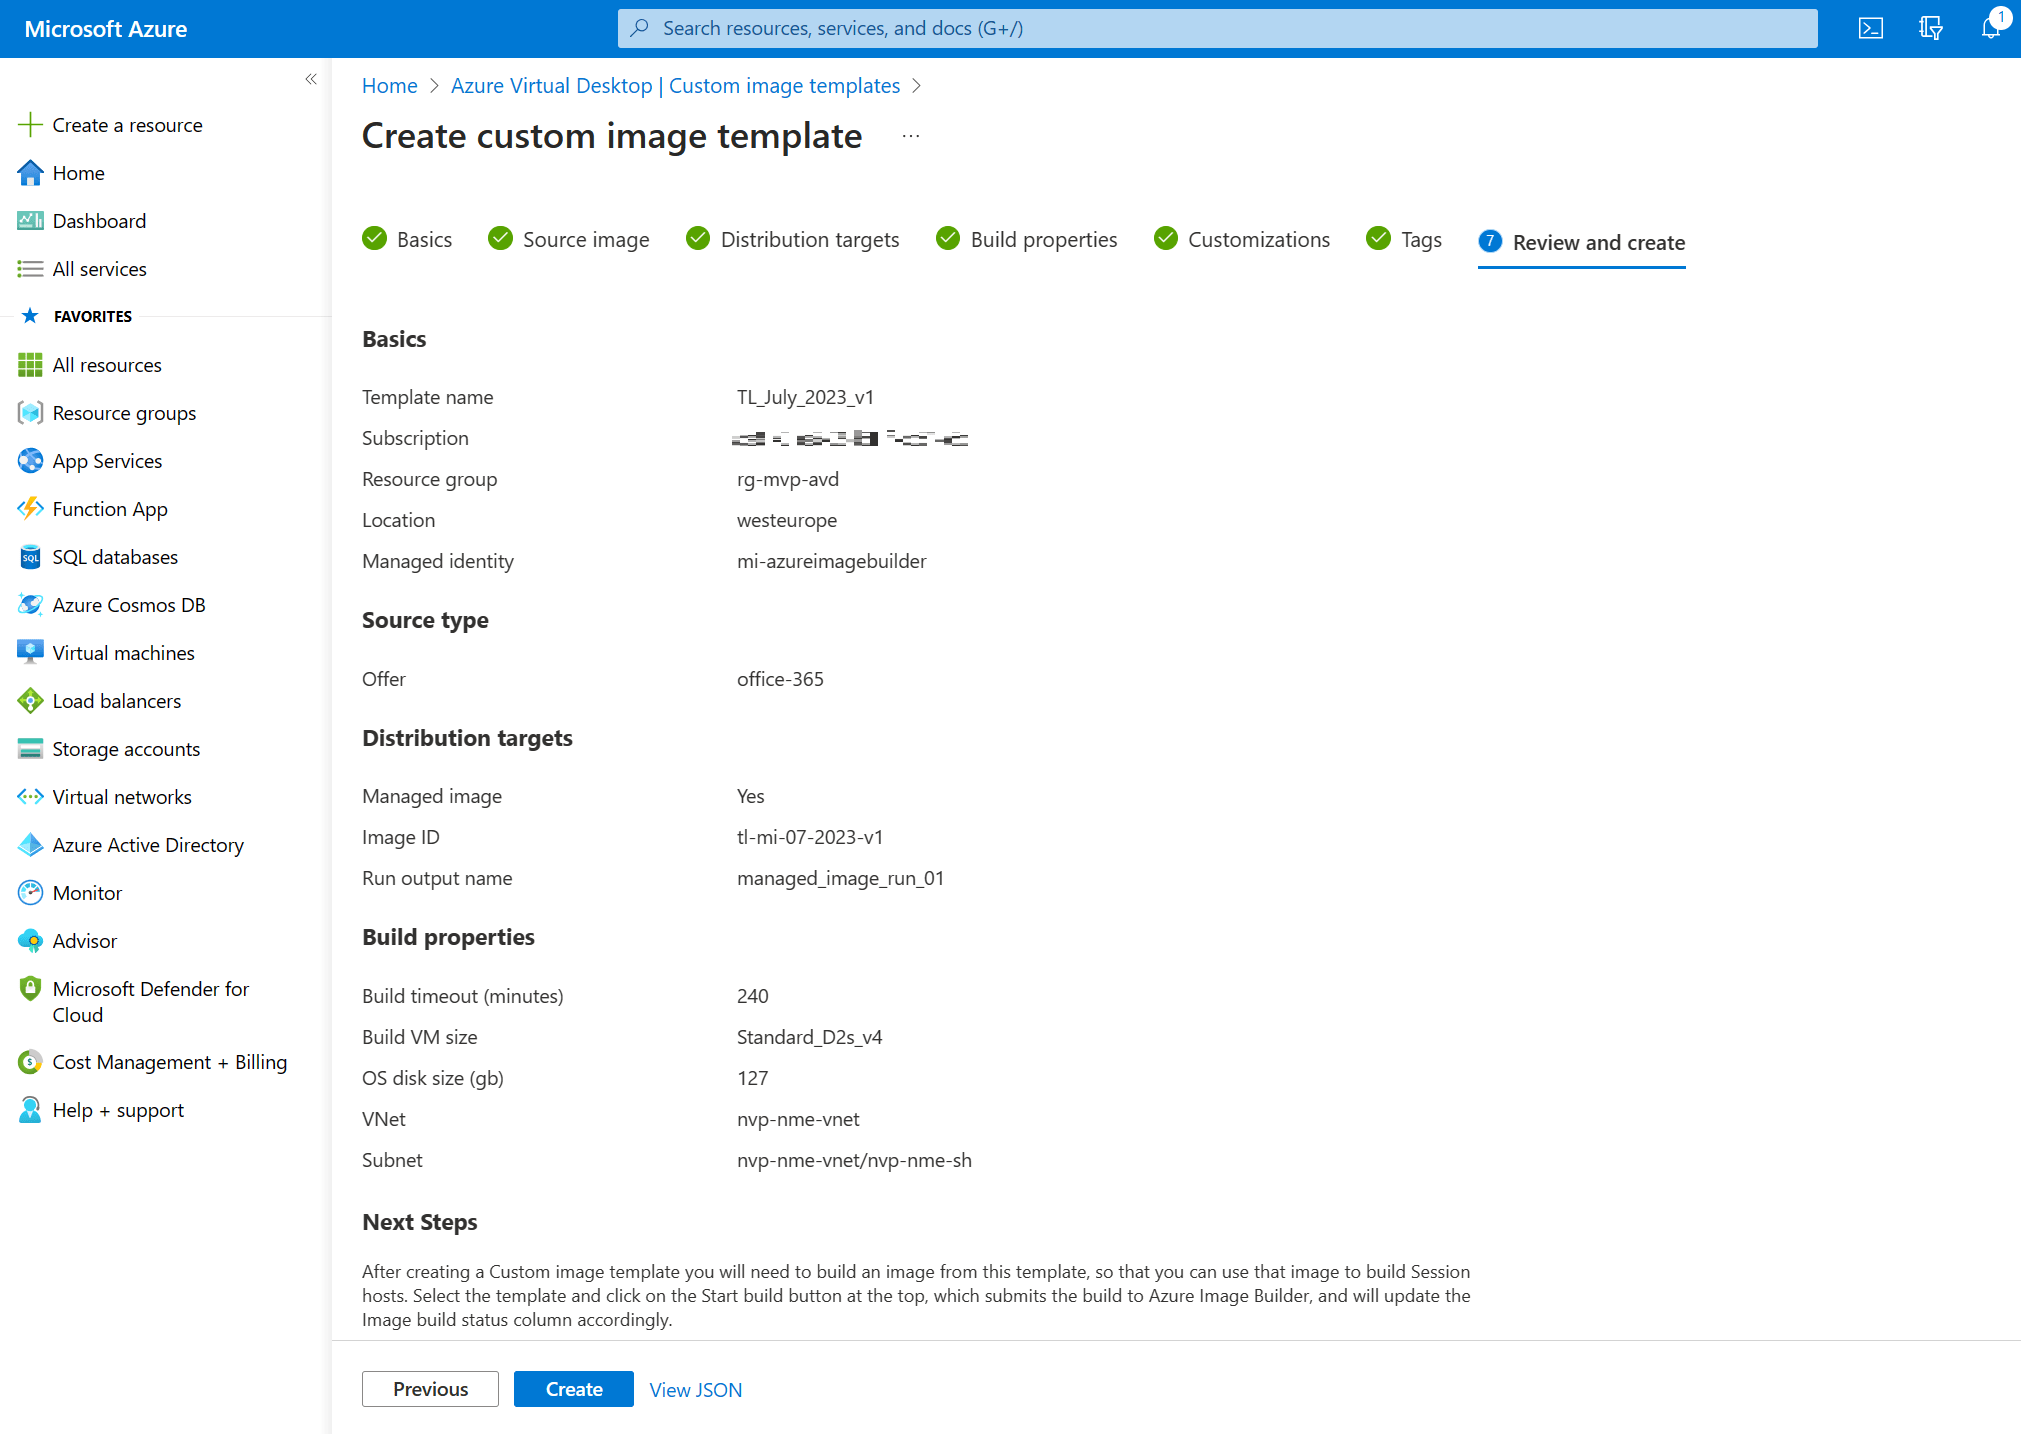
Take a moment to admire your awesome work and click the create button to create the custom image template.
And there you go! A shiny new custom image template with the status of … failed!
Let’s see if we can find a bit more information on what went wrong. I clicked on the custom image template and found an error which tells me that the user managed identity doesn’t have the correct permissions for the network. I’ve granted permissions by creating a custom role but I haven’t configured any network permissions so this error makes sense.
One of the optional steps actually discusses this topic;
“Optional: You can use an existing virtual network when building an image. If you do, the managed identity you’re using needs access to the virtual network, or the resource group it’s contained within. For more information, see Permission to customize images on your virtual networks.”
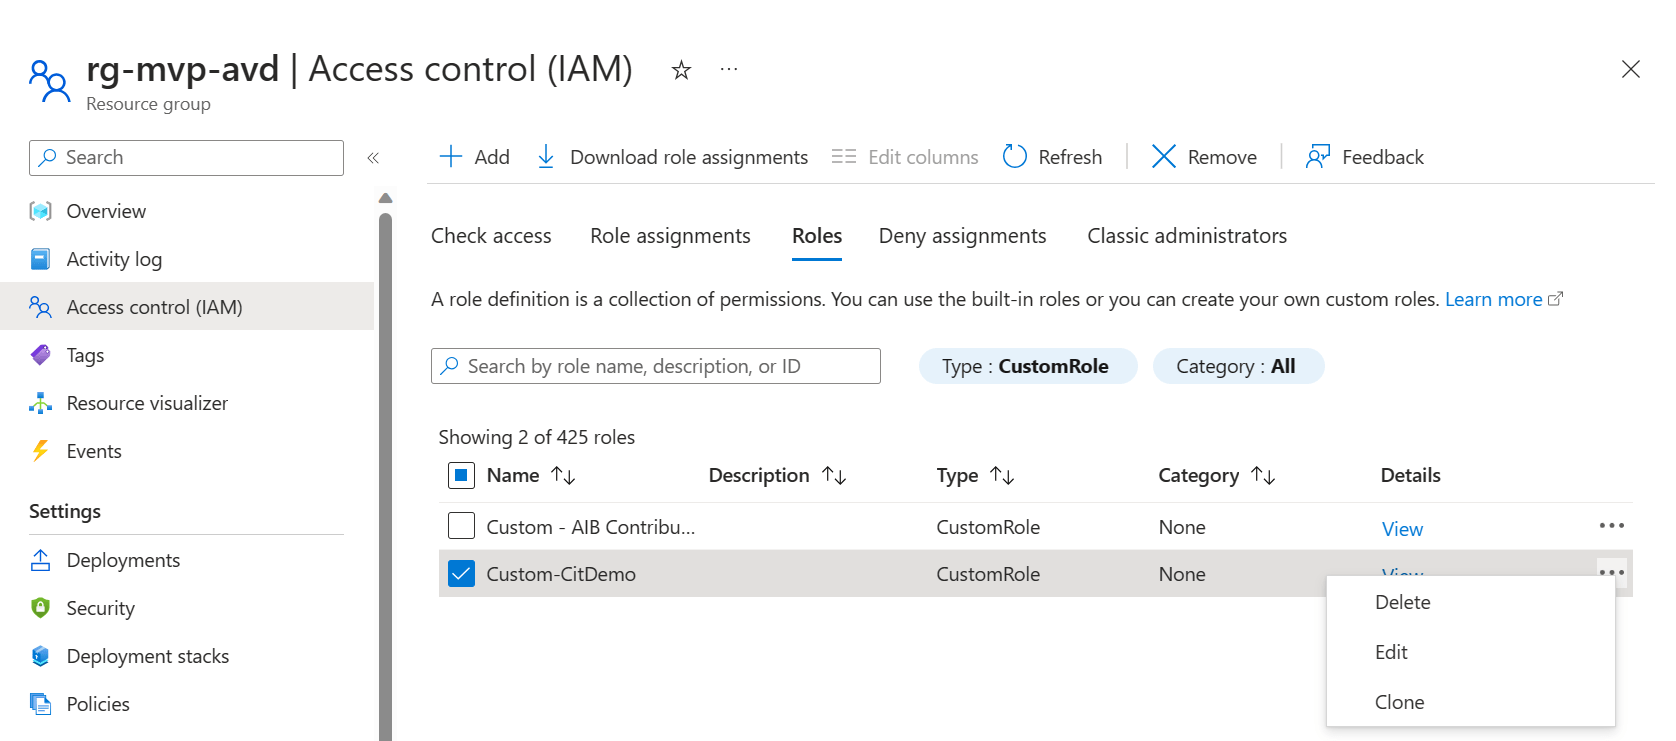
So to solve this issue I just have to add a couple of permissions to the custom role. The custom role is configured at the resource group so let’s go back to the resource group and click Access control (IAM) and go to the Roles tab. Search for the custom role you’ve created, select the correct custom role, click the three dots and select edit.
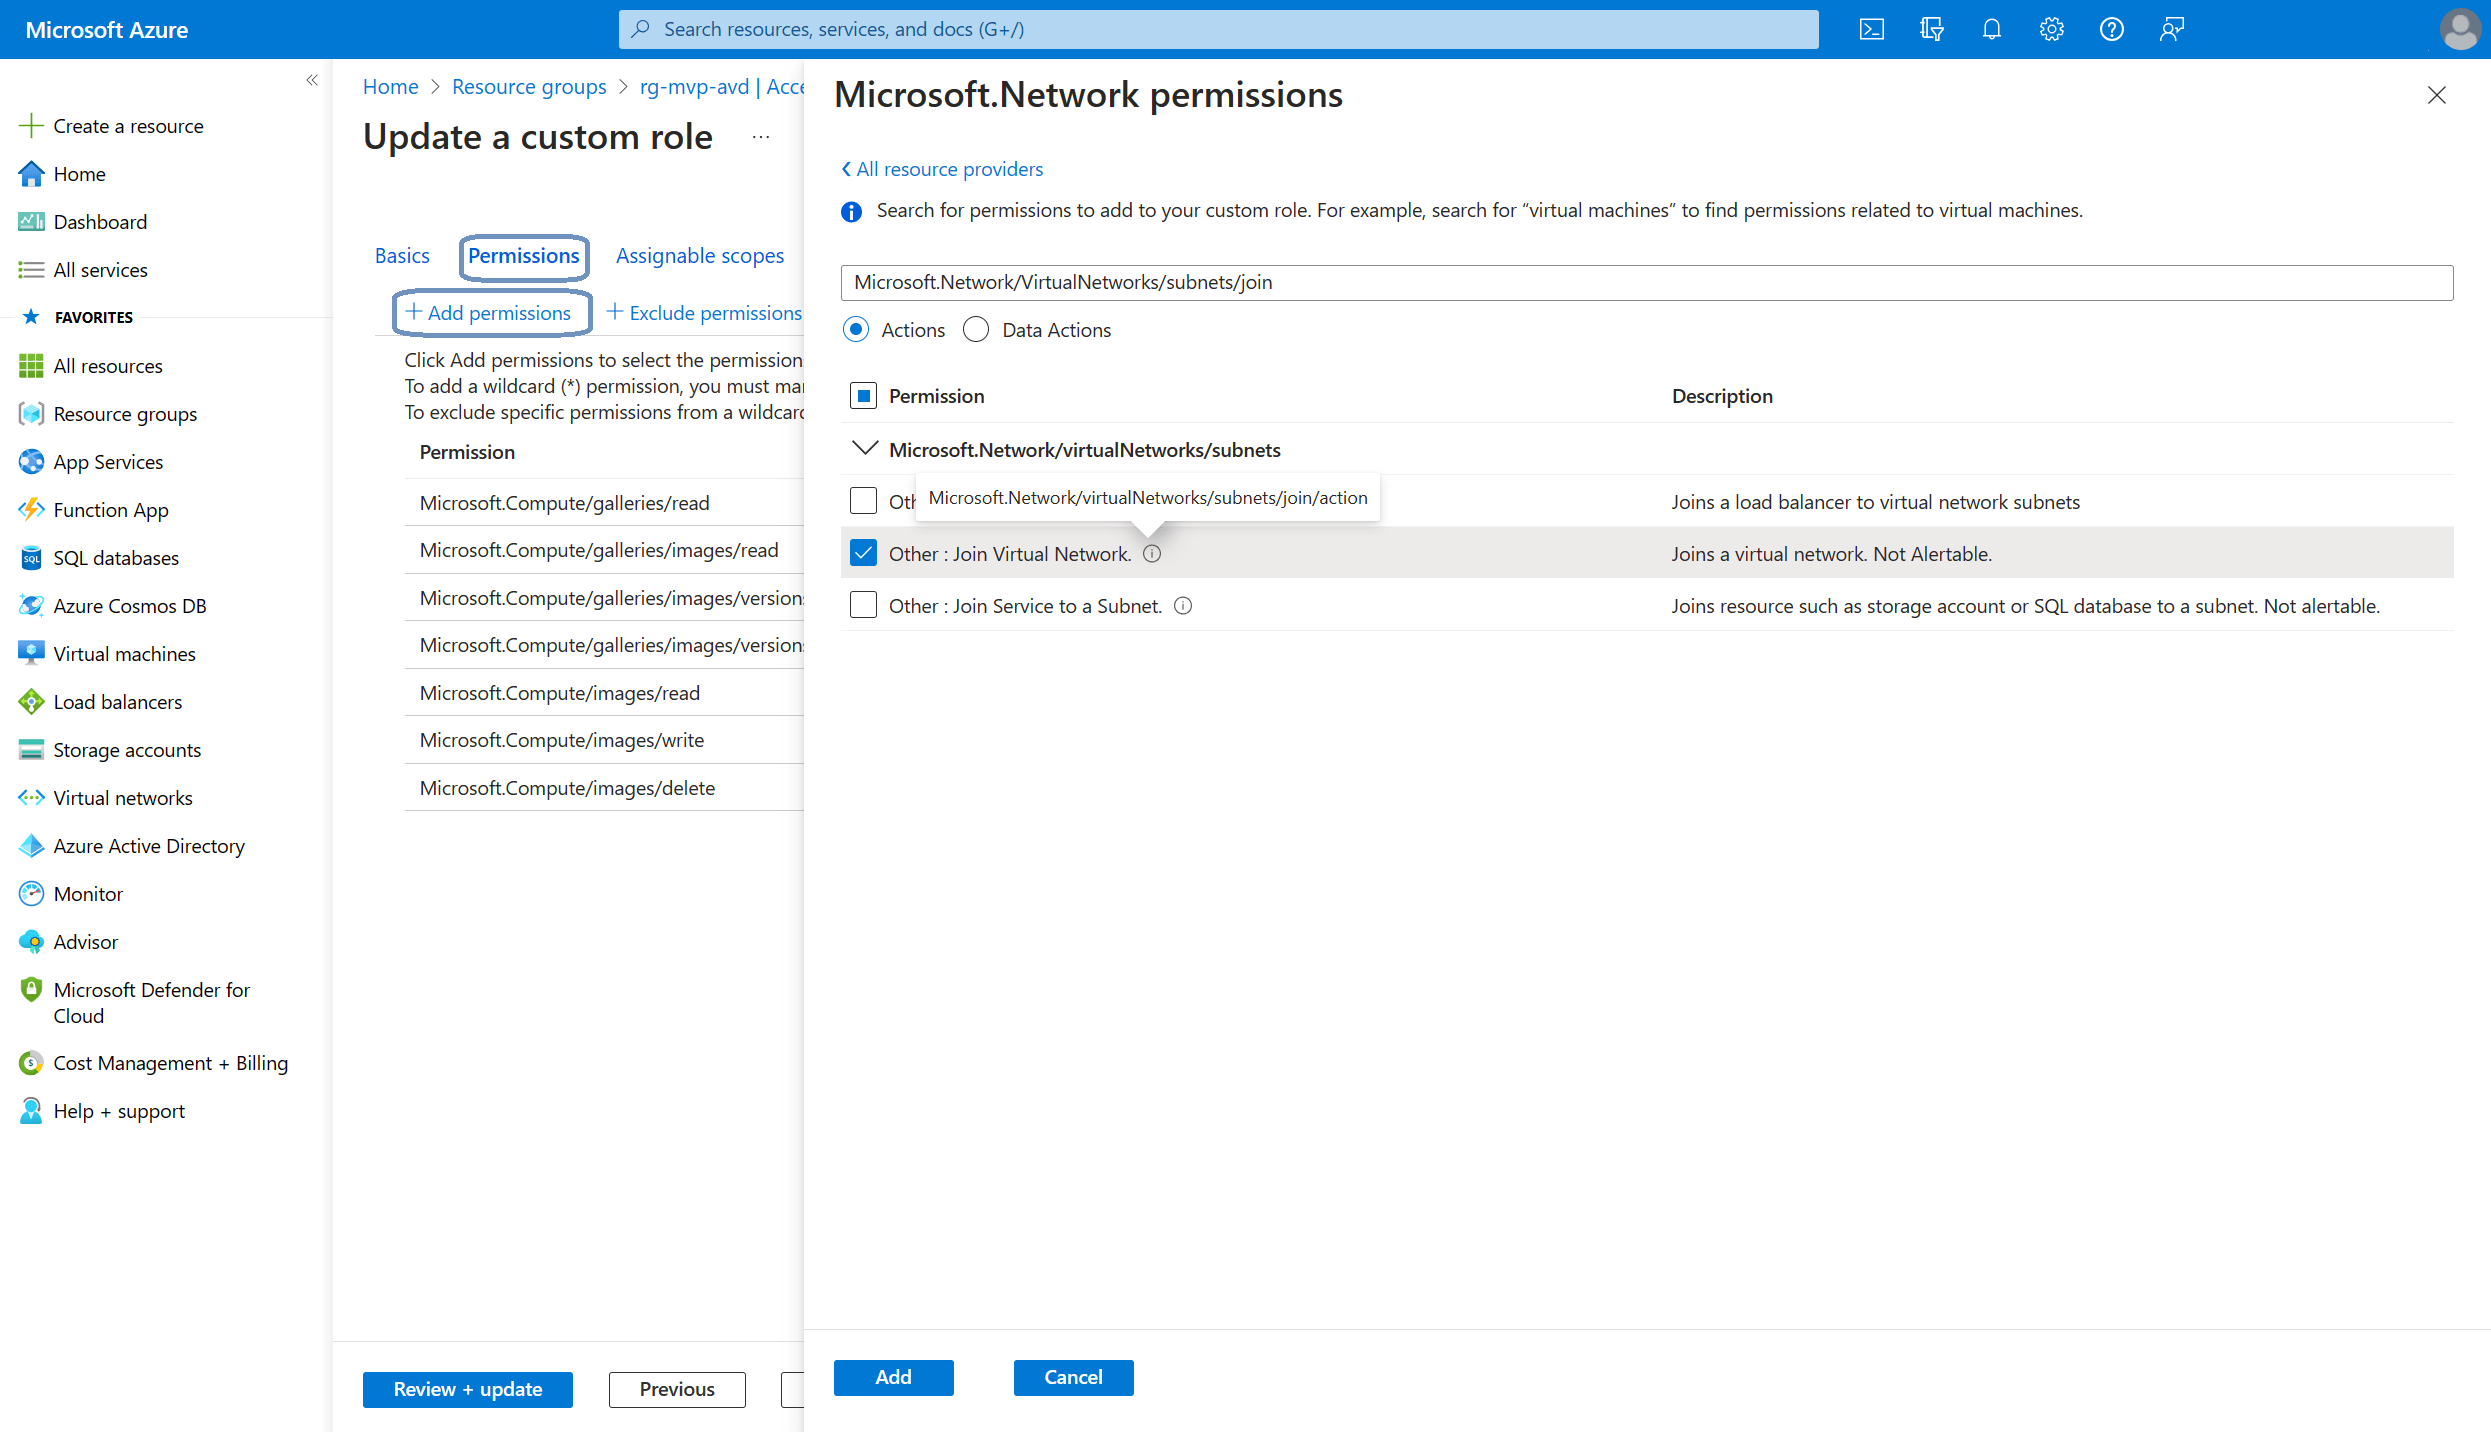
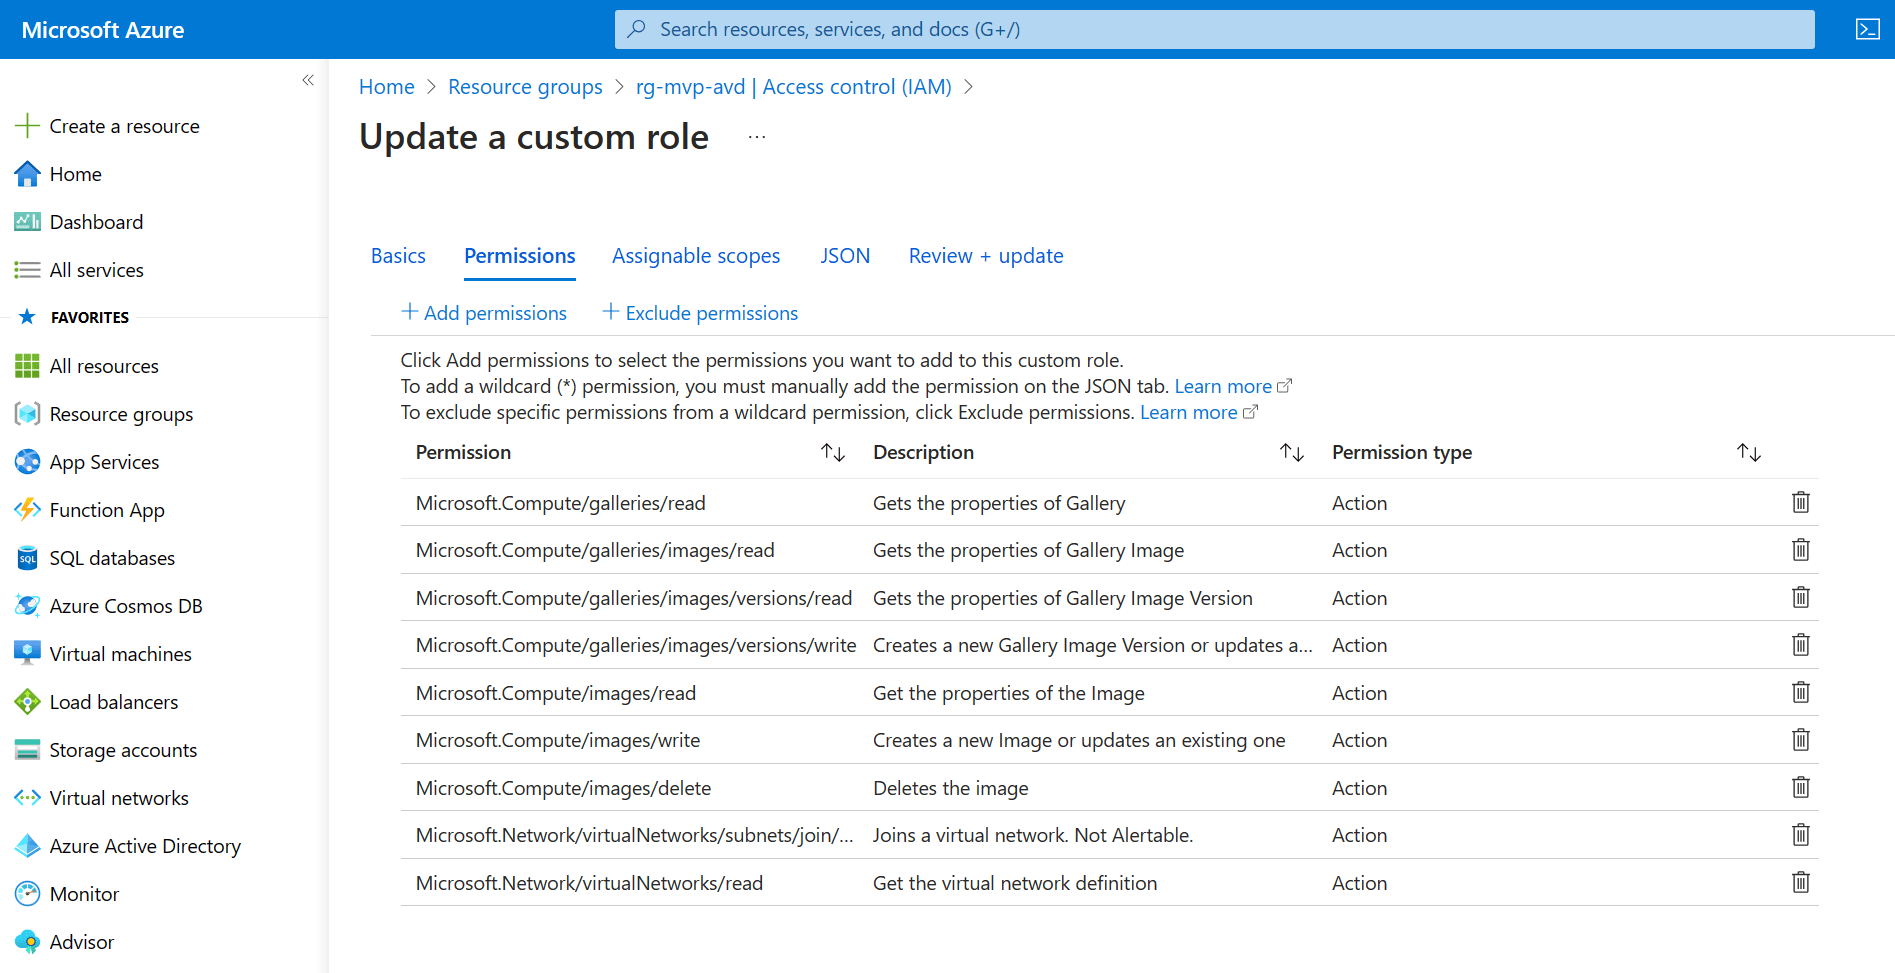
The update a custom role dialog appears. Click on the Permissions tab and click the + Add permissions button. Search for Microsoft.Network/VirtualNetworks. Add the missing permissions;
- Microsoft.Network/VirtualNetworks/read
- Microsoft.Network/VirtualNetworks/subnets/join/action
Once you added the network permissions you should end up with something like this:
Click the Review + update button to save the changes.
I did get another failed status while trying out the new permissions. I needed to disable the Private Link Service Network Policy on the subnet that I was using. A quick check returned this Microsoft doc to help me solve this issue. There’s a small Powershell script that we can run. The example script looks like;
$subnet = 'default'

$net = @{
    Name = 'myVNet'
    ResourceGroupName = 'myResourceGroup'
}
$vnet = Get-AzVirtualNetwork @net

($vnet | Select -ExpandProperty subnets | Where-Object {$_.Name -eq $subnet}).privateLinkServiceNetworkPolicies = "Disabled"

$vnet | Set-AzVirtualNetwork
You only need to change the name of the default subnet, the name of the vnet and the name of the resource group. Once completed, just copy the code and paste it into an Azure Cloud Shell.
Let’s find out if this solved the issue. Go back to Azure Virtual Desktop, Manage, Custom image templates. The status for the first template is still failed. Refreshing will not help here. So this is great time to show a different feature. We can create a new custom image template and base it on the first one we already created. This is great for admins who are tasked to create a new image each month with updates while still keep the existing settings and customizations in place.
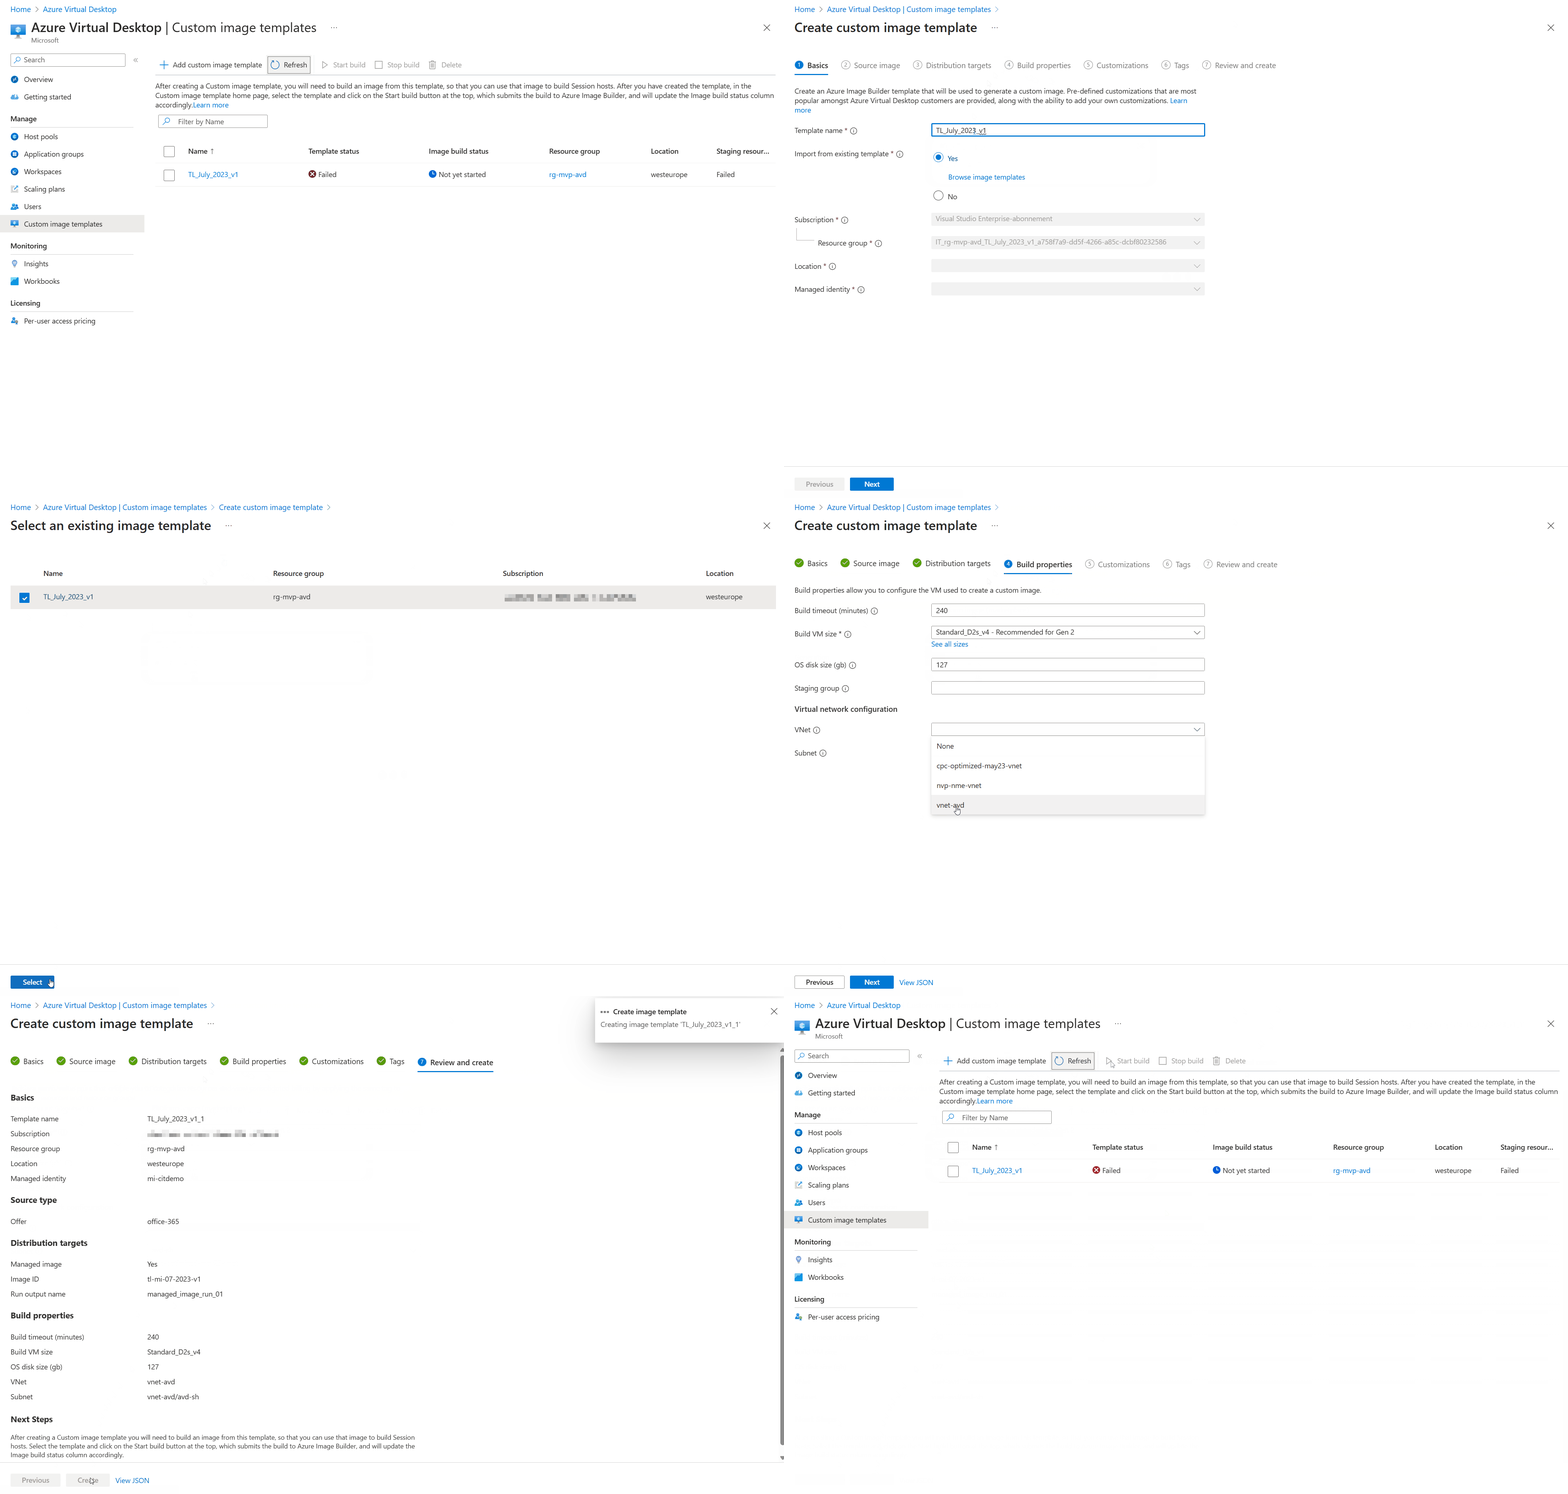
Just like before we can click the + Add custom image template button in the ribbon to get us started again. But this time we can can say Yes to the import from existing template.
And almost everything is filled in from the template we created earlier. The one thing that is kept blank is the networking part. Here’s a short demo on how to create a custom image template based on an existing template.
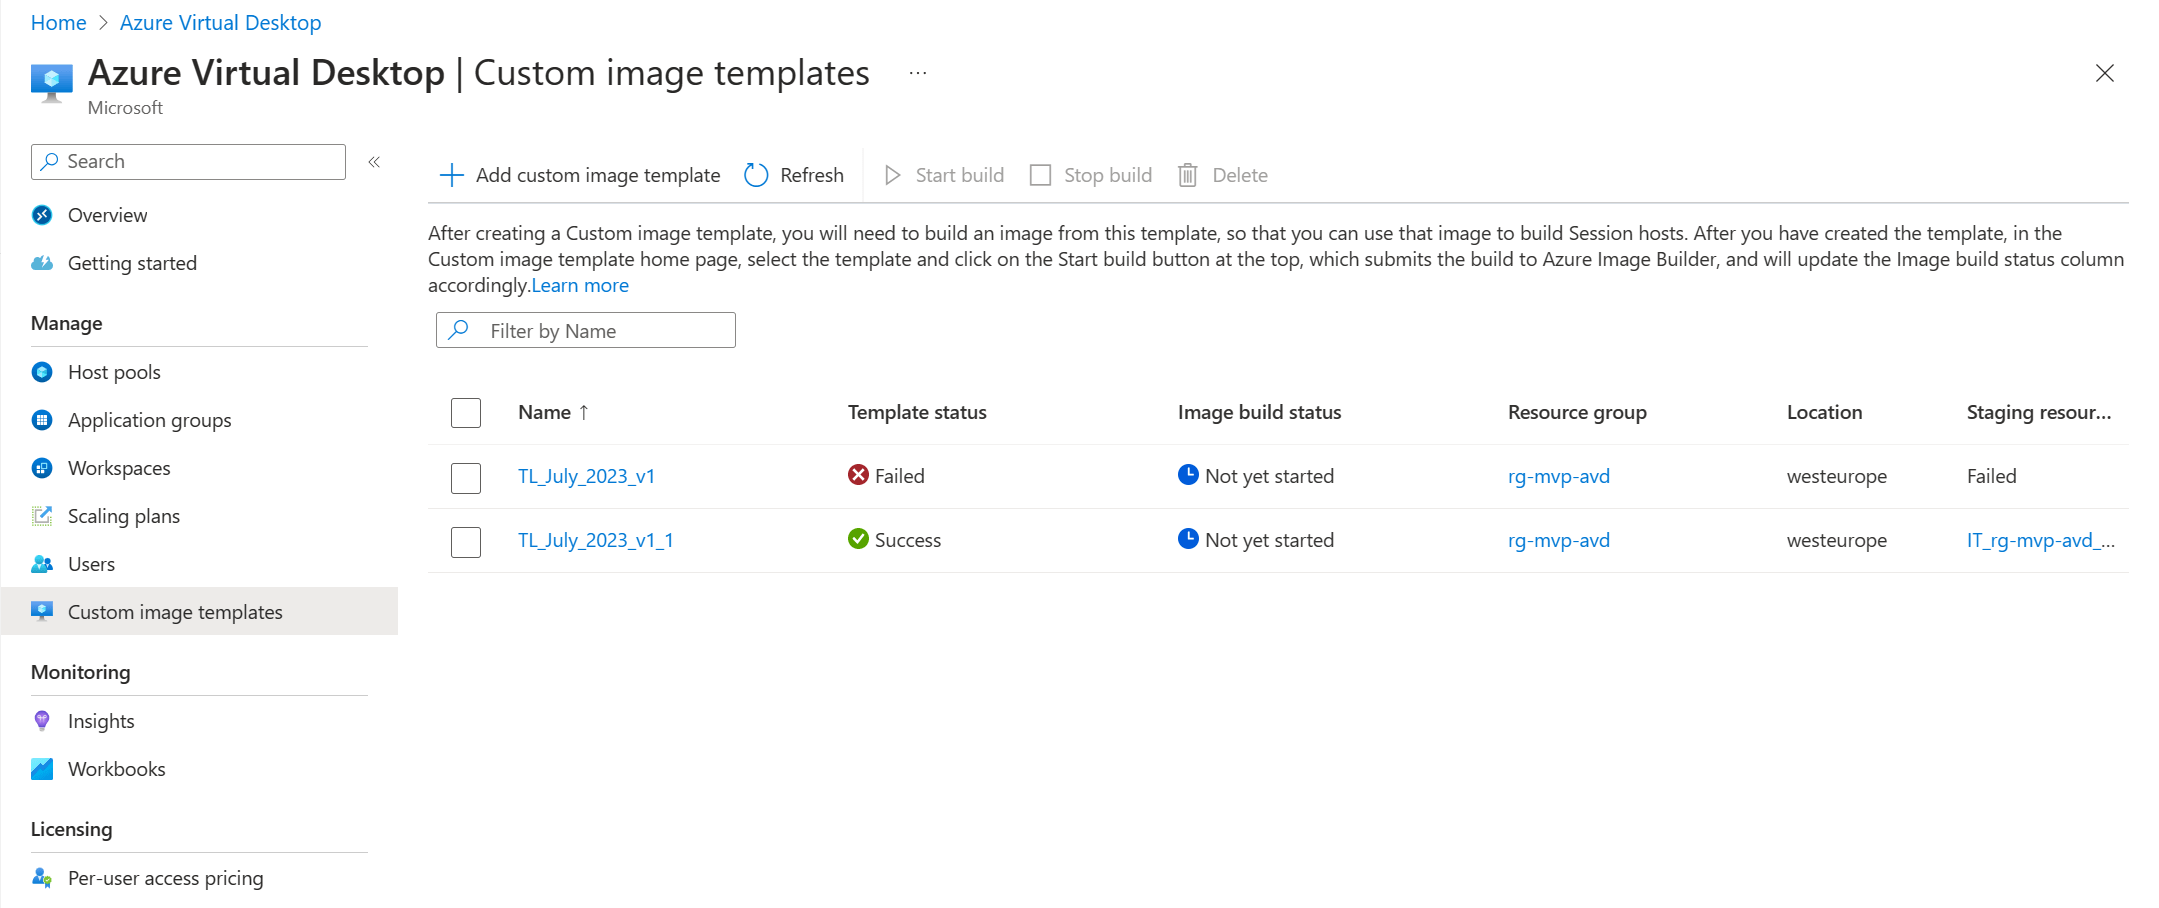
And after a short time we’ll see the new custom image template pop up in the list and this time we have a status of Success.
The only thing that’s left to do is to submit the template to Azure Image Builder. Just select the checkbox of the template you want to submit and click the Start build button in the ribbon.
You can track the build status from this overview. The image build status will have the status Running for quite some time before it completes.
Resources
Share this:
- Click to share on LinkedIn (Opens in new window) LinkedIn
- Click to share on X (Opens in new window) X
- Click to share on Facebook (Opens in new window) Facebook
- Click to share on WhatsApp (Opens in new window) WhatsApp
- Click to share on Telegram (Opens in new window) Telegram
- Click to print (Opens in new window) Print


