What’s up, everyone!
Did you know that Windows 365 admins now have the ability to recover a Cloud PC in case it was deprovisioned because the license has expired? This feature is currently in preview and uses the point-in-time restore feature.
In this post I will take a look at what the point-in-time restore feature is, how to use it from and admin and end user experience. And last but not least, let’s checkout how it helps in restoring a Cloud PC once it is deleted due to an expired license.
Enjoy!
Prerequisites
The point-in-time restore feature is included in the Windows 365 license which means you only need to have an Enterprise Cloud PC up and running if you want to follow along.
Introducing the point-in-time restore option
The point-in-time restore option is a great solution to recover the Cloud PC in case something went wrong in the Cloud PC itself, like an issue with the operating system or something else that prevents users to sign in into the Cloud PC. Windows 365 admins, and even end users, can revert the Cloud PC state to an earlier point in time and fix the problem in an easy way using snapshots of the disk.
There are three types of restore points:
- There are 10 short-term restore points and the interval when they are created can be configured by the Windows 365 admin in the user settings policy. Valid intervals are 4, 6, 12, 16 or 24 hours. The oldest restore point will be deleted once the 11th restore point is created. You can revert the Cloud PC to a restore point of max. 10 days old in case you select the 24 hours interval time.
- There are 4 long-term restore points which will be created after 7 days. Just like the short-term restore points, the oldest one will be deleted in case the 5th restore point is created. Using long-term restore points, you can revert the Cloud PC to a restore point of max 28 days old.
- Windows 365 admins can create custom restore points, or on-demand manual restore points. These restore points will be deleted after 28 days.
Another thing to mention is that one of these snapshots is actually saved in case the license expires and the Cloud PC is destroyed. This automatically means that all of the configuration, like the provisioning policy and assignments, should not have changed. Just reenable the license of the same SKU and restore the Cloud PC. Cool right?
But before we get to that, let’s check out where we can find these restore points. First, we sign into the Microsoft Intune admin center, Devices, Windows 365, All Cloud PCs and select a Cloud PC. Next, click on the Restore points menu item.
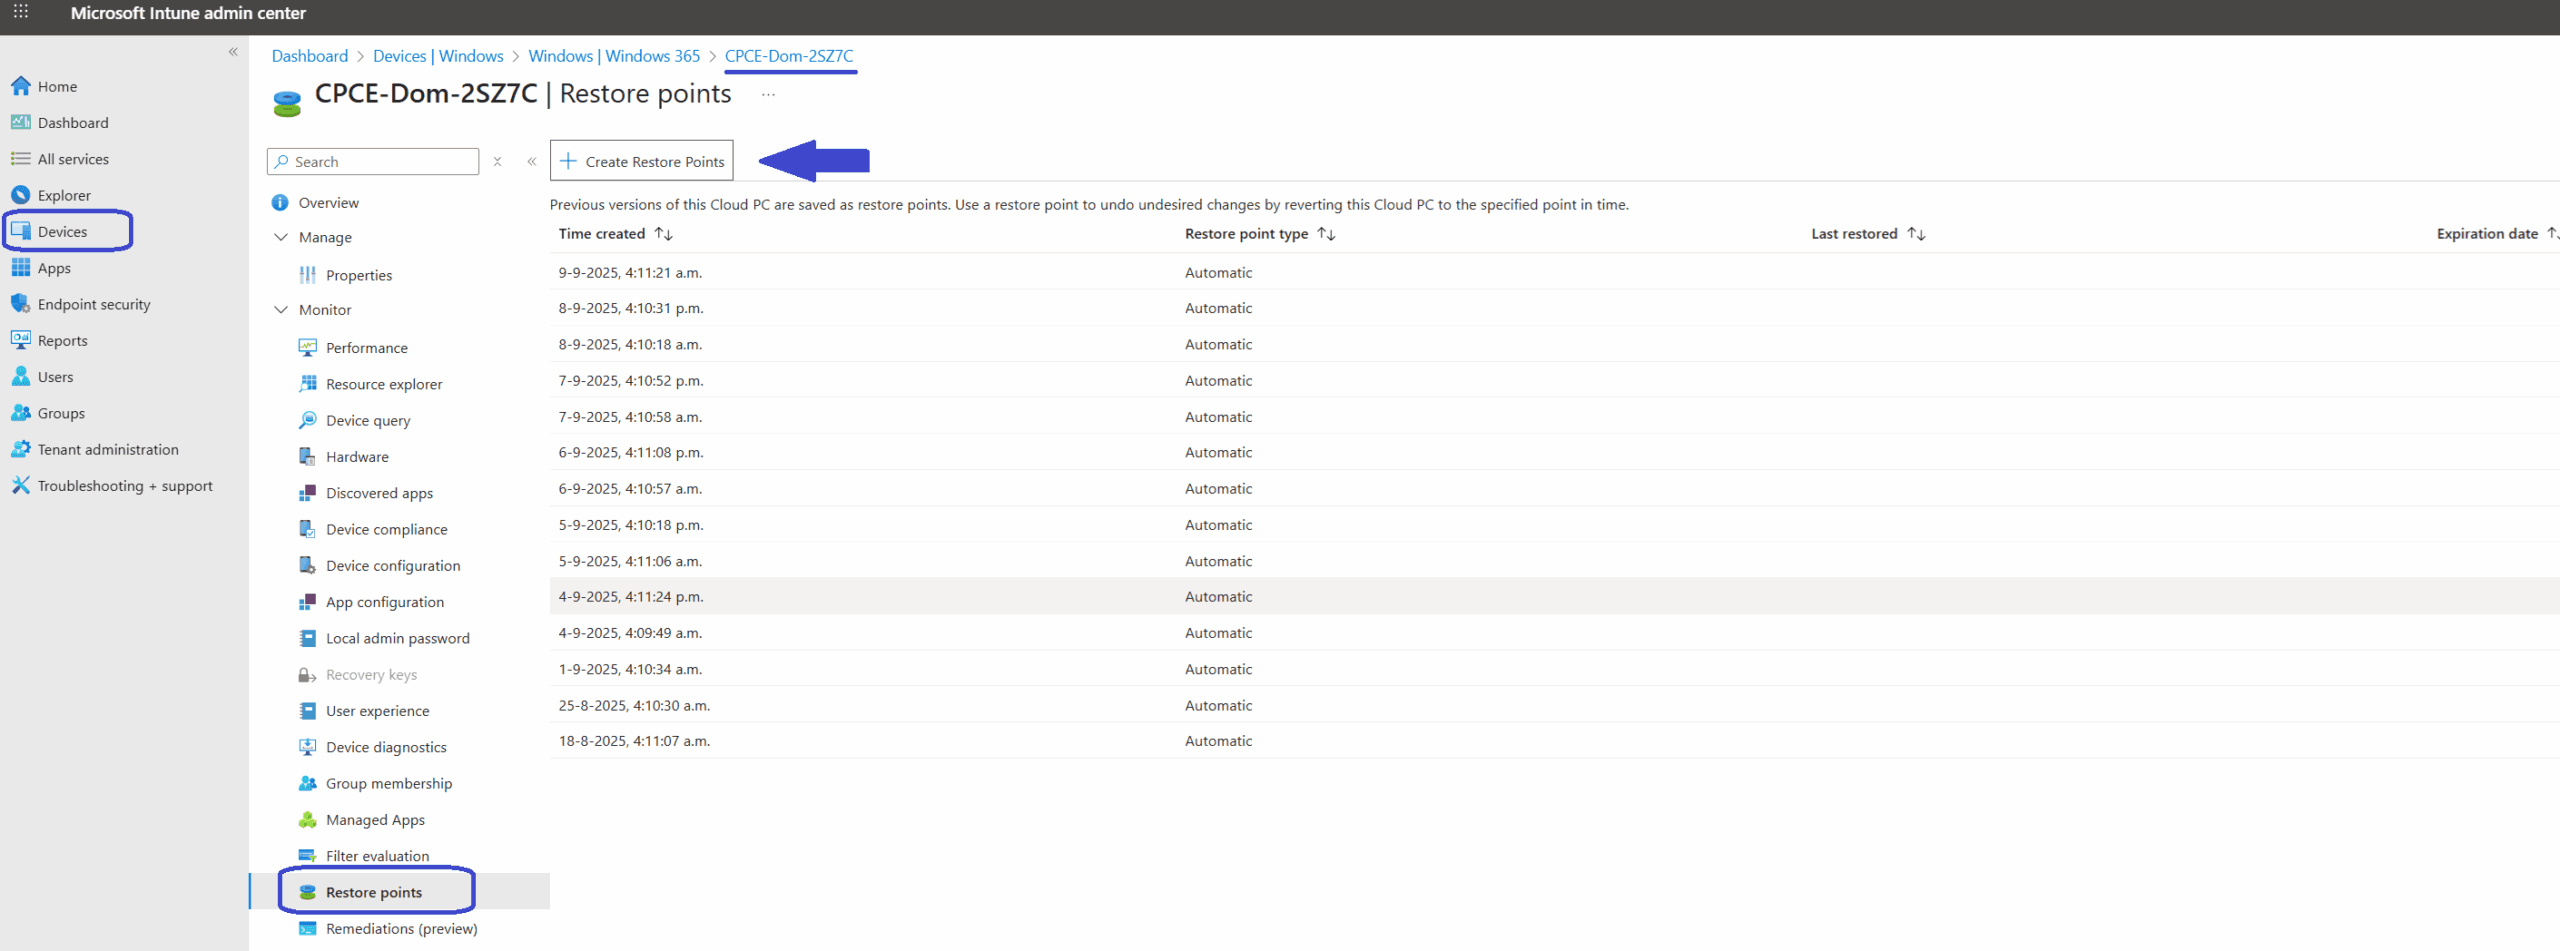
This screen shows all available restore points along with:
- Time created: showing the date and time the restore point was created.
- Restore point type: Automatic for short-term and long-term restore points. Manual if you created a restore point yourself.
- Last restored: shows the last time when the restore point was last restored, of will be blanc in case the restore point is not restored.
- Expiration date: tracks the number of days before a manual restore point will be deleted. It will have a max. of 28 days.
- Healthy and unhealthy restore points: overview will automatically show symbol in the form of an orange triangle with an exclamation mark next to a restore point that is not healthy. Even though you can restore and export them, you should expect issues with these unhealthy restore points. Example of the unhealthy restore point symbol:
Did you notice the blue arrow in the previous screenshot of Microsoft Intune? This is where Windows 365 admins can create their manual restore points. This process will require an Azure subscription with a storage account.
Reverting to a previous point in time
Let’s find out how to revert to a restore point. There are two ways:
- Direct restore from the Cloud PC object
- Use bulk actions
Restore a single Cloud PC object
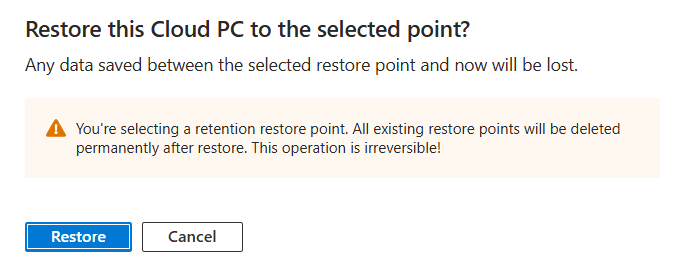
All we need to do is navigate back to the Restore points menu on the Cloud PC in question. Click the three dots (…) and select Restore this version.
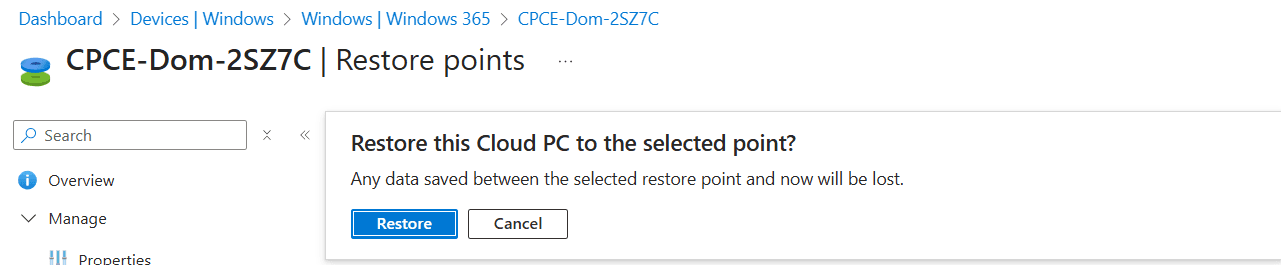
Make sure that you got the right Cloud PC and confirm by clicking the Restore button. Microsoft Intune will give a nice pop up confirming that the restore is initiated:

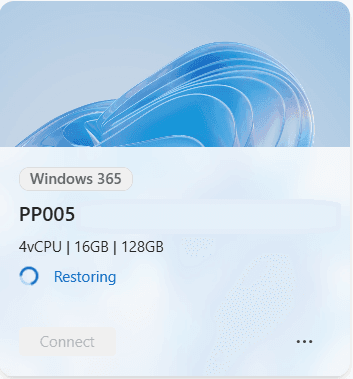
The Windows app shows the status of the Cloud PC during this process so the end user knows when the Cloud PC is ready:
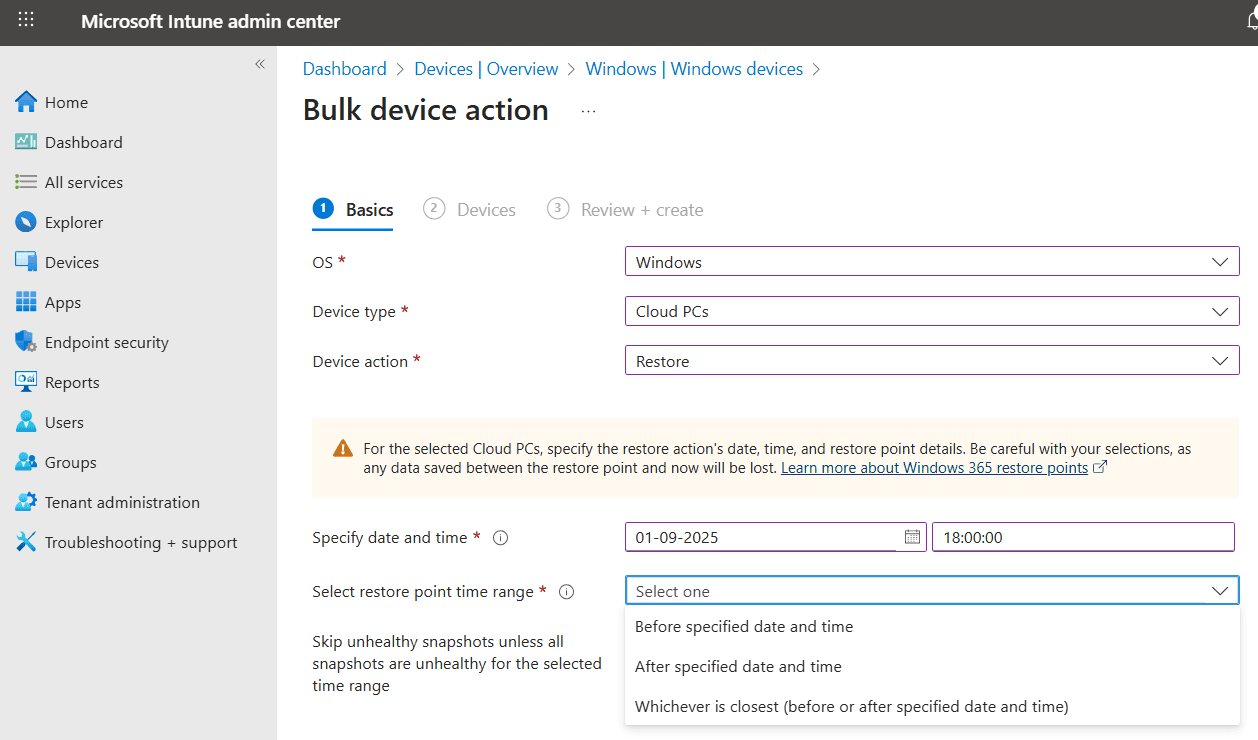
As mentioned before Windows 365 Admins can also use bulk device actions to restore multiple Cloud PCs at the same time. Using the Microsoft Intune admin center, go to Devices, Windows, click the Bulk device actions in the ribbon. Select the following:
- OS: Windows
- Device type: Cloud PCs
- Device action: Restore
- Specify date and time: select the date and time that is closest to the restore point you want to use.
- Select restore point time range: select the restore that is before, after or closest to the select date and time.
- Skip unhealthy snapshots unless all snapshots are unhealthy for the selected time range: a checkbox to enable or disable this choice.
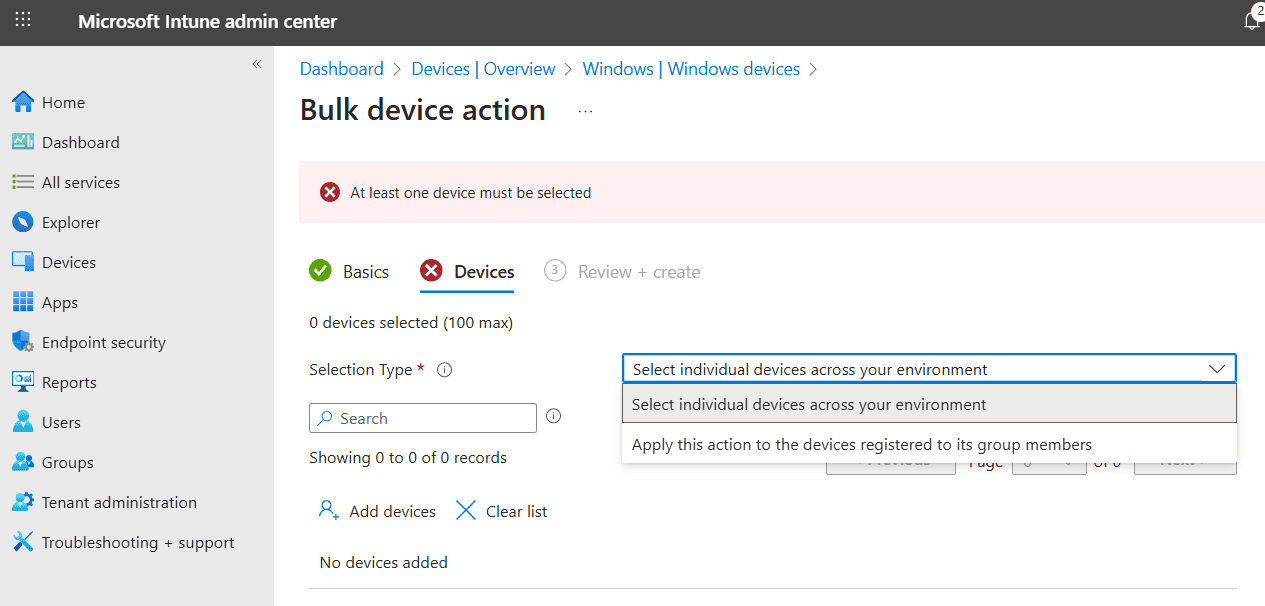
All that is left to do is to add the Cloud PCs to this device action. You can either select individual Cloud PCs or add a group containing the Cloud PCs:
Once that is done, all that is left to do in the final step is to admire your awesome work and finish up if you are happy with it.
Restoring a deprovisioned Cloud PC
Let’s shift gears and find out how to restore a Cloud PC that is deprovisioned. The key thing to note is that this only works in case the license has expired, the grace period is expired and the Cloud PC is deprovisioned. If this oops happened to you, the good news is that you now have the ability to use point-in-time restore to restore to a saved restore point. To do so:
- Renew the expired Windows 365 license.
- All configuration should have stayed the same, like the provisioning policy, the group memberships etc.
- Use the restore action and wait until the restore completes.
Let’s do a quick demo on how to restore the Cloud PC to a previous point in time. The first thing is to make sure the test account has some snapshots available:
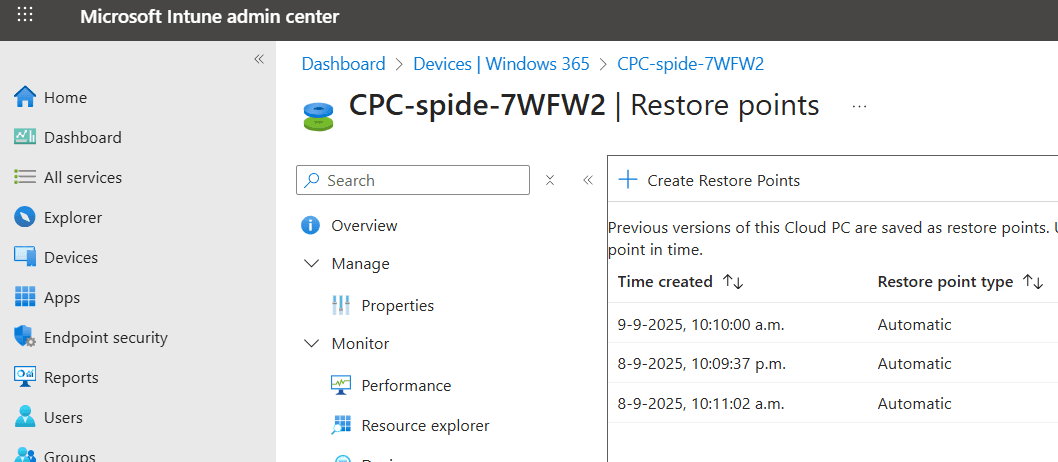
The Cloud PC has three restore points available. Now it’s time to test the process which the awesome duo of Niall Brady and Paul Winstanley have outlined in their detailed post (which you can find here).
Let’s continue from the moment where the provisioning process completes and we have a brand new Cloud PC. Next up is to restore the last restore point. From the newly provisioned Cloud PC, Restore points, click the Restore action in the ribbon.
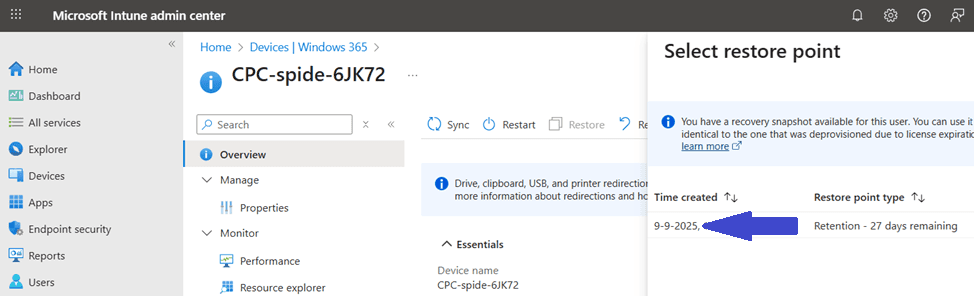
There is one snapshot waiting for us and we can see how many days it will still be available. Click the restore point and the select button in the bottom of the screen.
Just let Windows 365 do it’s magic and the Cloud PC will have the latest state once the process completes.
Resources
I used the following resources for this post:
What’s new in Windows 365 Enterprise | Microsoft Learn
Overview of restoring a Cloud PC to a previous state with Windows 365 Enterprise | Microsoft Learn
Share this:
- Click to share on LinkedIn (Opens in new window) LinkedIn
- Click to share on X (Opens in new window) X
- Click to share on Facebook (Opens in new window) Facebook
- Click to share on WhatsApp (Opens in new window) WhatsApp
- Click to share on Telegram (Opens in new window) Telegram
- Click to print (Opens in new window) Print