What’s up, everyone!
This week I will be taking a look at Console Connect. This feature is actually a collaboration between Nerdio and Zoho and was introduced at Nerdiocon 2025 in version 7 of Nerdio Manager for Enterprise. It helps Nerdio admins to assist end users by connecting to their desktop. This desktop can be a physical device, but also a virtual one running in Azure Virtual Desktop or Windows 365. Join me in this post as I will show you how easy it is to configure and how to use this new feature.
Enjoy!
Prerequisites
The following are prerequisites for Console Connect:
- Nerdio Manager for Enterprise v7 or higher
- Review the firewall settings
- Review the IP address and domain configuration
- Review the antivirus configuration
Nerdio Manager for Enterprise is moving towards a new and modern UI. This demo is based on the new UI.
Enabling Console Connect in NME
Console Connect is disabled by default. To enable it, just navigate to Settings, Integrations and expand the Console Connect box.

From there, simply click the + Add button. This is where we specify which desktops will be enrolled into Console Connect.
- For AVD: select the host pool(s) you want to deploy the console connect client to.
- For Windows 365: select the provisioning policy (or policies) you want to deploy the console connect client to.
- For Intune managed devices: select the Entra group(s) containing the Intune managed devices you want to deploy the console connect client to.
Finish up by clicking the OK button.

You also have the option to enable Console Connect on a per host pool basis. Just go to the host pool properties and select Console Connect. Enable the feature from here:

So what happens next?
- NME creates a task called Process Console Connect.
- This task is used to determine which devices already have the Console Connect client installed, which devices still need to have the client installed and which clients need to have the client removed. It also checks for the correct amount of licenses.
- Once the client is installed on the device, you now have the option to connect to it from the context menu of the device itself.
There are a couple of ways to verify if the Console Connect client is installed on the device:
- For Intune and Windows 365 Cloud PCs: go to Endpoints, All devices and search for the device. Click the dropdown arrow and select Connect. The client is not installed if the Connect option is greyed out.
- For Azure Virtual Desktop: go to Workspaces, select the workspace, select the host pool so you have an overview of the session hosts. Click the three dots and select Connect. The client is not installed if the Connect option is greyed out.
- Manual check on the device: search for the Zoho Assist Unattended Agent in Programs and Features.

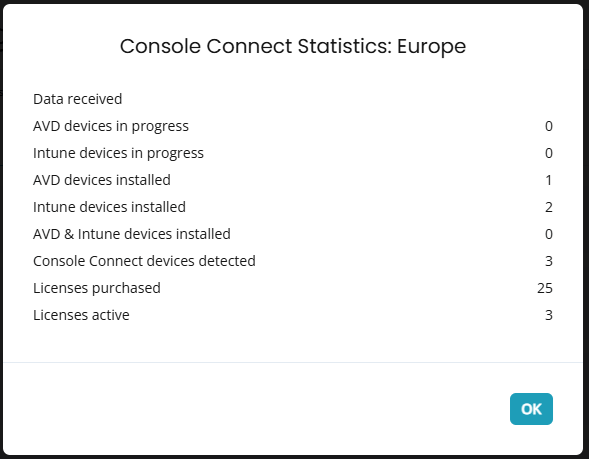
- View statistics from the Console Connect feature: go to Settings, Environment, Integrations, Console Connect. Expand the feature and select the View statistics icon. This will present a pop-up like this:
At this point it’s high time to take a moment to admire your awesome work and find out how to use Console Connect.
Using Console Connect with AVD
Let’s start with a desktop running in Azure Virtual Desktop. Click the three dots next to the session host and select Connect.

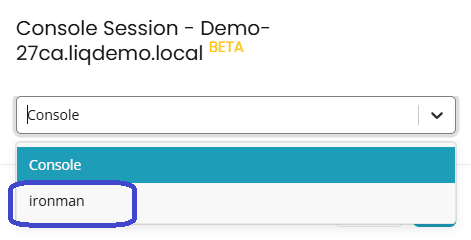
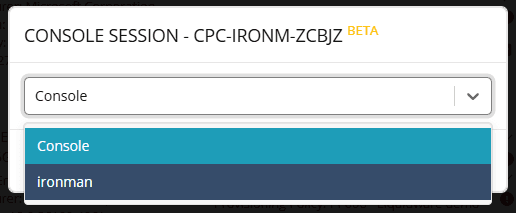
A window will popup with a dropdown box containing all user sessions and the console session. Select the session you want to connect to and click OK.
Let’s see the user experience on AVD:

Using Console Connect on Windows 365
Next up on the list is Windows 365! If you want to use Console Connect on a Cloud PC, just navigate to Endpoints, All Devices, search for the Cloud PC, click the dropdown arrow and select Connect:

All you have to do now is to select the correct session. Weird to see a console session on a Cloud PC, right?
Let’s see the user experience on Windows 365:

Using Console Connect on a physical device
Using Console Connect on a physical device is lot like using Console Connect on a Cloud PC. Let’s take a look!
Navigate to Endpoints, All Devices, search for the device, click the dropdown arrow and select Connect:

Just like before we can choose between the console session and the session of the signed in user:

Let’s finish up with the user experience on a physical device:

Remote support tasks
Let’s see what options we as Nerdio admins have to support our end users. A new tab in your favorite browser will open. It looks like this:

The left side has a menu with all the various support options while the session is displayed on the right side. The following options are available:
- View: this menu is used to configure the view settings, from size, to color, to screen resolution.
- Session: this menu has the following options:
- Send shortcuts like Alt+Tab or Ctrl+Alt+Del
- Screenshot
- Short keys
- Network statistics
- Disable Input Devices
- Remote Audio
- Blacken screen
- Clipboard sync
- Tools: this menu has the following options:
- Execute script
- Various Power Options like lock screen, log off, reboot, reboot in safe mode and shutdown.
- Files: this opens up a window where you can send and receive files with the remote desktop.
- Chat: provide chat capabilities.
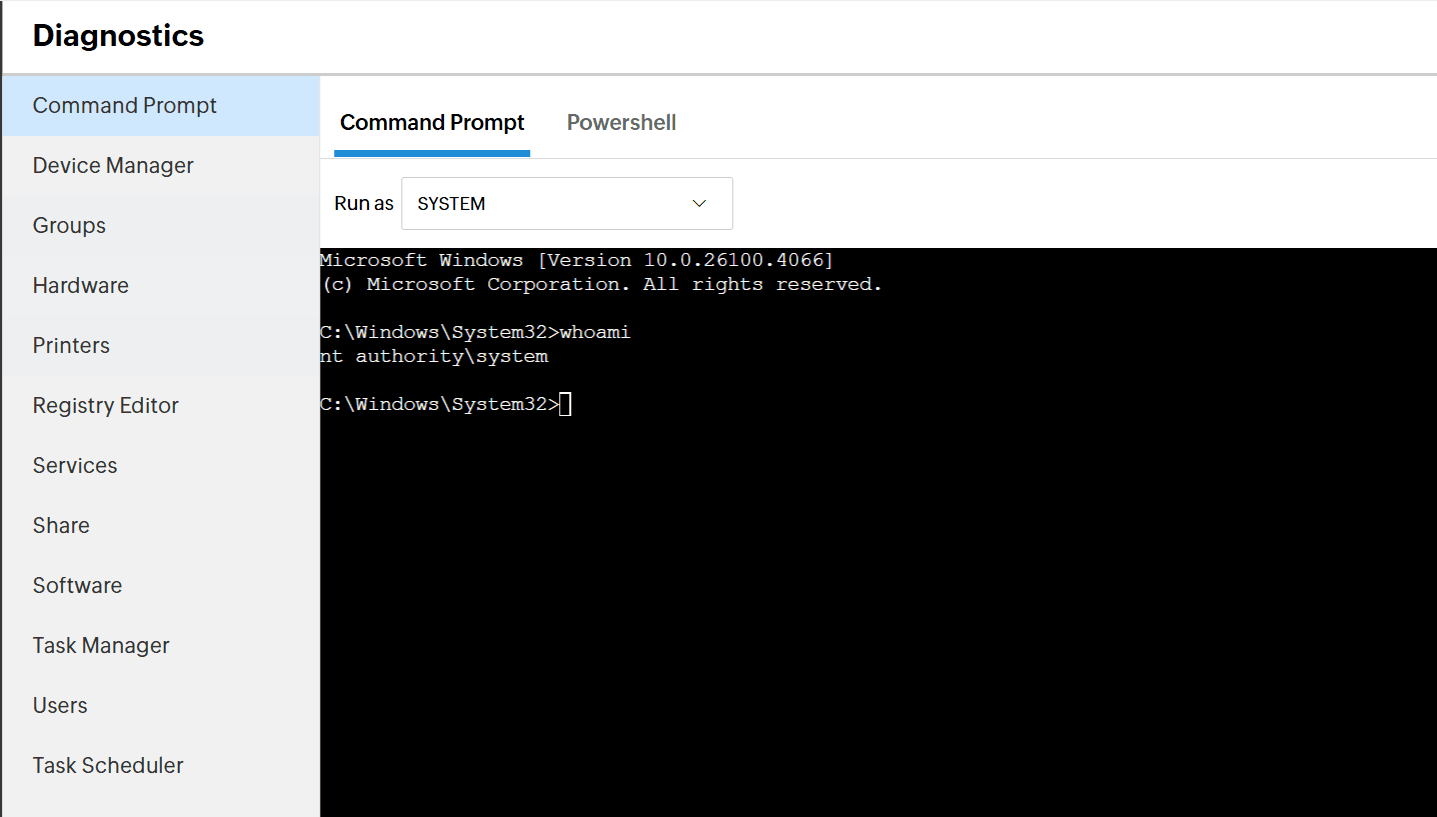
- Diagnostics: this powerfull feature provides everything from a command prompt / Powershell session to the task scheduler:
This concludes the demo on Nerdio’s Console Connect feature!
Resources
I used the following resources for this post: